Markers are like time-based bookmarks for your project to help you remember and quickly go to sections.
Timeline Markers were added in version 21.10.31.
- Press M or click toolbar button the first time to add a marker at the playhead (current position) with no dialog.
![]()
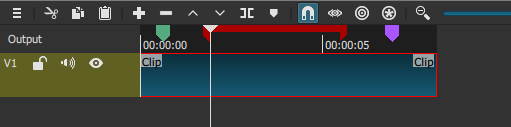
- Markers appear in the time ruler/track/row at the top of the Timeline.
- Drag a marker to move it.
- There are several ways to seek to a marker: Click directly on a marker, press < or >, or click the seeking buttons on the timeline toolbar.
![]()
-
If snapping is turned on then dragging clips or their edges snaps to markers and dragging markers snaps to clip edges or the playhead.
-
Press Alt+R (option+R on macOS) or click on the Ripple timeline markers with edits button on the Timeline toolbar to have the timeline markers shift according to the direction that the clips are dragged to in the timeline. Also works in conjunction with either or both of the other two ripple functions (Ripple trim and drop and Ripple edits across all tracks). Press Alt+Shift+R (option+Shift+R on macOS) to turn on and off all three ripple icons at the same time.
![]()
- Click toolbar button or press M when the playhead is on the exact start time of a marker to open the Edit dialog where you can change the name, color, start, and end times.
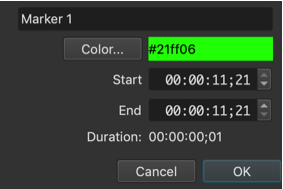
- A color change is remembered for all new markers until a new color is chosen.
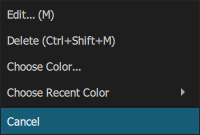
- Right-click a marker to open its context menu to Edit, Delete, Choose Color…, or Choose Recent Color.
- Press Ctrl+Shift+M when the playhead is on the exact start time of a marker to Delete it.
- Ctrl+drag (command on macOS) a marker to changes its duration (a marker with a duration longer than 1 frame is also called a “range”).
- When the mouse cursor is over a marker then a tool tip appears with the name and time. If the marker is longer than 1 frame (range) then the tool tip will also show its end time and duration.
![]()
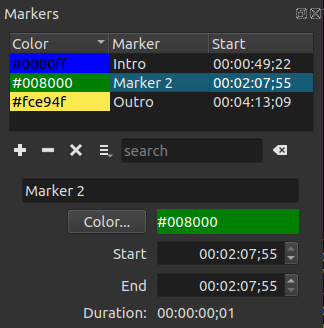
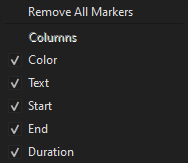
- View > Markers or press Ctrl+Shift+6 (shift+command+6 on macOS) to open the Markers panel where all markers are listed and can be categorized by several columns (Color, Marker, Start, End, and Duration). Clicking on a marker in the list will seek to that marker in the timeline. Click on a column header to change a column’s sorting to be either ascending or descending. Under the markers list there are buttons to Add a marker, Remove the selected marker and Deselect the marker. Click on the hamburger menu to Remove All Markers and to remove or add any of the columns. A search bar is also available to filter the list by name. The rest of the panel offers the same options as the Edit dialog for markers in the timeline where the name, color, start, and end times can be changed.
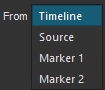
- Export > From lists all range markers (duration longer than 1 frame). Selecting a marker here allows the exporting of just that section of the timeline.
- File > Export > Markers as Chapters… outputs a .txt file in the format used to make chapters for YouTube. Only timeline markers with a duration of 1 frame (default) are exported as chapters.

- Markers are saved to the project file in a XML tag named
<properties name="shotcut:markers">. - Marker operations support Undo and Redo.
