Video Multi-track Transitions
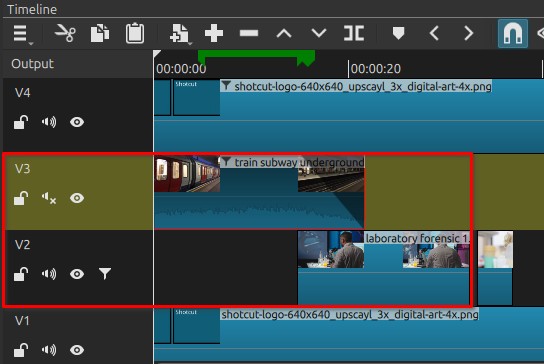
Multi-track transitions are created when two clips on different tracks overlap in time.
Shotcut blends the overlapping portion to transition from one clip to another.
This technique is commonly used for fades, crossfades, compositing, and layered transitions.
Unlike same-track transitions, multi-track transitions rely on the track stacking order: clips on higher tracks appear above clips on lower tracks.
Basic concept
In the timeline:
- Tracks are layered vertically
- The top track visually overlays the tracks below
- When clips overlap in time, the top clip normally hides the one underneath
To create a transition, the top clip must become partially transparent during the overlap.
Method 1: Track-level fade controls
Shotcut provides direct fade controls on clips in the timeline, allowing quick fade-in and fade-out adjustments without adding filters.
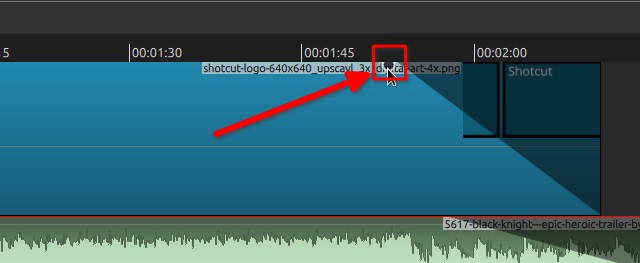
Each video clip has small fade handles at the top corners of the clip in the timeline:
- Left corner — controls the fade-in
- Right corner — controls the fade-out
To create a fade:
- Move the mouse over the top-left or top-right corner of the clip.
- When the fade handle appears, click and drag inward.
- The shaded area shows the duration of the fade.
During playback, the clip gradually transitions from transparent to visible (fade-in) or visible to transparent (fade-out), revealing tracks below if present.
These fades are equivalent to applying video fade filters but provide a faster, visual method for common transitions.
Notes:
The fade duration can be adjusted at any time by dragging the handle again.
Method 2: Using the Opacity filter
This is the most common method with the Opacity filter.
Steps
- Place two clips on different tracks.
- Overlap the clips on the timeline.
- Select the clip on the upper track.
- Add the Opacity filter.
- Add keyframes to animate opacity.
Example fade:
- Start of overlap → Opacity 100%
- End of overlap → Opacity 0%
Result: the upper clip gradually reveals the lower clip.
Method 3: Using fade filters
Shotcut provides dedicated fade filters that automate opacity animation.
Common filters include:
Example crossfade
- Place clips on two tracks.
- Overlap them.
- Apply Fade Out Video to the upper clip.
The top clip fades away while the bottom clip becomes visible.
Method 4: Using mask filters
Mask filters can define which parts of a clip are visible during the overlap.
Examples:
This allows transitions such as:
- wipes
- reveals
- geometric transitions
- custom image-based transitions
The mask determines which pixels of the top clip reveal the clip below.
Method 5: Using blend modes
Shotcut includes different blend modes that combine the pixels of two tracks.
Examples include:
- Add
- Multiply
- Overlay
- Screen
Instead of fading between clips, these modes mathematically combine colors from both layers.
This technique is often used for:
- creative transitions
- visual effects
- compositing
Method 6: Using animated transforms
Transitions can also be created by moving or scaling the upper clip.
Common examples:
- slide transitions
- zoom reveals
- picture-in-picture transitions
Typical workflow:
- Place clips on two tracks
- Apply Size, Position & Rotate
- Animate position or scale with keyframes
This causes the top clip to move away and reveal the clip below.
Track order behavior
Track stacking determines visibility:
- Higher track = rendered above
- Lower track = background layer
If the top clip is fully opaque, the clip below will not be visible.
Typical examples
Common multi-track transitions include:
- crossfade
- fade-to-black
- wipe transitions
- split-screen reveals
- animated slide transitions
These are all variations of revealing the lower track over time.
Usage notes
- Overlapping clips is required.
- The top clip usually carries the transition filter.
- Keyframes allow precise timing control.
- Complex transitions may combine multiple filters.
Limitations
- Requires multiple tracks
- Manual setup compared to same-track transitions
- Incorrect opacity or masking may hide lower clips completely
Audio Multi-track Transitions
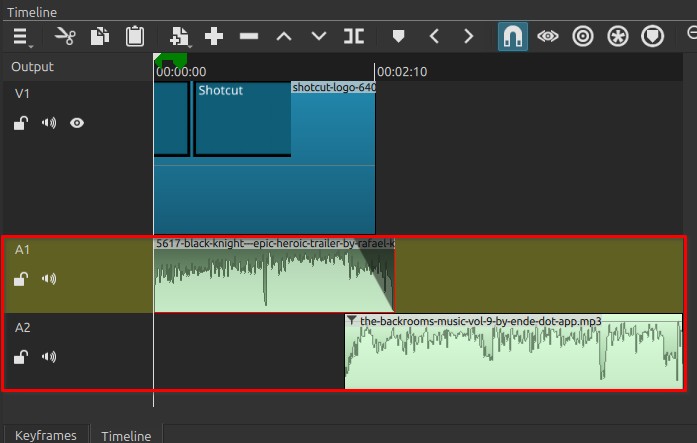
Audio transitions can also be created when clips on different tracks overlap in time.
During the overlap, the sound from one clip gradually decreases while the other increases. This is commonly called an audio crossfade.
Unlike video, track order does not affect audio. All audible tracks are mixed together during playback.
Basic concept
When two audio clips overlap:
- Both clips play simultaneously
- Their relative levels determine which one is heard more strongly
- A transition is created by changing the volume over time
Method 1: Using Fade filters
The simplest method is to apply audio fade filters.
Common filters:
Steps
- Place clips on different tracks.
- Overlap them on the timeline.
- Apply Fade Out Audio to the first clip.
- Apply Fade In Audio to the second clip.
Result: one sound fades out while the other fades in.
This produces a smooth audio crossfade.
Method 2: Using the Gain / Volume filter
Transitions can also be created using the Gain / Volume filter with keyframes.
Steps
- Add Gain / Volume to a clip.
- Add keyframes to the Level parameter.
Example fade:
- Start of overlap → 0 dB
- End of overlap → very low level (e.g. –70 dB)
On the second clip, perform the reverse animation.
This method allows precise control over fade timing.
Method 3: Using track-level gain
Audio transitions can also be managed at the track level.
Instead of adjusting individual clips:
- Use track gain or track filters.
- Animate levels across the overlapping region.
This approach is useful when multiple clips share the same transition behavior.
Method 4: Combining with audio effects
Transitions can also include audio processing effects during the overlap.
Examples:
- EQ filters for tonal change
- Reverb to simulate distance
- Delay effects
- Compression adjustments
These effects are optional but can help create more complex transitions.
Typical examples
Common audio transitions include:
- dialogue crossfades
- background music transitions
- ambient sound blending
- smooth scene changes
These transitions avoid abrupt audio cuts.
Usage notes
- Audio crossfades usually sound best with moderate overlap.
- Very short overlaps can sound abrupt.
- Music transitions often require longer fades than dialogue.
- Use headphones or speakers to verify the result.
Limitations
- Audio mixing depends on track levels.
- Incorrect gain settings may cause clipping.
- Too many overlapping tracks may reduce clarity.