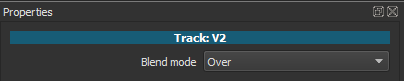
The Blend Mode filter lets you override the way a clip blends with the the bottom video track. The default blending mode follows the video track’s blending mode, which is set in Properties with a default of Source Over (simple alpha compositing).
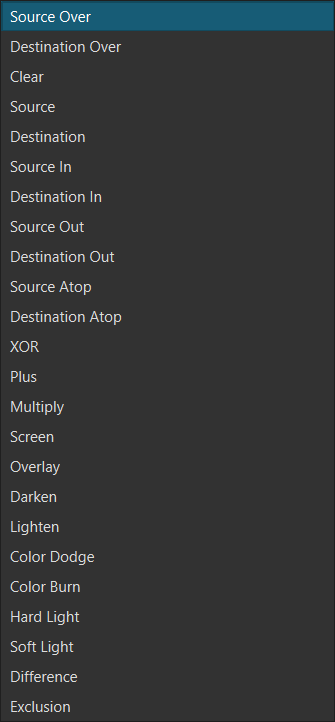
Most of the options are the standard Porter/Duff blend modes:
- Source Over is the default, standard way layers stack: an upper layer is drawn over a lower layer.
- Destination Over: if for some reason you are layering tracks to be composed in a bottom-up instead of top-down fashion. For example, you have the clip with the transparent background under the background clip on the timeline.
- Lighten is useful if you have a clip with a black background and no transparency. It makes black transparent without needing a chroma key filter.
- Darken is useful if you have a clip with a white background and no transparency. It makes white transparent without needing a chroma key filter.
Quick Reference
| Category | Blending Mode | Core Function | Primary Practical Use |
|---|---|---|---|
| Darkening | Multiply | Darkens the base layer by multiplying values. Ignores white pixels. | Compositing Dark Textures/Shadows. Best for removing white backgrounds from assets. |
| Color Burn | Darkens more aggressively than Multiply. High contrast, rich shadows. | Deepening Shadows and creating a moody, high-contrast cinematic tone. | |
| Darken | Compares and keeps only the darker pixels from either layer. | Knocking out white backgrounds on graphics or text (similar to Multiply but simpler). | |
| Lightening | Screen | Brightens the base layer by multiplying inverted values. Ignores black pixels. | Compositing Light Effects (fire, flares, smoke, etc.) over black backgrounds. |
| Color Dodge | Dramatically brightens and increases saturation. Creates a luminous glow. | Intense Glare and Spotlight Effects. Pushes highlights towards white with energy. | |
| Lighten | Compares and keeps only the lighter pixels from either layer. | Knocking out black backgrounds on high-contrast visual effects. | |
| Contrast | Overlay | Combines Screen (on light areas) and Multiply (on dark areas). | Non-Destructive Contrast Enhancement and adding seamless textures/color grades. |
| Soft Light | Applies soft contrast and subtle lighting effects. | Subtle atmospheric effects and gentle warming/cooling of the scene. | |
| Hard Light | Applies strong contrast and dramatic lighting effects. | Dramatic Lighting or compositing intense, high-contrast black/white textures. | |
| Component | Color | Applies the blend layer’s Hue and Saturation, keeping the base layer’s Luminosity. | Color Grading: Quickly applying a specific tone (e.g., teal/orange) while preserving detail. |
| Hue | Applies only the blend layer’s Hue (color), keeping base Saturation and Luminosity. | Changing a specific color (e.g., a shirt) without affecting its shading or brightness. | |
| Luminosity | Applies the blend layer’s Luminosity (brightness), keeping the base layer’s Hue and Saturation. | Sharpening and Contrast Control separate from color (to avoid color artifacts). | |
| Creative | Difference | Subtracts the lighter color from the darker color, causing inversion. | Creative Glitch Effects and precise edge detection (often used with offset layers). |
More Information
Blending modes are categorized by how they calculate the final color by comparing the pixels of the top layer (blend) with the pixels of the bottom layer (base).
Isolation and Compositing Modes (Darken / Lighten)
These modes simplify compositing by isolating only the darkest or lightest parts of the blend layer.
| Blending Mode | Practical Use | Example |
|---|---|---|
| Darken | Removing Highlights/Combining Shadows: Compares the pixels and keeps only the darker one. This is perfect for compositing elements where you only want the shadows or dark parts of the top layer to show. | You have a logo or text graphic with a white background and dark text. Place it over your video and set it to Darken—the white background disappears, and only the dark text remains, quickly knocking out a light background. |
| Lighten | Removing Shadows/Combining Highlights: Compares the pixels and keeps only the lighter one. This is the opposite of Darken. | Use this to overlay a series of different spark or lens flare effects (that typically have black backgrounds) onto your footage. The black background disappears, and only the bright flares/sparks are visible because they are lighter than the base video. |
Color Dodge
Color Dodge is a member of the Lightening Group. It creates a much stronger, more luminous brightening effect than Screen by dramatically increasing the brightness and saturation of the base layer.
| Practical Use | Explanation |
|---|---|
| Intense Glare and Light Flares | Use a soft, bright color (like a vibrant orange, yellow, or white) on the blend layer and set it to Color Dodge. This creates a powerful, focused light bloom or lens flare that looks highly energetic and realistic, especially over existing highlights. |
| Cinematic Focus/Glow | Create a shape or brush stroke over a face or object using a subtle, bright color. Color Dodge will make the area glow brightly, drawing the viewer’s eye and creating a dreamy or heroic spotlight effect. |
| Saturated Color Grading | Applying a solid, bright color layer (e.g., a fiery red-orange) at a low opacity and setting it to Color Dodge will inject intense saturation into the mid-tones and highlights, giving the entire scene a vibrant, almost painted look. |
Color Burn
Color Burn belongs to the Darkening Group. It creates a stronger, deeper darkening effect than Multiply, giving the result an intense, rich mood, especially in the shadows.
| Practical Use | Explanation |
|---|---|
| Deepening Shadows and Blacks | Use Linear Burn on a duplicate clip or a blurred copy of your footage. It significantly enriches the shadows and dark areas, instantly giving the video a deeper, moodier, and more dramatic contrast, especially useful in horror or dramatic genres. |
| Gritty Texture Compositing | When applying a texture (like dirt, grime, or deep film grain) that you want to aggressively darken the underlying image, Linear Burn is far more effective than Multiply. It burns the dark texture into the base layer with a higher contrast and less saturation than Color Burn. |
| High-Contrast Cinematic Tone | Use a solid, dark color (e.g., a deep teal or maroon) on the blend layer at a low opacity. Setting it to Linear Burn infuses that color into the shadows and dark mid-tones while intensely deepening the black points, creating a strong, stylized color grade. |
Contrast and Lighting Modes (Overlay, Hard Light & Soft Light)
These modes modify the contrast and brightness of the base layer using the blend layer’s color values.
| Blending Mode | Practical Use | Example |
|---|---|---|
| Overlay | Non-Destructive Contrast Enhancement: It’s perfect for adding contrast, texture, and color grading in a non-destructive way. | Duplicate your clip and set the top layer to Overlay. This instantly increases the overall contrast and saturation, giving the image a punchy, professional look. You can then lower the opacity to fine-tune the intensity. |
| Hard Light | Dramatic Lighting/Texture Overlays: Creates a much more intense effect than Soft Light. It’s ideal for adding dramatic lighting effects or quickly compositing detailed textures. | Use a black-and-white texture (like scratched film or dust) over a clip. Set the blend layer to Hard Light—white areas will brighten the base, and black areas will darken it, adding instant grit. |
| Soft Light | Subtle Lighting/Atmosphere: Excellent for non-destructively brightening or darkening a scene, adding a soft glow, or applying a colored atmosphere (e.g., a warm, hazy glow) without blowing out highlights or crushing shadows. | Place a solid color layer (e.g., warm orange) or a gradient over your footage and set it to Soft Light to mimic sunset lighting. |
Subtractive Modes (Difference / Exclusion)
These modes are used for creative, often psychedelic, or glitch effects by subtracting one color from the other.
| Blending Mode | Practical Use | Example |
|---|---|---|
| Difference | Color Inversion and Alignment Check: It inverts the colors of the base layer based on the brightness of the blend layer. If the blend layer is pure black, nothing happens; if it’s white, the base layer is fully inverted. | Use a copy of your base video as the blend layer and offset it slightly. Setting the blend mode to Difference creates a colorful, high-contrast, edge-detection effect, popular for abstract or glitch aesthetics. |
| Exclusion | Softer Inversion Effects: Similar to Difference but with lower contrast, often used to create a more dreamy or muted inverted look. | It can be used for artistic color shifts and subtle, high-contrast text overlays, where the color changes depending on the background video. |
Versions before 25.10
In previous versions the blending options were a little different because it was using a component that could not be updated to support 10-bit video.
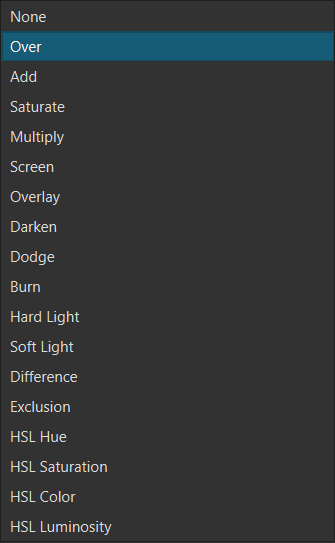
In this version Over is equivalent to Source Over.
Component Modes (Hue / Color / Luminosity)
These modes are used for advanced color grading and correction by manipulating the separate components of a color (Hue, Saturation, Luminosity).
| Blending Mode | Practical Use | Example |
|---|---|---|
| Hue | Changing Colors without Affecting Brightness: Takes the hue (color) of the blend layer and applies it to the base layer, retaining the base layer’s saturation and luminosity. | To change the color of a specific object (e.g., a shirt or car) without affecting its lighting or shadows, mask the object, apply a new color layer above it, and set the color layer to Hue. |
| Color | Applying a Specific Tone/Tint: Applies both the hue and saturation of the blend layer, while retaining the base layer’s luminosity (brightness). This is the best mode for coloring black-and-white footage or adding a precise color grade. | Place a color adjustment layer over your footage (e.g., a cool blue) and set the blend mode to Color to apply a professional-looking cinematic blue tone across the whole image. |
| Luminosity | Sharpening and Contrast Control: Applies the luminosity (brightness) of the blend layer while retaining the base layer’s hue and saturation. This mode is mainly used for manipulating contrast separate from color. | To increase sharpening without introducing color artifacts, create a high-pass filter effect on the blend layer and set the mode to Luminosity or Soft Light. |