Important: This article describes a feature that is in a beta/unstable state. Bugs are expected and the feature is subject to change. This feature is currently only suitable for testing.
Get it from the link below with more detailed release notes:
Known Issues/Limitations
There will be at least one candidate release before v21.04 is released in April.
It can only be added onto clips with NO B-frames. If you try to add it to such a clip, it shows the Convert to Edit-friendly dialog.
A proxy clip can mask the above check for B-frames and then export may be very slow or give bad results. However, it may also be a very convenient workaround for the check and dialog mentioned above if you are patient and confident to troubleshoot and fix problem areas upon export.
The About dialog says the version is UNSTABLE-21.03.13. That is intentional as builds are based on date.
There is no Pitch Compensation.
This filter cannot be disabled.
This filter does not support simple keyframes or filter trimming.
This filter can not be applied to tracks or the timeline output.
Usage
Basically, go Filters > Time > Time Remap > Keyframes
1) Right after adding Time Remap to a clip that has been split on the right side, stretch the clip out by at least a couple of seconds. Select the last keyframe then press the button to set the speed after to 1.00000x. It instead will freeze the clip. Demo.
2) Right after adding Time Remap to a clip that has been split on the right side, add two keyframes somewhere in the middle. Then stretch the clip on the right side by at least a couple of seconds. Select the last keyframe then press the button to set the speed after to 1.00000x. It instead will reverse what comes before that last keyframe. Demo.
3) Right after adding Time Remap to a clip set two keyframes with some frames between each other. Take the second of those two new keyframes and move it farther down so that it slows down that section. Select that second keyframe and press the set speed after button to 1.00000x. The section that was just slowed down will now be reversed and the section that comes after the second new keyframe will be sped up. Demo.
By the way, are the new buttons for setting speed before and after meant to be used to set a new keyframe, to reset an existing keyframe or for both?
Just to comment on something that was in the previous alpha thread:
Is it possible to make that 30 seconds maximum on both sides for both Reverse and the upcoming option to convert just a selected section? That way it would be a total of 1 minute additional footage? Along with that I think it would be good thing to actually have this noted in the dialog box for the reverse and converting selected section options so that the user knows that they will have additional footage on either side to work with if they need it.
Also, @brian you mentioned a couple of times in your last reply to me in the previous alpha thread that you had something that was a “work-in-progress” to address a couple of issues I brought up as well as the Blend Image Mode issue. I don’t think they are in this beta version. Is they going to be on the next testing version of Time Remap?
Your steps seem very clear, and I can see the problem in your demo. But it does not happen for me when I test on Windows and Linux. When I try to set the speed on the last keyframe as shown in your video, the last keyframe does not change. “Not changing” is the expected behavior if there is no keyframe after it. Maybe there is one small detail that I am missing.
This looks like a variation of #1. But when I closely follow your steps, I do not create the problem. Can anyone else recreate either of these problems?
I also can not recreate this one. I observe that in all of your reports (1-3) when you try to set the speed after the selected keyframe, it maps the time for that keyframe to zero (00:00:00:00). Fundamentally, that is the root problem for 1-3. But why is it mapping the time to zero in your demos? It does not do that when I try it.
Any further help recreating these scenarios would be appreciated.
It is designed to make a new keyframe on the current frame if one does not exist - or modify the existing keyframe on the current frame. Your demo brings an interesting question: If there are no keyframes after the current frame, should the filter create a keyframe at the end of the clip? Maybe users would be surprised that a keyframe was added at a position that is not the current position.
Yes. That was relating to the handling of keyframes when trimming the clip in and out. Please do some testing on that if you are able. In particular, observe what happens when you trim the in point or out point to go past a keyframe. For the in point, the keyframe is “moved” to stay at the beginning of the clip (because there can not be keyframes at a negative position). For the out point, the keyframe stays at its position beyond the end of the clip. If you “untrim” the clip, the keyframes beyond the end of the clip are restored.
I have been thinking about the blend mode, but have not made any changes.
@shotcut How long before this moves out of this beta and into the beta for the April release? I really haven’t had time to do much testing except for the couple of days I did last week.
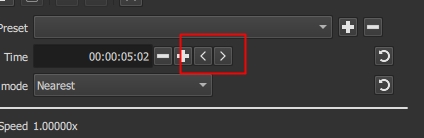
I have been very busy and haven’t really had much time to do as much testing as I wanted. As far as you saying that you can’t reproduce the bugs I reported, there really isn’t much more I can do on my end. I got some time today to retest my reported bugs this time on different clips and all of them happened again. Are you making sure you are selecting the keyframe by pressing the arrow button to seek to the next keyframe? Aside from that the only other way to see if you are repeating the steps I detailed is to record a video of you trying to reproduce the bugs.
If the purpose is to get the desired speed selected but there is no keyframe to follow it then it would make sense to have a keyframe created to be able to set the desired speed. I think users would figure out that a keyframe would need to be set there in order to get the desired speed.
I’ll see if I have some time tomorrow for this.
Also, how about adding the Blend mode option in Properties if the speed is changed there?
That sounds great.
4) If you delete at least one of the default keyframes then create a new keyframe with the keyframe button and move that new keyframe while holding Ctrl, the keyframe will not be connected to the curve line. Demo.
5) If the filter is added to a split section of a larger clip, then the default last keyframe can be moved to the right past the length of the clip going as far as the screen and the source clip will allow. This seems to happen only with the default last keyframe and not the first. Demo.
6) None of what you describe happens in this beta. The [ & ] buttons on the trackhead for the keyframe timeline don’t do anything. Pressing ] on the keyboard does not work. The only key that works is [ but the result is strange.
In this demo I first show that the [ & ] buttons on the keyframe timeline don’t do anything as I try to click on them. After that I place the playhead in the middle then I start to hit just the [ key on my keyboard and show how the default keyframes are moved around in a way that I don’t think is intended because it doesn’t make any sense. With the playhead in the middle of the two default keyframes, hitting the [ key brings the last keyframe closer to the playhead. But when I place the playhead beyond the last default keyframe then press the [ key it keeps sending the last keyframe toward the first default keyframe. Then when I bring the playhead before the first default keyframe and press the [ key the set of keyframes are sent towards the end of the clip. It comes across as buggy to me. I’ll also mention that after pressing the [ key the speed is affected only in random spots between being frozen to playing normally regardless of how close or far the default keyframes are to each other. To top it off, there is no visual indication of the trim handles in the keyframe timeline like there is for every filter.
And just to make clear, I am using version UNSTABLE-21.03.13.
