…because it was getting quite complex and actually off-topic for its original title.
So user @nurub asked if there was a way of highlighting text with a rectangle that’s drawn slowly around the text as shown in the picture below:
… and I thought of one way to do it, and made this 5-minute tutorial showing how I did it. I didn’t have time to add a commentary and it’s a bit rough and ready, but I hope you can pick up the basics of what I did.
It’s best viewed a full screen size so you can see the detail.
Then @PoisonedSlice mentioned that it can also be done with drawing four individual boundary boxes using the SPR filter, keyframing the values of each boundary line, and posted this tutorial video and MLT file:
I commented that it was a great method but very tricky to get the keyframe values exactly right, and I came up with a method of making it easier to generate the keyframe values easier, and use them in a box of any size or position on screen.
So here’s my post:
Then @PoisonedSlice made the suggestion to start a new thread:
So there it is - over to you, @PoisonedSlice, with details of your alternative mask method…
Thanks @jonray and very good synopsis. Sorry for the delay in getting back.
My method isn’t anything too exciting, and in fact I used an idea from @MusicalBox’s Animated Text Banner thread, where everything is placed on the same object. First attempt is here:
But since then I’ve spent a little time cleaning up the layout, and it seems to be solid enough and quite scalabe as long as the correct numbers are altered. Most box sizes can be achieved with a high level of accuracy (obviously not as good as the Size, position & rotate or SPR method however).
Altering the box width is directly reflected in the speed of the line drawing, and that can be an issue. I tried to work around that by providing 4 box lengths - extra long, long, regular, and short, with key frames set accordingly. In the mlt files, on the properties of each item I have added a description so if you copy one into a project, you can easily identify which box you are working with.
Here is a short video demonstrating the different width boxes, 2 different line thicknesses and 2 different overall speeds (regular and fast).
Make sure you have your target project open. Then open the mlt in a new instance of Shotcut, copy the object you want, go back to the original Shotcut and paste. Simple as that!
But since all those masks and key frames in one file can make my machine lag, I saved each object to its own txt file, which can be copied and pasted into an existing or new project (no extra Shotcut application needed). File names are self explanatory, as an example: BoxReveal_SpeedFast_LineWidthThick_LongWords.txt
Those are 1920x1080p @ 30fps examples. I did start a 1280x720p version before realising Glaxnimate is the way to go and discontinued that approach (but not before completing the basic mlt files linked above).
General Use:
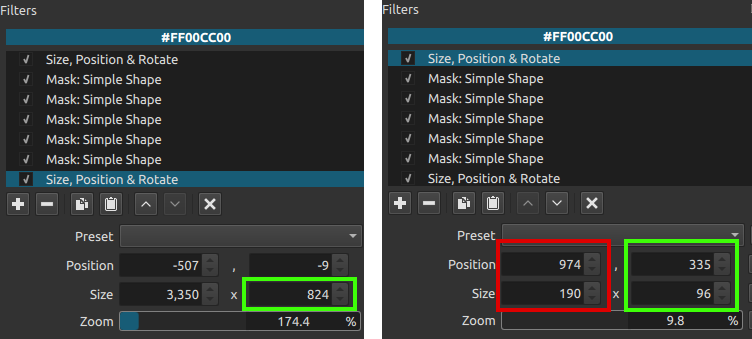
The bottom SPR is for overall resizing, and the top SPR is for fine tuning line and overall box widths. If you experience weird clipping when sizing down the height dramatically on the bottom SPR, simply adjust that value up or down a few pixels and it will go away.
If planning on using more than one instance on a block of text, I recommend getting the first one setup perfectly. Then take note of the bottom SPR height value, and the top SPR adjusted position values (see screenshot).
Green box values should be observed and duplicated when working with the same line-height.
824 is the resized height and shrinks the overall box.
335 and 96 are adjustments to get the top and bottom lines the same width.
974 and 190 adjust the horizontal position and box width. These values will change depending on the box width.
I will continue to investigate this approach using Glaxnimate (which I have opened only twice)! But in the meantime I plan on creating a version for 60fps and 25fps respectively and that should cover most use cases. I’ll upload those when completed.
I hope that makes sense, and if I have any obvious errors please let me know.
Great work, @PoisonedSlice. Genius idea to provide 4 box lengths and also different line thicknesses. Although doing that makes it look a little complicated (more complex in fact than it is), it provides the user with the necessary options.
I’ll investigate when I have time. I thought of yet another method - to create a HTML file (a regular HTML/CSS file, not using WEBVFX but AT keyframes) which produces a revealing box of any size and/or thickness ready for screen capturing and saving as an MP4, to be imported into SC.
It’s nearly completed - I’ve been getting some help from @elusien via PMs - and I’ll post it here when it’s done.
Thanks for your sterling work!
Yes you are right. However, most average users can simply copy the two primary mlts (BoxRevealAll_ReusableMasks_ThickLineDemo.mlt or BoxRevealAll_ReusableMasks_ThinLineDemo.mlt) and select their preferred box width from one of those. So really not complicated at all! And I need to tweak some of the key framing since that red box is still too fast (among other things), but that is for tomorrow.
I saw some html/css references flying around but I need to catch up on the other conversation first. Your idea sounds very interesting, and a learning experience to boot! I await the final product, and good luck.
Thanks @PoisonedSlice - yes, not really complex at all. Actually the HTML idea will sound complex as well to many users … but again, easy when you know what to do! It’s looking good and I’ll post it soon.
UPDATE
After some more messing around and not being happy with the speed and smoothness of the line drawings, I discovered an issue with the masks. The way I had it configured was causing the corners to occasionally look slightly weird, and it required a small adjustment plus an extra key frame on the corners for the slow thick line version (which was the most noticeable). I have updated the demo video above and the associated mlt and text files in post 2.
I opened Glaxnimate for the second time last night, and it is not so easy to use with a touchpad that doesn’t have middle click support … but I’m an idiot, so there’s that too.
Here’s my first successful attempt. Uses bezier lines, additional nodes, and key frames. No mask required and much easier!
P.S There is one tiny tiny tiny imperfection, but it requires some zooming. Let me know if you can see it! I am confident I can do better, but I’m still learning the program (I still don’t know the keyboard shortcut to force perfect horizontal/vertical lines so my method requires zooming and eyeballing the inner line). The next step is to look at the numbers under the paths.
Here is a quick demo. This is not the same box as above, but it came out just fine (no mouse, which should be apparent).
Next step is rounded corners, so I’ll have to mess with joining the last node (I see there are transform, smooth, & symmetrical options, so I hope they behave similarly to inkscape). And I am more than happy to receive any tips/tricks/advice.
I wonder if doing a quick voiceover and uploading to YT would be worthwhile? For instance, the first node placed on the canvas is actually a double click, and the rest are all single, but that’s not so easy to see.
Yes please, that’s great @PoisonedSlice . Pardon my ignorance if you already showed how to do this - I only briefly watched your demo - but did you find a way of restricting the lines to horizontal or vertical?
Great work and very useful.
No I haven’t worked out perfect horizontal and vertical lines yet, sorry. I was hoping someone else knew and would chime in! I did discover that the kink in my first effort was primarily my own fault; so as long as you release the line and it’s really close to v or h, then it renders fine (but I will try and find that out first because it would be much easier). I tried a few combinations, starting with the obvious ctrl which constrains lines to 15° in applications like Inkscape and Gimp. I couldn’t find anything in the manual, but there is a Glaxnimate telegram and that might be my next visit.
The dragon example they provide looks interesting and I’ll take a look at that when I have some time.
Not that I have found, but you can convert a rectangle into a Path shape that then has editable nodes. Right click the shape or its parent group either in the canvas or timeline and choose Convert to Path. Also, keep in mind that Layers have in and out points like a video clip in Shotcut. While you can keyframe a path node’s position, I have not found that you can keyframe the addition or removal of nodes. So, you can probably use layers and copy and paste the shape to simulate the addition of nodes. At this point it probably reads like I am an expert on this tool, but not yet!
I asked Glax on Telegram and ctrl is supposed to snap to 90°. But I’m running Shotcut as an AppImage, and that might have something to do with it. How does the windows version behave?
That was my third attempt, and the above is where I got stuck. I went back to trying to find a way to force H/V, because I figured there had to be a way. I just tested on the standalone windows version and I can’t get that to work either. So If this doesn’t work for anyone else (I’ll add Dan to that list) then I was told to raise an issue.
")