Animated Text Banner preset

Yesterday I saw an animated text banner in a YouTube video. I thought it was pretty nice, so I reproduced it in Shotcut and saved it as a Clip Preset.

Here’s a preview of the result

Download the file: AnimatedBanner03-Presets.zip (11.5 KB)

It works on 1920 x 1080 projects and I made versions for 24 fps, 25 fps, 30 fps, 50 fps and 60 fps frame rates. You can use the 24 fps version on 23.98 fps projects and the 60 fps version on 59.94 fps projects.
And each version comes in two length : 5 seconds and 7 seconds.
presets-list

INSTRUCTION

  • Download the file and un-ZIP it.

  • Choose the preset you want to use and open it with Notepad (Windows) or TextEdit (Mac).

  • Select ALL the content and copy it.
    preset-copy

  • In Shotcut:

    • Select a track.
    • Move the playhead where you want to drop the clip preset.
    • In the Timeline tool bar, click on the Paste or the Overwrite button.
    • You can also use the Append button, bu if there’s already one or more clips on the track, the preset clip will be pasted at the end of the track. If the track is empty, the preset clip will be pasted at the beginning of the track, no matter where the playhead is located.
      paste

How to edit the clip.

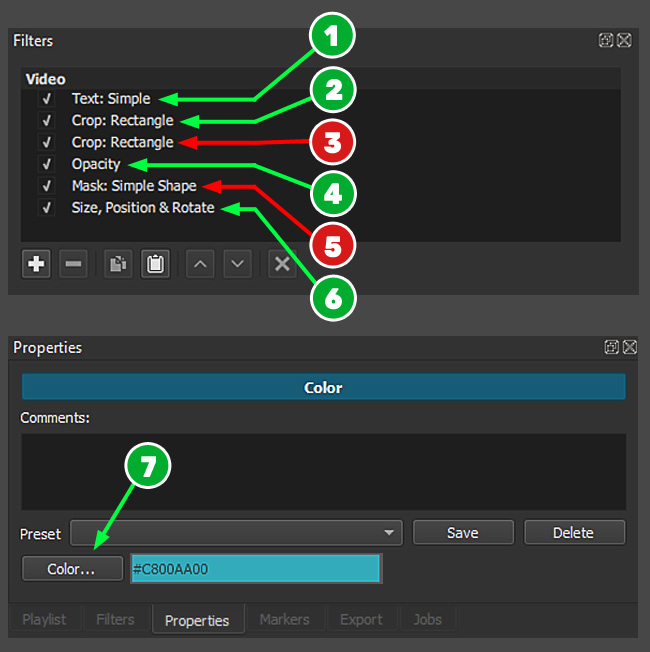
All the clip presets in the ZIP file use the same 6 filters, so they all work the same way.

1- Text: Simple filter

  • Replace the default text by your own text. If needed, you can change the font, the font color and size and add an outline.

  • Depending on the font used, you may need to adjust the vertical alignment of the text.
    Use the vertical Position setting for that.
    v-position

2- First Crop: Rectangle filter

  • Use the Padding color tool to change the color of the two red bars.
    X7UBNtzTvR

  • Do not edit the other parameters of this filter.

3- Second Crop: Rectangle filter

Don’t change anything in this filter.

4- Opacity filter

Used to increase or decrease the transparency of the entire banner.
If you don’t want transparency, simply deactivate the Opacity filter.

5- Mask: Simple Shape filter

Don’t change anything in this filter.

6- Size, Position & Rotate filter

Activate this filter if you want to change the size and/or the position of the entire animation. You can even rotate the banner if you want.
shotcut_22.03.30_MOD_usahOqsa9k

7- Properties

To change the color of the rectangle under the text, go to the Properties panel and edit the color there.

properties

17 Likes

Brilliant - thank you so much

1 Like

Thank you @Devin_Chopra !

I realized a moment ago that I forgot to include some infos at the end of the instructions. :grimacing:
It’s fixed now. :innocent:

@MusicalBox - you are truly a gentleman - and clever! Thank you so much for this brilliant resource!!

1 Like

Thanks for these great presets. Always fantastic effects with Shotcut. Thank you for sharing… What’s new with the ‘Magnifying Glass Effect’?

Merci pour ces super presets. Vous faites des effets fantastiques avec Shotcut. Merci de partager… Quoi de neuf avec ‘l’Effet de Loupe’ ?

1 Like

Thank you for the nice comments @jonray and @SergeC. I appreciate it and I’m glad you like the preset.

Ah! Merci de me le rappeler Serge. Je met ce projet en tête de liste.
Thanks for reminding me Serge. I move this project on top of the list.

Very nice effects!
Thanks for sharing @MusicalBox ! :yum:

You’re welcome @RilosVideos. Thanks you also for taking the time to comment

Hi @MusicalBox - love the transition at 0:25 in your demo video. How did you do that?

1 Like

@MusicalBox. Thanks :slightly_smiling_face:
Merci. Aucune urgence

1 Like

Hi @jonray

The one you see in the demo video:

  1. Make a 1/2 second transition between the two clips
  2. Select the transition
  3. Add a Blur: Box filter to the transition
  4. Set both values to 0.0%
  5. Activate the Width keyframes
    • Keyframe on the first frame 0.0%
    • Keyframe in the middle 70.0%
    • Keyframe on the last frame 0%

shotcut_22.03.30_MOD_8Hftn0XoxX

Result:

But today I came up with a different method (that I prefer):

  1. Add a Blur: Box filter to both clips
  2. On the first clip:
    • Activate the Width keyframes. Set Height value to 0.0%
    • One keyframe on the very last frame at 70.0%
    • Go back 1/2 second
    • Add a keyframe there at 0.0%
  3. On the second clip:
    • Activate the Width keyframes. Set Height value to 0.0%
    • One keyframe on the first frame at 70.0%
    • Go forward 1/2 second
    • Add a keyframe there at 0.0%
  4. Make a 1/2 second transition between the two clips

shotcut_22.03.30_MOD_SG1DUs80Kk

Result:

Hope this answers your question :wink:
Also hope this all makes sense to you :grin:

3 Likes

Yes!

Yes! I was wondering if you had just used the blur:box filter and nothing else. Thanks for the instructions - impeccable as ever! I like both methods.

1 Like

So cool! Will def use in future videos. Thank you for sharing!

1 Like

You’re welcome @AVENUENIGHTS.
I’m glad you like it.

Awesome as always :grinning:
Made a varient with a Center banner
AniBanner_Cente_30fps_7s.txt (4.1 KB)

5 Likes

Brilliant! Thanks @TimLau !

1 Like

Very nice Tim!
The cool thing about what I call Clip Presets is they are easy to edit to fit whatever project you’re working on. In my demo video for example, in the last clip I added a glow filter and also keyframes to make the text flicker.

2 Likes

Love the banners! And the blur transition is very cool! I’ll be using that for sure.

1 Like

Hi @MusicalBox, this is a tad pedantic - but pasting the code into a track won’t work unless you have an existing track with something on it. I just tried this:
Open a new instance of SC,
Hamburger menu - “add video track”
Paste your code.
The clip appears but it is unresponsive to editing.
If you add a colour clip (or other clip) to the track, then it works.
I thought you might just like to make this clear in your instructions? or is it too obvious? In most cases users will add to an existing track anyway.
PS I analysed what you did with crop and mask filters in this effect. Brilliant! Bravo - you are cleverer than I thought :smile:

1 Like