Thanks @jonray and very good synopsis. Sorry for the delay in getting back.
My method isn’t anything too exciting, and in fact I used an idea from @MusicalBox’s Animated Text Banner thread, where everything is placed on the same object. First attempt is here:
But since then I’ve spent a little time cleaning up the layout, and it seems to be solid enough and quite scalabe as long as the correct numbers are altered. Most box sizes can be achieved with a high level of accuracy (obviously not as good as the Size, position & rotate or SPR method however).
Altering the box width is directly reflected in the speed of the line drawing, and that can be an issue. I tried to work around that by providing 4 box lengths - extra long, long, regular, and short, with key frames set accordingly. In the mlt files, on the properties of each item I have added a description so if you copy one into a project, you can easily identify which box you are working with.
Here is a short video demonstrating the different width boxes, 2 different line thicknesses and 2 different overall speeds (regular and fast).
Here is a separate mlt file for the 2 different line widths (with each mlt containing the 4 different box widths).
BoxRevealAllFast_ReusableMasks_ThickLineDemo.mlt (32.6 KB)
BoxRevealAllFast_ReusableMasks_ThinLineDemo.mlt (32.6 KB)
BoxRevealAll_ReusableMasks_ThickLineDemo.mlt (32.8 KB)
BoxRevealAll_ReusableMasks_ThinLineDemo.mlt (32.8 KB)
BoxReveal_ReusableMasks_ThickLineDemoScaled.mlt (9.1 KB)
Make sure you have your target project open. Then open the mlt in a new instance of Shotcut, copy the object you want, go back to the original Shotcut and paste. Simple as that!
But since all those masks and key frames in one file can make my machine lag, I saved each object to its own txt file, which can be copied and pasted into an existing or new project (no extra Shotcut application needed). File names are self explanatory, as an example: BoxReveal_SpeedFast_LineWidthThick_LongWords.txt
Here is the zip:
BoxReveal_TxtFiles_1920x1080_30fps.zip (15.5 KB)
And a quick live demo using both methods:
Those are 1920x1080p @ 30fps examples. I did start a 1280x720p version before realising Glaxnimate is the way to go and discontinued that approach (but not before completing the basic mlt files linked above).
General Use:
The bottom SPR is for overall resizing, and the top SPR is for fine tuning line and overall box widths. If you experience weird clipping when sizing down the height dramatically on the bottom SPR, simply adjust that value up or down a few pixels and it will go away.
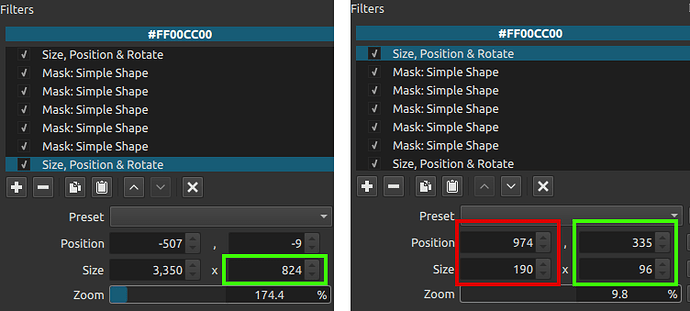
If planning on using more than one instance on a block of text, I recommend getting the first one setup perfectly. Then take note of the bottom SPR height value, and the top SPR adjusted position values (see screenshot).
Green box values should be observed and duplicated when working with the same line-height.
824 is the resized height and shrinks the overall box.
335 and 96 are adjustments to get the top and bottom lines the same width.
974 and 190 adjust the horizontal position and box width. These values will change depending on the box width.
I will continue to investigate this approach using Glaxnimate (which I have opened only twice)! But in the meantime I plan on creating a version for 60fps and 25fps respectively and that should cover most use cases. I’ll upload those when completed.
I hope that makes sense, and if I have any obvious errors please let me know.
