Red animated pencil circle for highlighting text etc in Shotcut

So after thinking about this for a while - and remembering @MusicalBox’s animated text banner preset - I decided it must be possible to apply all filters to a single color element and make it moveable on the screen, instead of having to redo every darned size, position, & rotate (SPR) filter!

This is still a little rough around the edges (a WIP), and I need to tweak some of the masks since they currently affect the key framing speed, but here is a working version.

This uses a single SPR to set the size of the box around the targeted text, then a mask is used to create the border by hiding the inner box. Then a single mask is applied to each visible line. And finally an SPR filter is used for the overall screen boundary and is for screen positioning.

In my example, the second box is simply a copy of the first and then the last SPR filter is used to drag the element around the screen AND resize it. However, when making the box smaller (since it uses distort you can make it narrower or wider or taller independently) sometimes the top SPR filter needs tweaked to stop some clipping on the left and right lines. No biggie, and it takes about 10 seconds to adjust the position and/or size settings by a few pixels, but I’d like to be able to get that sorted if possible.

Please feel free to chime in if anyone has a solution or can improve on this, but I will continue to see if I can get it right without needing to adjust for resizing.

And here is the mlt and mp4.
BoxReveal_ReusableMaskVersion.mlt (18.0 KB)

Hey @jonray,

I just completed a version of this using masks that can be copied and moved around the screen to highlight various words. However, I noticed the first box is actually not quite correct (the right vertical line is a touch narrow), so I need to fix that mask. But otherwise, it seems to work OK. I’ll do a quick screen recording for those with less time to demonstrate it, but if you see something wrong or any improvement let me know.

Yes, when I was working on it I noticed that but I thought I corrected by allowing for the width and position of the joining vertical line and it wasn’t visible. I guess not!

1 Like

Using masks with percentage values, @PoisonedSlice - that’s a genius idea! Great idea. Looking forward to seeing the finished article…

Yes it is! Another @MusicalBox idea I believe, and if I am misattributing that then I apologise to the original concept creator.

Getting percentage masks to align perfectly with other fixed pixel values is also tricky, but once it’s done then the rest is cake (I think!).

Je suis hors sujet, mais comme @nurub demande comment mettre en surbrillance une partie d’un texte, il existe une solution bien plus rapide et moins compliquée pour attirer l’attention du lecteur.
Un clip couleur sur la piste supérieure (ici vert à 50%)
Appliquez un filtre “Recadrer: Rectangle” avec 2 images clés

I’m off topic, but as @nurub asks how to highlight a part of a text, there is a much faster and less complicated solution to draw the reader’s attention.
A color clip on the above track (here green at 50%)
Apply a “Crop: Rectangle” filter with 2 keyframes

1 Like

Sure, but they also asked:

Since that can be a PITA, I think it’s why @jonray - given he likes a challenge - focused on that aspect.

1 Like

UPDATE:
So after a little tweaking I think it is acceptable in the current format for most use cases. There is still the necessity to very slightly tweak the top SPR filter when resizing sometimes, and I can’t seem to get around that. However, I did discover that if I set up all the filters on a smaller box, it scales up much better and is easy to adjust without weird results (the vertical lines end up wider but are easily clipped in the top SPR filter and there is no odd behaviour, which I experienced when sizing down a larger box).

Also, be aware, the interpolation choice that is enabled in the settings menu should match the export option, or you don’t get exactly what the preview shows, at least I didn’t (even with no proxy and no scaling). I’m pretty sure most of my issues here are due to the mask percentages, but this is about as close as I can get it, and I did use a green color block to view all the masks and position them.

Duplicate the first box then move by dragging the bottom SPR filter and resizing to the length of the word. Then tidy up by adjusting the top SPR filter (position and size) if necessary. See my mlt for examples of this.

If pixel perfect precision with super sharp lines is a requirement then maybe it’s back to all SPR filters. I suspect someone more advanced can do better than this, since I’m really still a beginner, closing in on intermediate.

BoxReveal_ReusableSmallMasks.mlt (23.6 KB)


1 Like

Wow, this looks great, @PoisonedSlice - I will do some testing hopefully later today when I can grab some time. Thank you!

In the meantime I was thinking yesterday in a slightly different direction - how to do it using the SPR filter method but making it easier to input the values, and also generate values for boxes of different sizes, and different border thicknesses. I have a plan for a semi-automatic way of doing this, but restricted time, so watch this space … I’ll post as soon as I can…

Thanks! And before you point it out the “dol” box is clipped slightly and the top SPR should really be:
Position: 966, 377 Size: 208 x 93

Sounds like you have a plan, and now I’m also curious. In terms of automation that really is the best solution. Here is a stripped down mlt with two starter boxes (one green with thin lines, one red with thicker lines). The only drawback I see is that altering box sizes changes line speed. But that should at least get the job done in the meantime.
BoxReveal_ReusableSmallMasksTemplate.mlt (14.4 KB)

1 Like

Good to hear from you again, @jonray. You’re videos were something special in the day. I hope you’re back from your sabbatical and the journey has been fruitful.

Stephen :o)

1 Like

Hi @namna, no, you’re on topic! As @PoisonedSlice pointed out was indeed one of the questions @nurub asked in the Opening post. That’s very helpful for users - thank you.

1 Like

Gosh, thanks for those words @Stephen_SE9, especially for the compliments on my tutorials! Well, I haven’t actually been very far but I’ve been busy making a lot of music videos to go with my flute compositions - all done with Shotcut of course!
This has meant that I haven’t had much free time to do any more SC tutorials, or contribute here, but I do check in daily to see what’s going on. I would love to get back yo tutorials one day.

Yes, my flute videos have been very fruitful thank you. I have made lots of flute-playing friends all over the globe. Very satisfying. Hope you are OK.

Hi @PoisonedSlice, your method works fine so far in the limited time I had to test it today! Bravo - great idea to use percentage mask values and incorporate it all into one clip. Genius.

So here’s my idea - not better than yours but just an alternative. It’s based on your idea of having a clip for each of the border lines and uses the SPR filter, but I’ve been thinking of how to make it easier to generate and input all the values.
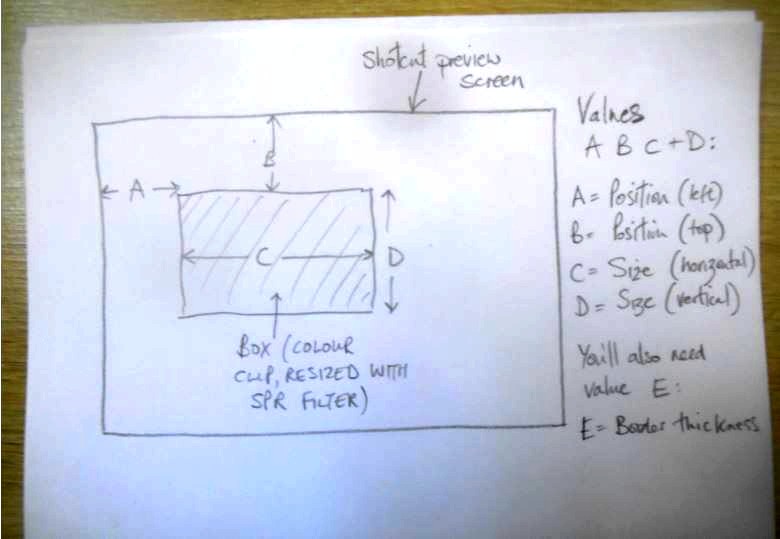
So here goes. First, this diagram explains that I’ve identified the four SPR values as A, B, C and D. You’ll also need value E, which is the border thickness. This can be any value of your choice.
(Note - all the best ideas begin by being drawn on the back of a fag packet…) :rofl:

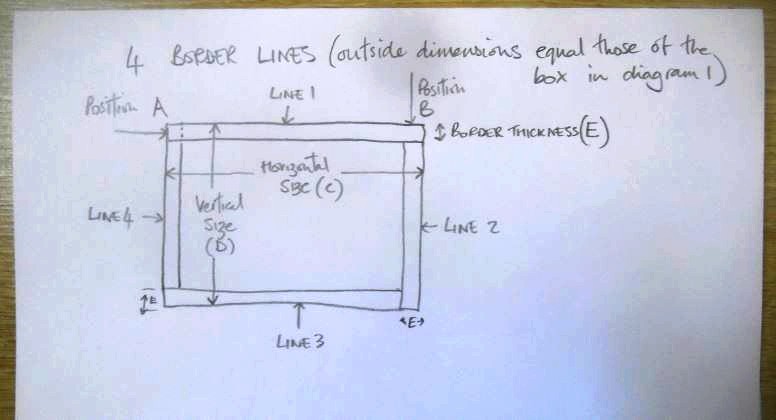
In Diagram 2, I show how the 4 border lines will appear on screen:

Next, Lightbulb moment number 1: Using @PoisonedSlice’s MLT example as a guide, I worked out the keyframing values needed for each line to appear, but not in numbers - in a series of mathematical formulae based on the values A B C D and E.
Here’s what I came up with. I have limited time to explain this now but I hope it is fairly clear how it works.

Next, Lightbulb moment number 2:
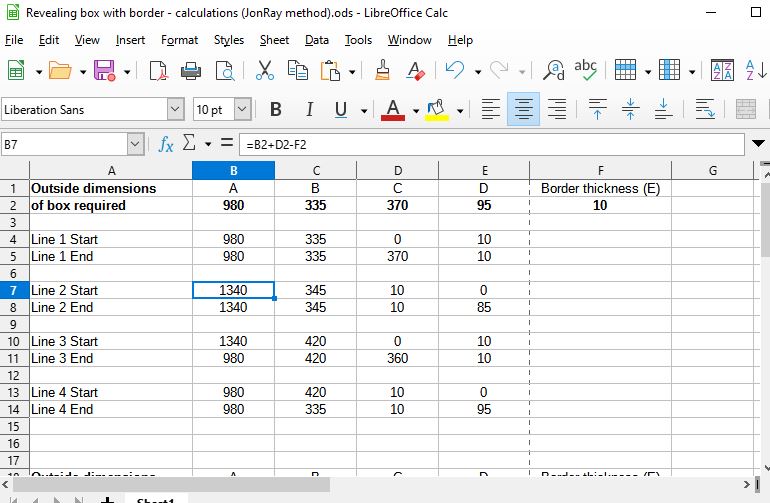
I put these formulae in a spreadsheet. I don’t have Excel so I used LibreOffice Calc:

So, how to use it.
(BTW I punched the air when it worked)!!

I made a short tutorial video which I hope explains it. I used it to highlight a bar of music and I’ll be using it in a forthcoming video.
The basic process is to begin with a colour box sized at exactly where you want it on screen.
This generates values A B C and D. Then decide on value E (border line thickness).
Then input these values into the spreadsheet, and immediately the required values appear for each of the four border line clips (two for each, start and end keyframes).
Then transfer these values into the SPR filters of each clip.

Finally, hide the original box and Ta-Da!
Here’s my tutorial video. BTW the program I used to keep the spreadsheet in view is TurboTop. :

The big plus point of this method is that you can choose a box of any size and any border line thickness, and the border stays exactly that size, on all sides of the rectangle.
The PITA of course is that it’s still fiddly to input each of the 32 values (although some are duplicates). However the tutorial is only 4 minutes long (although I did speed up some of the tutorial video slightly. In real time it took me 5:30 from start to finish.
If anyone would like the spreadsheet file to try it out, it’s here, in both ODS (LibreCalc) and XML (Excel) formats. Just delete the fake TXT extension:

Revealing box with border - calculations (JonRay method) 01.ods.txt (19.4 KB)

Revealing box with border - calculations (JonRay method) 01.xml.txt (19.3 KB)
Here’s the MLT of my tutorial but it won’t have the music graphic:
Revealing Box border with automatic calculations (JonRay) 01.mlt (38.6 KB)

2 Likes

I am thanks, @jonray. I wouldn’t mind checking out these flute videos edited with Shotcut if they’re in the public domain that is :laughing:

Fantastic! It takes the grunt work out of the process and removes any potential for miscalculation. I think you should start a separate resource topic on this box reveal since I can definitely see a use case for it. And if you don’t include SPR in the title - something like “Animated box drawing for outlining text” - then I can reply with a detailed post including my own alternative mask method (which I’ve done some more work on also, including an improved screen recording on how to use, but I will save all that for your new thread).

1 Like

They are on Jon’s Youtube channel:

1 Like

Thanks for the heads -up, @elusien. Actually I had forgotten just how many videos I’ve made! (I make it 60 - and more in the pipeline) …

@Stephen_SE9 - for an example of some custom masking action, see:

https://youtu.be/CMg65Ap4H3k

1 Like

That’s a great idea, @PoisonedSlice. Will do, as soon I can find some time. Today if possible…

@jonray, I like those words “more in the pipeline”.

1 Like