1) Bug #6 from my last year’s bug report here has returned:
6 - Pick the Mask From File Filter. Animate a wipe using Simple Keyframes that goes from 0 to 100%. Go to the timeline and place the playhead right in middle of that animation. Now go to corner of the clip to activate the Fade filter and drag it up to where the playhead is. Let go then pick the handle again and drag it back to deactivate the Fade filter. Now the animation in Simple Keyframes is interrupted and won’t go to 100%: https://images2.imgbox.com/3b/33/StU9R2MF_o.gif
2) The “Timeline” in Properties does not update right away when clip is resized or cut. You have to deselect then click back to update.
3) The “Duration” in Properties appears open to the user to go in and type a number but “Timeline” is darkened and you can’t type anything. Shouldn’t that be the reverse considering that typing in a number in Duration won’t do anything? It would make sense if it were laid out similarly to how it’s in the timer under the timeline where the current clip duration would be first followed by the full length of the source clip:
Also, anyway to make it so that you can change the duration of a clip in the timeline by typing in the duration in “Timeline” in Properties?
4) If you try to save a preset with 70% (crf 16) it will save it as 71%.
5) If you reverse a clip in the timeline, the Source tab does not immediately update to reflect the newly added reversed clip.
6) Bring the playhead to the end of the timeline. Keep pressing spacebar. Instead of returning to the start of the clip Shotcut will keep moving ahead in the timeline seemingly a frame at a time. Demo.
7) Start 3 video tracks. Have some clips on tracks V1 and V2. Lock V1. Do a select all. Use any clip on V2 as the lead to move the clips to V3. The V1 tracks will move to V2 above even though it’s supposed to be locked. Demo.
8) I think the filters that don’t support preview scaling should probably be marked as such either on the filters list or in the panel for that filter so that the user knows this ahead of time. It was noted in the release notes for last version but new users will not be aware and if they see them not working in preview scaling they may think something is wrong.
9) If you have advanced keyframes on and use Corner Pin pressing one of the corners on the VUI does not automatically create a new keyframe the way it would with the rectangle controls when the central button is clicked on. Can Corner Pin be made to be like the filters with rectangle control in that way?
The “Duration” in Properties appears open to the user to go in and type a number but “Timeline” is darkened and you can’t type anything.
This is intentional. Changing Duration does override the source duration, which is usually not obvious it is doing something until you need it, which is rare. Changing the timeline clip duration outside the timeline is out-of-scope for now, or I would have added it.
If you try to save a preset with 70% (crf 16) it will save it as 71%.
Minor, not new, and due to rounding error because we treat crf as integer even though it is real.
If you reverse a clip in the timeline, the Source tab does not immediately update to reflect the newly added reversed clip.
Intentional change.
Bring the playhead to the end of the timeline. Keep pressing spacebar. Instead of returning to the start
Intentional change because some people are complaining that the timeline playhead is unexpectedly jumping to the beginning and this can be one reason.
I think the filters that don’t support preview scaling should probably be marked as such either on the filters list or in the panel for that filter so that the user knows this ahead of time.
Not a bad idea, but requires design and out-of-scope for this release.
pressing one of the corners on the VUI does not automatically create a new keyframe
That is a quirk of the Size and Position filter that is unintended (can be considered a bug). The plan is to add an add-keyframe button on the parameter track head for parameters that do not already have it. I have an idea for how. For now, the simple workaround is to put your cursor in a numeric parameter and press up and down to increment/decrement the number.
10) The default position for Corner Pin is slightly slanted on the left and top sides while on the right side and bottom it is fine. In the image here you can see the red line on the left and top that is of the image that is underneath the video with the Corner Pin.
11) On the topic of the Corner Pin filter, I have been testing it more and while reducing the amount of keyframes for the corners to one is far easier to manage I realize that there is one advantage that having all of the parameters being keyframed allowed and that was the ability to move each corner independently of the other including assigning different keyframe types to each corner parameter to have them move in different way at the same time if the user wanted.
Perhaps both kinds of keyframe types for the corners can be included but program it so that both keyframe types can’t be activated at the same time? In order to not clutter the Corner Pin tab maybe some kind of collapse button can be placed so that if it’s clicked on it will replace the one keyframe button with the ones from before and vice versa.
Or alternatively, have two Corner Pin filter versions: One called “Corner Pin: Simple” (the one now with one unified corners keyframe) and the other “Corner Pin: Advanced” (the one from before with 8 corner keyframes).
Since that capability was there originally it would be good for those that want to achieve that kind of an effect at certain times to still have that option.
I don’t know if this bug existed in previous versions.
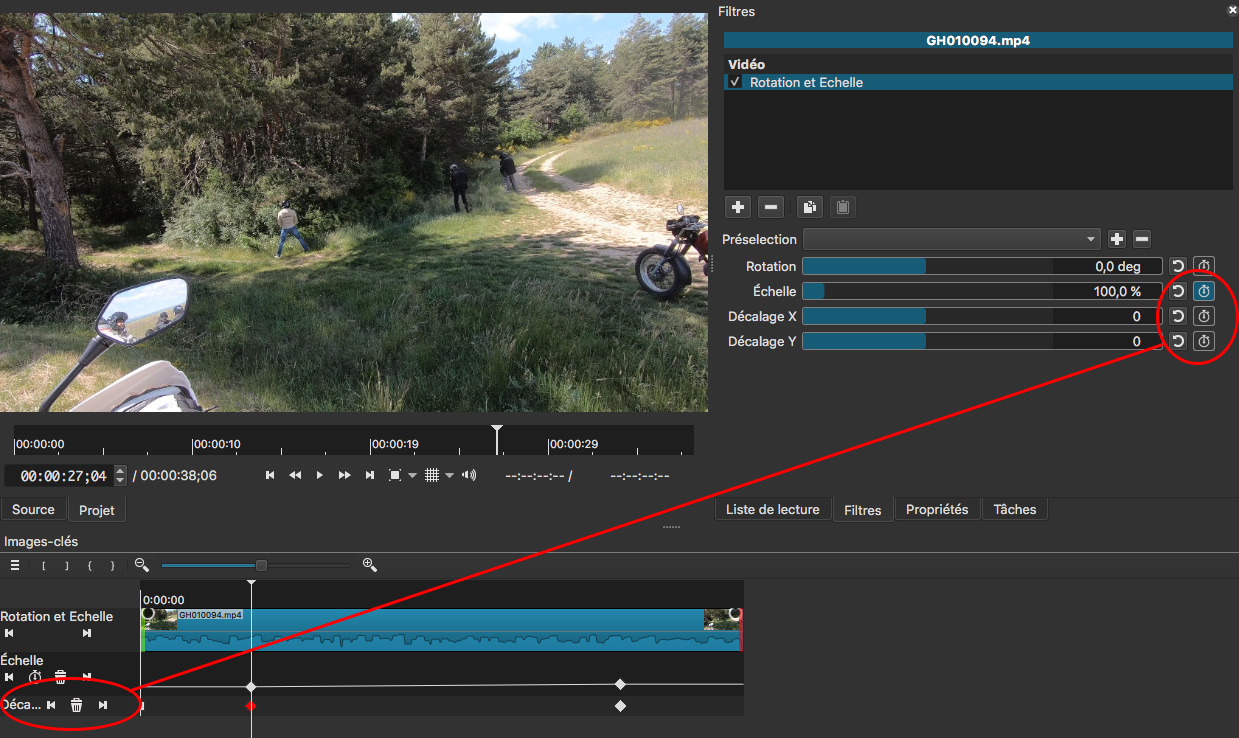
Apply the rotation and scale filter to a clip in the timeline.
Define keyframes on the 2 parameters “scale” and “offset X”. The 2 stopwatch buttons in the “filter” window are blue.
Save the project and exit Shotcut.
Open the project again and select the clip. In the “filter” window, only the “scale” parameter has its blue stopwatch button.
The “X offset” parameter has its button disabled (not blue) but the keyframes are still present in the Keyframes window.
12) In Corner Pin, if you press the advanced keyframe button to turn off the advanced keyframes and erase all of the keyframes for the corners, the keyframes will not be erased. Demo.
10 ) The default position for Corner Pin is slightly slanted on the left and top sides while on the right side and bottom it is fine.
Fixed
11 ) Perhaps both kinds of keyframe types for the corners can be included
Not going to happen soon.
12 ) In Corner Pin, if you press the advanced keyframe button to turn off the advanced keyframes and erase all of the keyframes for the corners, the keyframes will not be erased.
Fixed
Done
1 ) Bug #6 from my last year’s bug report here has returned
This was never fixed, and I reproduce it on versions 19.12, 19.10, and 19.09 in addition to the 20.04 beta. I have not yet figured out the cause.
In addition to my previous post.
This does not always happen systematically. To get it every time, here are my conditions:
The clip to which the keyframes are applied is between 2 clips without filters.
Just before switching between the keyframe window and the timeline window, I select the first keyframe of the X offset parameter
Immediately after switching between the keyframe window and the timeline window, I save the project (cmd + S) and exit Shotcut.
Screenshot after re-opening the project
I can confirm this…, and, yes, this happens to me often, not very often, but often.
You can “reset” it by selecting another part and then selecting again that part.