After rendering a video project countless times with low & high settings of each scale, then closely studying the results, this is what I believe each setting does. The higher the setting, the more it does what is described.
Shakiness seems to average out the frame movements instead of each frame migrating too much compared to the previous/next frame. Max recommended.
Accuracy seems to prefer keeping the main point-of-reference figure stabilized instead of the moving background (this was for my case of a moving selfie camera; not sure what happens with a stationary camera and moving objects; in a video of walking around filming a city, this setting didn’t make any difference). I found Accuracy to be more effective at stabilizing the video than Shakiness, tho there seemed no downside to maximizing both.
Zoom is the relative size of the output frame compared to the input frame. If the whole input frame matters, I wouldn’t set it above 0%. And if you do want to zoom in, I’d rather do it with Smoothing.
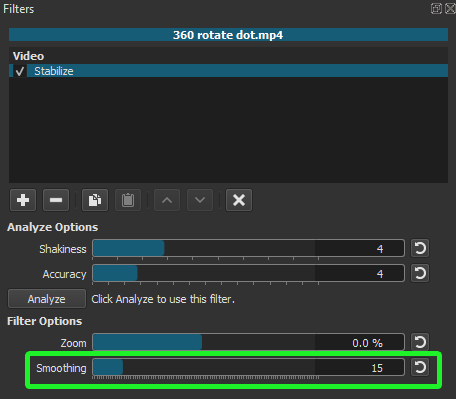
Smoothing is how much the frames are allowed to move around from center to stabilize the image (this can be seen when Zoom is negative). It also zooms in, which I guess is to hide the shifting frame borders. Without allowing some Smoothing, Stabilize isn’t able to do its job. I suggest between 10 to 30, depending how tolerant you are if the moving original border becomes visible in your output. If you prefer to not see any corrections along the edge and want to keep almost the entire outer frame, then set Zoom=0 and Smoothing to less than 5, but don’t expect much stabilization.
By setting the Zoom out the maximum of -50% and the smoothness around 30, I was able to get a good perspective of how hard its working and what it’s doing. I suggest max shakiness, max accuracy, zoom around 0%, and adjust your smoothness for how much you want the video to be stabilized.
To compare the scale of Shakiness vs Accuracy, I rendered the same video 4 times with low and high settings for each (low-low, high-low, low-high, high-high) then made a single video with each version in its own video track and displaying them in the 4 corners using the Size and Position filter (like 4 Picture-in-Pictures). Then Render/Export the whole project to have them play smoothly side-by-side and analyze the movements frame-by-frame. I also took the same approach with Zoom and Smoothing to determine their effects and preferred settings.
In my very dynamic sports video with a GoPro on a selfie stick, the Stabilize feature helped tremendously, tho the algorithm still needs improvement. Big stabilization movements seem to correct in sets of 2 frames instead of every frame (or the average of many frames) across the sample, resulting in jitteriness. Lossy vs Lossless didn’t seem to correct this, nor did any combination of Stabilization settings.
Stabilize/Analyzing filter tendencies:
I found that Stabilize won’t “kick in” until you click or fumble with ShotCut somehow. In other words, don’t start an Analyze job, then try to Export as a pending job immediately after. Once it’s finished analyzing, then tell it to Export.
When exporting the video, the stabilization filter won’t apply to the output if the frame rate or video size is changed.
When Stabilizing (or any other filter) make sure you’ve properly selected what you want it applied to. Videos in the Player, Playlist, and Timeline are 3 different instances, and are not connected. To apply to the other instances, you must update or add the video to them. When Exporting, you also select From which source at the top of the tile.
Player and Playlist videos only analyze the portion selected. If its in-point/out-points are ever expanded (in the Player or Timeline), the new sections won’d be stabilized.
Timeline clips analyze the entire source video, not just the portion that’s selected. If you only need a small clip of a long source video, it’s much quicker to analyze a portion in the Player/Playlist, then add it and further trim it down in the Timeline.
It’s a mystery why we must specially save a .stab file if this file can’t manually be loaded later to save from having to analyze the same video again. Hopefully this is fixed in a future
The Stabilization filter can only be applied to individual clips, not the entire track or project. To affect more than just a single clip, either apply stabilization before you chop a source video into many pieces, or render your tracks or final project into an output file with minimum compression, then start a new project with that output file as your source and apply your stabilization and other global processing as needed.
If after stabilizing, you see little artifacts along the edges, this is a byproduct of it being stabilized. If you set your Zoom to a negative value with a little bit of Smoothing, you can see what’s happening. Read about Zooming and Smoothing above for a solution.
Thank you ShotCut developers for all your hard work!! Hopefully you can continue to document these filters/features as you build and implement them. Users can do our best to experiment and figure them out, tho we’d hate to misunderstand them or provide false information to others. If anyone has anything to contribute or correct, please add your comments so this post can become a complete reference to this important and complicated filter.
I’d say that for very shaky footage in your activity, you should try to use VirtualDub and the deshake filter.
You really have better chances to optimize the results.
I recommend everyone to render your project with Zoom set to negative (like -30%) to see what this filter is doing, and what other settings work best for your video. Then once you like how stabilized it is, then set your Zoom to 0%ish so the final output doesn’t show the moving borders. (Actually with my project I left it at -30% because I thought it looked cool, and didn’t want to crop the edges.)
I did a day of testing and found the same settings worked best for me too. Max analyze options, keep zoom zero, smoothing around 20-30. Made a video talking about some other things regarding this.
Thank you so much for taking the time to do all this testing and writing it up!
I just tested your suggestions on a hand-held (300mm lens) video that was pretty shaky. The results were amazingly good. It looks like part of the “fix” involved some slight cropping and resizing, but it was minor so I’m very pleased with the result. It was a static subject (a nature scene with a waterfall) so I can’t say what would have happened with, say, moving animals, but for this type of shot it was very, very good. There is still some slight movement, but it’s smooth and really not very noticeable.
Me either. I’m trying to stabilize a 16 second clip and it’s going to take an hour and a half. This is a small video (source of the entire thing is only 58 MB) and I have an i7. It’s using only 20 percent of the processor.
Neither of us knows how to use the software, apparently. I’m sure there’s a way to do it much, much, much faster. I’ve read a lot here and watched a couple Youtube tutorials but haven’t found anything.
The i7 doesn’t mean much since there are so many different releases spanning a 10 year period. Listing full computer specifications, Operating System & Shotcut Version number will help the community and the devs. To find the Shotcut version number, go to Help/About Shotcut.
Since this is a tutorial thread, I highly suggest starting your own thread with the classification of “Help/How To” for type of post, and describe your experience. And with your own post, list your source file specifications, Video Mode (Settings/Video Mode), and any filters you have applied, and where there are applied.
A most intriguing article, with lots of insights and learning.
For me it is a crash course in image stabilization. I am pondering the objectives and requirements of the algorithm, and I discover the wider implications and relevance for other fields of life, namely politics.
The algorithm trades edge space for the stability of a central portion of the image. In fact, it needs edge space as working material, into which it can shift the core, up and down, left and right, as needed. By sacrificing the edges, it preserves the stability of the core, free of shaking.
The amount of shaking in the original image determines the size of edge space needed; it informs the trader about the price to pay, that is, how much edge space to sacrifice.
In my experiments, prematurely applying a Crop Rectangle filter on a 1920x1080 original to reduce it to 1920x720, before applying the Stabilize filter, did not yield the desired stabilization, as a hard vertical edge of zero width does not provide any sacrificial space to work with. It also produces a very large output file.
I achieved the best stabilization quality by using only the Stabilize filter, without any Crop Rectangle. This also produced the smallest output file. It appears that a stable image compresses much better than a shaky one.
I am testing the Stabilize filter.
The higher the Shakiness value, the more of the edge is sacrificed (higher magnification and loss of sharp detail).
I have not yet found a (fast) visual difference between the extreme values of the “precision” value. Maybe my test clip is not suitable for noticing differences.
So I thought if converting the clip and modifying the frame rate with one of the fusion modes or with motion compensation would have any effect on the way the stabilizing filter algorithms work.
The “motion compensated” mode seems to mold some areas of the frame (such as ripples) and the post-analysis with the stabilizing filter seems to sacrifice less edge space.
Has anyone tried something like this?
Maybe it’s a placebo effect? (I’ve been watching the same clip for so many hours that I can’t see the improvements anymore).
I’m trying to restore video that was transferred from 8mm film. The film dates from 1960. Each part (my parents’ honeymoon) has many different values depending on where and when it was taken. Some parts are dark and noisy (video color noise) while other parts were taken outdoors and have much less noise, but more camera shake. I only want to stabilize those parts that absolutely need it to be watchable.