Ideal Volume Levels for Audio on YouTube Uploads?

Hi

I’m having a problem finding a way to make the audio on my YouTube videos loud enough without distorting it. I record videos using SLOBS then edit them in Shotcut, after exporting the final product the volume sounds OK when I play the video in Windows, however when it’s uploaded to YouTube it sounds quite a bit lower.

I’m not sure what I’m doing wrong, but I was recording with the slider at close to full volume in OBS and then using the gain/volume filter in Shotcut to increase it until it sounded distorted then brought it down just under that level so it’s basically the loudest I can get it without it sounding distorted, but as soon as it gets uploaded it sounds quite a bit quieter on YouTube, even at max volume.

I read somewhere that it’s better to record in OBS at around -10db and then use the editing software to bump it up which would help it not to sound so distorted at the higher volume levels. I haven’t tried that yet but it mentioned that you want to be somewhere close to 0db using whatever editing software you’re using, however Shotcut is set at 0db as default so I’m not entirely sure what I should do. At 0db it’s going to be way to low once it gets onto YouTube, but any higher and it’s suddenly going to be way over the “recommended” 0db in the editor.

I’m using a Blue Snowball Ice mic, is there something I need to adjust with the mic to make it louder without distortion? I assumed that the volume slider in the OBS mixer was doing that?

Nearly every other video I watch on YouTube has almost the same level of sound at max as eachother, and it’s a very good level. Is there some kind of standard I should be aiming for? How can I tell if it’s going to sound the way I want it to when I upload it to YouTube?

Thanks.

I am not an audio technician so I can only speak from what I have read.
The 0 dB refers to audio levels but the volume filter is only about increasing the volume and is not about the audio levels. They use the same unit but they are not about the same. If you use the volume filter you are not able to assess the audio level. The audio level is also described with dBFS which is better to distinguish from just gain in dB.
If you want to measure the dBFS and other loudness related statistics just use View > Scopes > Audio Loudness. That should give you more insight. I would recommend you search for guides about LUFS if you want to achieve the optimal loudness for YouTube.

By the way, you can right click on videos in YouTube and press on Stats for Nerds for more information about the audio normalisation. If the values are negative your content is not changed, if it is positive it will have a decreased loudness (http://productionadvice.co.uk/stats-for-nerds/).

(You could listen to one of my videos and tell me if they are loud enough. I could post the values to the video if you want.)

2 Likes

Thanks for the reply samth…

I didn’t know about that ‘stats for nerds’ thing, I just checked a bunch of my videos and they’re all negative in ‘content loudness.’ My loudest was -6.5, with most of them more than negative 10, one being -13.4. I’m thinking being under 0 is a bad thing… I’m just not sure how to make them louder without distortion? Although I have no idea what LUFS is, I’ll look it up and check out the guides…

Thanks again. :slight_smile:

With -10 dB or lower your videos are very quiet. You can definitely raise your volume. My videos are according to YouTube algorithms aproximately -7 dB too low but that works for me. You do not have to be at 0 but a couple of dB higher would probably help.
Could you open one of your projects with Shotcut and enable the Audio Loudness panel? If you post a screenshot of the values, I might be able to tell you whether your videos are too quiet according to Shotcut.

1 Like

sc%20audio

Thanks.

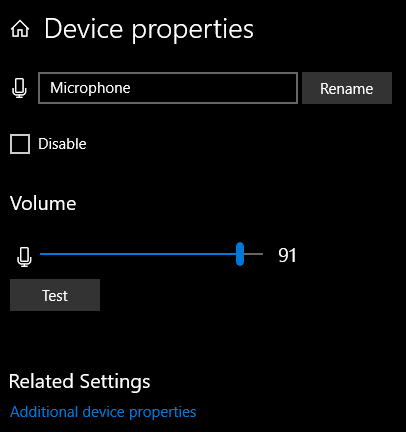
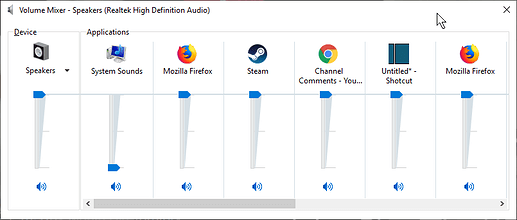
One thing you might want to look into is your computer’s sound settings, especially via the microphone. There are levels you can set withing Slobs, and even playback sound levels via each browser.

This is for Windows 10, microphone volume setting.
ApplicationFrameHost_2019-07-31_16-45-59

These are the different levels you can set via each web browser & application that is beyond what volume you set on a youtube page.

Your mic doesn’t have any gain control on the mic itself and depending on your actual room surroundings may just amplify your recording if you’re not directly in front of the microphone. Depending on how close you are to this mic can determine the record quality as well.

Best advice I can give you… don’t adjust any volume levels in Shotcut unless you have to. Run a few tests with OBS at various levels, upload videos to YT, but select “Private” for the privacy setting, then play them back. Make all of your adjustments before you record. It may take you 4 to 10 recordings to find the spot you want to be at.

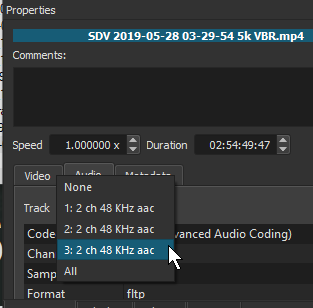
If you really do want to adjust levels of your recordings every time you edit a video, then record your audio to a 3rd track. You can separate that mic track in Shotcut to raise/lower the mic volume without adjusting the entire video sound.

In OBS, allow 3 tracks for recording, Track 1: everything, Track 2: general audio, Track 3: Mic

How it looks in Shotcut
shotcut_2019-07-31_17-12-33

And every application/game has it’s own audio levels as well.

The right mix would be what you want. It took me several weeks to figure out where to have various levels where I want them to be at. For many videos I published I would always adjust the mic levels with Shotcut until I got tired of doing so.

1 Like

OK, thanks for all of your help. I actually just tested a quick recording and setting obs closer to the max, but not on the max then using gain to bump it up more in Shotcut didn’t produce the distortion I was getting before and the content loudness on YouTube was -3, so much, much better. I’ll look at my system settings and see if I can get a similar result without messing with the gain in Shotcut. Is there a particular reason why it’s best to avoid tinkering in Shotcut? Or is it just extra work?

Thanks again. :+1:

Edit: Forgot to mention, I do already use 3 tracks exactly as you described.

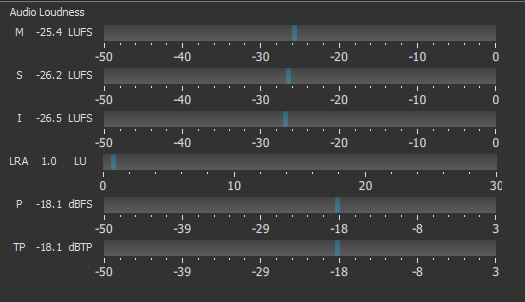
I need not M or S which are the momentary loudness but I which is the loudness overall to be able to judge.
But it seems, you were already able to raise the volume to your satisfaction.
If you use the volume filter, there should be not many problems as long as you keep attention. I personally adjust everything within Audacity and rarely use the volume filter to increase it around 1 or 2 dB.

1 Like

Yeah, it looks like I’ve got at least some solution now. Sorry I didn’t realise there were extra numbers in the Audio Loudness, anyway, here’s the full list…

sc%20audio

Going to sleep now anyway, but thanks again for all the help.

Cheers. :+1:

You do not need my help anymore but I will just add that the integrated loudness (I) is too low with -26.5 LUFS and has to be a bit higher, around the -20s at the minimum. The recommended for YouTube is -13 LUFS but I have around -21 LUFS which is enough for me (Broadcasting companies seem to adjust to -23 LUFS so I guess my values are not that bad :man_shrugging:).
In the end, these are just recommendations and I listen to my ears first and foremost and only make sure the values do not drop too low.

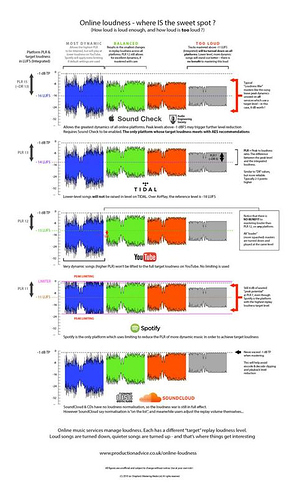
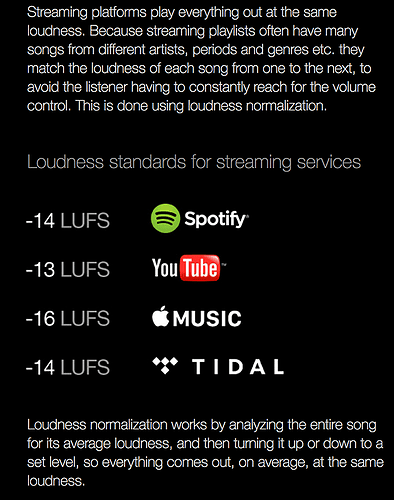
I take advantage of this thread to include some of the recommendations that I compiled from the various popular media.

These reference data can be modified according to the requirements of each service, but they can serve as an indicative starting point.

One tool that can be useful to have updated data on the requirements of each service is this:

A priori, this online tool seems interesting to me because I suppose the developers will have updated data about LUFS value changes in the platforms they list.

I only use one audio track (playing my bass), and for me, the reference value is -16 LUFs (YouTube). However, in my videos, there are no narrations, only music.
I add the SC filter “normalize in two steps”, set to -16 LUFS and press the analyze button.

I do music stuff on YouTube, so I know a reasonable about on this. YouTube normalises the volumes of all videos on it so that really quiet videos get turned up and really loud videos get turned down. This normalisation is based on the average loudness of the video (which is measured in LUFs I believe). Usually, a video with poor audio (mixing, recording, etc) may seem quiet because of its dynamic range. If one part of the video is really loud, but other parts are quiet, the quiet parts will get turned down even further. This is especially problematic in classical music because of the large dynamic range. What you could try would be using some kind of limiter or compression to ensure that your video stays at a similar volume throughout, I try to aim for between -1dB and 1dB. This will prevent YouTubes loudness normalisation from making your video sound so quiet in some sections, which greatly improves the viewer experience too (meaning viewers will be more likely to continue watching your content (since I started caring about the dynamic range in my music, my audience retention has risen by a good 45 seconds).

There are conflicting statements in this thread about what happens to quiet audio when transcoded by YouTube. The current state of things (always subject to change with YouTube) is that loud videos are turned down, but quiet videos are not boosted up to the reference level. It would not be possible for dark moody videos to sound quiet if YouTube boosted everything to -13. YouTube assumes that if you mixed your audio under -13 LUFS, you did it for an artistic reason and they’re not going to mess with your art. It’s a different mindset than the broadcast world. Ian Shepherd has previously written about this, and I can verify it with my wife’s cooking videos:

http://productionadvice.co.uk/youtube-loudness-normalisation-details/

In the Stats for Nerds box (in the right-click menu), the audio is reported 3.1 dB below the -13 LUFS reference level, meaning the integrated source is -16 LUFS (which matches our master file). But normalized playback volume is still only 100%. It would take more than 100% to get the -16 LUFS source up to -13 LUFS. Ripping and integrating the YouTube player’s audio is also below -13 LUFS as expected.

So what’s an easy way to get Shotcut audio up to -13 LUFS?

When I have time to be an editing purist, I like the workflow of exporting speech stems to a DAW to make things pretty, then bring a consolidated stereo file back into Shotcut before the final export. I did this for my wife’s early videos, but then she got so efficient that she could edit video faster than I could mix audio in my limited free time. :slight_smile:

Luckily, since my wife’s cooking studio (which is really just our kitchen that no longer functions as a normal kitchen) is such a known and consistent entity, volume leveling can be done directly in Shotcut and sound pretty much as good as a DAW for simple things. Here is the filter chain we have been experimenting with in Shotcut for speech tracks so that she can do full video and audio production by herself. (This is the same woman who edited a 40-minute documentary using Shotcut on Linux two years ago. Yes, I know I married a rare gem.) The first filter for speech tracks is:

Gain/Volume: This is to get the audio within 5 dB of the target -13 LUFS level if it starts out too quiet. Watch the short-term loudness (the “S” bar) on the loudness scope to help with setting the gain. Don’t go for the full -13 LUFS yet.

High Pass: When raising gain, we also raise background noise like air conditioners. For female voices, the cutoff frequency can often be set as high as 200 Hz without impacting speech.

Limiter: This filter prevents clipping distortion due to the Gain filter. We usually set the limit to -3 dB.

Compressor: This filter is for making the audio smoother, as opposed to rapid gain adjustments for level compliance. We give it a 1:3 ratio with a -19 dB threshold and +3 dB makeup. We also change the attack to 50 ms and the release to 300 ms. However, this is dependent on the percussiveness of your presenter’s voice.

Notch: Optional. Our room has resonance that causes a buildup at 3.2 kHz, so we add a notch at 3200 Hz with a bandwidth of 50 Hz and rolloff of 6 to minimize it. The result has less echo and shrillness.

Then we preview the audio (including music now) and go back to the Gain filters. We adjust them (speech and music) to try to get the short-term loudness on the meter close to the -13 LUFS spec while also being balanced well to each other. Short-term loudness held to spec over time will cause the integrated loudness to be the same number. But short-term loudness provides much faster feedback on the scope about how close you’re getting to spec. Still keep an eye on the integrated level, though.

The filters listed so far go on individual clips or, more ideally, an entire track head. They are rather robust as general purpose settings, but will of course require tweaks for your exact environment. Be aware that you can only raise the Gain so far in this configuration because the Compressor will start squashing whatever extra gain you try to push. If you want a squashed sound, great. But if what you’re really wanting is more volume that pushes the edge of distortion, then increase the Compressor’s makeup gain instead of the first Gain/Volume filter.

Lastly, we apply a Limiter filter to the master track in an attempt to keep true peaks below -1 dB. To achieve this in reality, the amount needs to be -1.5 or -2.0 to allow for slight overages since the limiter is measuring sampled peaks rather than true reconstructed peaks.

Extra tip: When people mix speech tracks with music tracks, they often create a “swell” in the human voice range of the spectrum because all tracks are contributing to that range (music has sounds in the speech range too). This hot spot in the spectrum is bad news because normalizing the finished audio will cause the speech range to top out before the rest of the spectrum can top out, meaning your bass guitars and high-frequency sound effects will sound unnaturally quiet compared to the doubled-up speech range. This spectrum imbalance makes it harder to “sound loud” even though you’re punching at -13 LUFS. The solution is to create a hole in the music tracks so that music and speech don’t combine to make that part of the spectrum sound twice as loud as it should be.

To do this with Shotcut filters, mute everything except your speech track, then play it back while watching the Spectrum Analyzer scope in Shotcut. Notice which bar in the graph is consistently taller than the rest. (Widen the window dock so you can see every label on the graph.) For my wife’s voice, she usually talks at 500 Hz. Next, we go to the music tracks and add a Notch filter with a center frequency of 500 Hz (or whatever your fundamental speech frequency is) and a bandwidth of 150 Hz. This reduces the volume of the music in the frequency range that your voice is talking in, effectively creating a “hole” in the music for your speech track to fill. Now, when speech and music are summed together, you maintain an even frequency spectrum instead of doubling up in the speech range. This lets you raise the overall volume louder than you normally could, and most importantly, increases the intelligibility (clarity) of the speech because the music isn’t drowning out the speech anymore.

If anyone happens to visit my wife’s channel, could you leave a shout-out that Austin sent you so she knows I’m supporting her? :slight_smile: Thanks! And yes, the video was mastered and uploaded in 4K as an H.264 CRF 16 file (Shotcut quality 68%) to get the higher bitrate from YouTube, but that’s a discussion for another thread.

3 Likes

The described workflow is interesting.
I use an equaliser with a high pass filter and a compressor in Audacity. What is the advantage of using a gain and a limiter filter? I do not use them because I assume that would lead to a squashed sound as you mentioned. In Shotcut I maybe adjust with the Volume filter if the integrated loudness is too low. I might try now to pay more attention to the short-term loudness which I just neglected so far.
The tip with the Notch filter is very helpful, I will keep that in mind. Thanks!

Until now I have set the video quality to 90 % because 59 % seemed to be very low. Fortunately, I found a forum topic which describes how to determine the CRF. I will not use a CRF of 5 anymore when the “sane” values are around the 20s :sweat_smile:.
I use 1440p for a higher quality which is enough for me.

Vegetable pancakes look tasty.:grinning:
Great technical advice on mixing audio with voice and music tracks. :+1:

I hate to be a stick in the mud, but, if you are downloading original films that others have made, you are stealing their copy right . You tube are trying to protect their clients. What would you think if you spent years and millions of currency doing it for someone to remodel it. Think about if it was done to you.
You tube gives you the advantage in watching it at you convenience. Please abide by their wishes.
Pete

I am confused whom you are replying to. This is a topic about audio levels and only one YouTube video was linked which is a video made by @Austin’s wife. Where do you see an issue?

@samth,

Great question. If you are recording just your own voice with the same mic in the same room every time, then you can dial in a high pass filter and a compressor and be just fine. What the gain and limiter filters give you is flexibility.

Let’s say you invite a guest to your next recording and their voice is much softer than yours. You now have to tinker with the compressor threshold to even get the compressor to activate on their softer voice, and then you’ll probably have to tinker with the makeup gain to boost them up to your vocal level. That’s a lot of tinkering. Other circumstances like using a new mic or recording in a new location could cause the same problem.

Ideally, the compressor should do nothing but compress. That’s its job. Playing hide-and-seek with the input volume is mind numbing and worth avoiding. In the case of YouTube videos, I’ve chosen -19 dB as the threshold because it is 6 dB lower than the reference level of -13 LUFS. Being a logrithmic scale, 6 dB means a change of half or double depending on which direction you’re going. So, my goal is to apply 3:1 compression to any signal that is louder than half the reference level. This is how we achieve the smoothing effect on vocals. Due to the 3:1 compression, a signal that used to hit reference level (6 dB above threshold) will get squashed down to only 2 dB, meaning I can safely apply makeup gain of +3 dB and not go over the reference level. I could technically do +4 dB, but my source audio has so many transients over the reference level that I don’t want to push it too much.

That’s a long way of saying I would like my compressor settings to be constant because I want a specific effect applied to my vocals. That’s where the gain filter comes in. If a vocal track is too soft to activate the compressor, or so loud that the compressor is squashing it, then I can change the gain going into the compressor to alter the sound. I can see what’s really happening by watching the gain reduction meter on the compressor settings page.

I put a limiter in front of the compressor as a counter-measure to the gain filter. Let’s say my vocal track has a moment where somebody drops a book on the floor and the waveform makes it all the way to the clipping point. If the vocals were soft and I boost the track by 3 dB, I just put that book drop transient over the clip point by 3 dB and there will be terrible distortion. The limiter is there to squash any clipping that could result from increasing the gain. Generally speaking, a tame vocal track with a brick-wall limiter will not squash or even affect the sound at all because it will only activate for the loudest of sounds. A limiter is basically a compressor with a high threshold and a ratio of 10:1 or higher. It’s not even activated most of the time. It’s just a safety net for when things get near the clip point. In the case of the filter chain above, I chose a limit of -3 dB because I’m applying +3 dB makeup gain in the compressor. This gives me reasonable assurance that applying +3 dB makeup gain will not create clipping distortion of its own during the loud parts.

So, using this convoluted filter chain :slight_smile:, the gain filter is all I really need to alter whenever I change recording locations or invite a guest. All the other filters can have fixed settings most of the time because they are tuned for a specific amount of input volume which is guaranteed by the first gain filter. Granted, this chain is still experimental and some more tweaks may happen before we go to YouTube with it, but we like the results so far in testing. The video I linked above was created before this new filter chain was developed, for anyone listening to its audio and not being terribly impressed.

Regarding the “S” bar on the loudness scope, you probably know already that the short-term loudness is defined as the last three seconds whereas integrated loudness is supposed to be the entire program from start to finish (which is why a Reset button is needed in Shotcut if you’re scrubbing around the timeline). Since speech is a fairly constant volume, the short-term loudness meter gives very fast feedback about how close you’re getting to your loudness target.

Regarding CRFs, you’ve probably seen general guidance on the Internet that CRF 18 is considered visually lossless. This is probably true for 98% of the population. The remaining 2% of the population can see minor artefacts and then they created accounts in this forum to talk about them. :slight_smile: Actually, it’s true that if you know what you’re looking for, you can see artefacts particularly during fast motion at CRF 18. That’s why I choose CRF 16 for my masters, where my definition of “master” is “flawless to the human eye and enough color information to support transcoding to lower resolutions without problem”. I’m not saying this is what everyone should do. I’m just saying it’s worked really really well for our situation. Other people have used CRFs in the low 20s with great success for direct playback, but those don’t transcode as well to lower resolutions, which is what YouTube will do to your uploaded master.

@ejmillan,

Thanks for stopping by the channel! You will definitely get your daily dose of veggies if you hang around for long.

@Peter_Dore,

I assume your post went to the wrong thread as there are no references to downloading films in this thread. Just to put your mind at ease, I was a professional classical and jazz musician in my younger days, and I know what it’s like to be the artist whose work is ripped off by others. So you don’t have to worry about me infringing on anyone’s copyright. I feel the artist’s pain and do my best to play by the rules. Although, when you’re a jazz musician, you’re kinda glad anybody is listening to your music even if they rip it off. :rofl:

1 Like

Magnificent and practical explanation. Although I don’t interviews (no guests) is an information to have at hand.
Thank you @Austin

I take my daily dose of vegetables because it is part of the Mediterranean diet (Spain). However, it is necessary to take care of our diet for a better quality of life.
Thank you for sharing this video.

Oh, a professional musician. :sunglasses:
Jazz is definitely not as popular as other musical styles. It’s hard for me to play something like that.
From my broken right shoulder, I started playing the bass through the PC (Ubisoft-Rocksmith 2014). Now it is one of my main entertainments and the daily practice has strengthened the arm musculature (with the activation of the movement of the fingers of the right hand).
I never studied music theory but although with many flaws, I publish my advances in YT.
My ability curve is falling (age doesn’t forgive), however my desire to learn is increasing. Life is short for so many things around.

I apologize for getting a little out of the pot with the thread thing.:innocent:

Thanks for the exhaustive explanation!
Since I have the same room and same mic for every session, I do not have a big variance in my recordings.
It’s impressive how methodical you approach this; I just try to get the recording somehow evenly loud and on a high enough level. I already use an enormous amount of time to record and edit a voice track so that mouth noises are reduced to a low level. Therefore I am too exhausted listening to the same sentences for the hundredth time to try achieving a reference level :sweat_smile:.

The sound of this video was maybe not very impressive but she was clearly audible and the background music was at the right level of actually being in the background; not gone and useless nor overpowering. I think that is what I would strive for if I were to use background music. (Unfortunately, my topics do not lend themselves to background music.)
What will change that you think the audience might be more impressed compared to current videos?

I thought because it is short-term that it might be too rough, but it makes sense that for speech S is enough for an estimation.

Honestly not, since Shotcut uses a percentage, I never was “tempted” to search for advice outside this forum. I recently found out about how to determine CRF in Shotcut and then of course searched for more information about it.
Did you try 1440p and were not satisfied with the results? I know that YouTube uses a “better” conversion for 1440p compared to 1080p and therefore I have chosen to upload with this resolution.

Oh, a professional jazz musician :smile:. Jazz is a nice genre which I like to listen to if I want background music while doing something. Not really very considerate but I am not an avid listener of music in general. Do you have per chance uploaded some pieces you recorded? I would listen to them; without any distraction of course :wink:.