Timeline markers add-on

2021-04-19_10.26.59

With @MusicalBox we created this small Shotcut add-on that you can install and use while waiting for the official Marker management tool that is currently listed in the Shotcut Roadmap.

INSTALLATION INSTRUCTIONS

1. If you are currently running Shotcut, save your work and exit the program.

2. On your computer, go to the Shotcut directory and find and open the timeline folder.

  • On MacOS: Applications>Shotcut.app>Contents>Resources>shotcut>qml>views>timeline>
  • On Windows: Program Files > Shotcut > share > shotcut > qml > views > timeline >
  • On Linux: Shotcut.app > share > shotcut > qml > views > timeline >

3. Locate these three files:

  • Ruler.qml
  • Timeline.qml
  • TimelineToolbar.qml

4. Rename them to:

  • Ruler.qmlORIGINAL
  • Timeline.qmlORIGINAL
  • TimelineToolbar.qmlORIGINAL
    (Don’t delete these files. You’ll need them if you decide to remove the Markers add-on)

5. Download and unzip this file on your computer:

Files_for_markers.zip (12.7 KB) -> See the new version in post 72

This version is for SC V21
A version for SC V20.09.27 is available at post 24

6. Copy the three files from the unzipped folder and paste them in the timeline folder of the Shotcut directory (the one where you renamed the three other files earlier).

7. You’re done ! Launch Shotcut and enjoy.

Notes: If for any reason you decide to remove the markers add-on from Shotcut, go back to the timeline folder and delete the Ruler.qml, Timeline.qml and TimelineToolbar.qml files. Then, remove the word ORIGINAL from Ruler.qmlORIGINAL, Timeline.qmlORIGINAL and TimelineToolbar.qmlORIGINAL.


MARKERS TOOL INSTRUCTIONS

To activate this extension, open the Timeline toolbar menu, go to Other and select the Show Markers Management option.


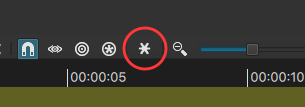
An additional button is added to the timeline toolbar.

Icon Marker


TO ADD A MARKER:

  • Move the playhead to the position where you want to add a marker.
  • Click on the Marker button and select Add a marker here.
  • You can place up to 5 markers, each one will have its own color.


TO NAVIGATE BETWEEN MARKERS:

  • Click the marker button,
  • Go to Move Playhead to Marker.
  • Select the desired marker.
    In addition to its color, the position of each marker relative to the origin (frame 0:00:00:00 of the timeline) is shown in parentheses.


TO DELETE A MARKER:

  • Position the playhead over the marker you want to delete.
  • Click on the Delete this marker option in the Markers menu.

You can delete all markers by clicking on the Delete all markers option.


The next option allows you to display a timer that shows you the position of the playhead relative to a reference (origin or marker).
To display this timer, click the markers button and select Display the timer.
To choose a reference, click on the timer and select the desired reference in the menu.
The outline color of the timer indicates to which reference the timer is associated to (black outline if associated to origin).

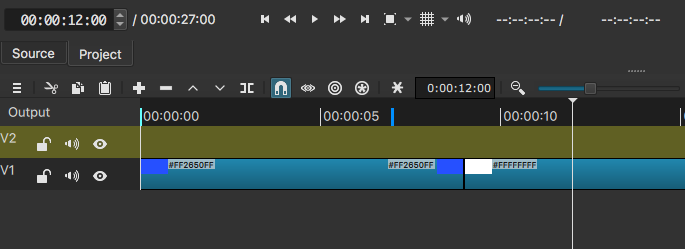
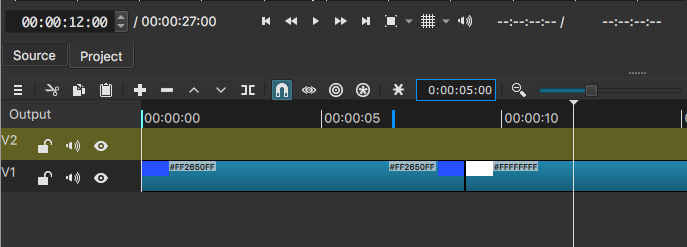
In the example bellow, the playhead is located at 12 seconds from the origin, as shown in the Player timer. The markers timer also displays 0:00:12:00, since it is associated to the origin (black outline).

Marker01

In this other example, the playhead is still at 12 seconds from the origin, but the timer indicates its position relative to the blue marker (5 seconds).

Marker02


BONUS EXTENSION

In addition to the markers tool, the add-on includes a second extension that allows you to move the playhead by a specified number of frames.

To activate this extension, go to the Timeline menu, choose Other and select the Show Playhead Assisted Displacement option.
An input field surrounded by 2 arrows is added to the timeline toolbar.
Enter the desired number of frames in the input box and then click on the right or left arrow to move the playhead forward or backward.
This option is particularly useful for setting transitions of the same length throughout your project.

15 Likes

Brilliant. I’ll be using this in future.

2 Likes

This is spectacular! I love the frame skip feature. Glad you included it.

2 Likes

This is amazing and a great surprise! Now you guys need to make a video!

2 Likes

Let me rephrase that, and return it to you:
Now you guys, use it to make your videos :smile:

I think the tool is simple enough that the instructions provided above are quite enough. I can’t speak for @Namna, but I feel that after… hmmm idk… 2 or 3 weeks of coding (Namna) and testing (me), we need a small break from the Marker tool :slight_smile:

@Elusien @Austin @bentacular Thank you

The idea came from the message of @MusicalBox

The first version was spread over almost the entire timeline and it took us a hundred personal messages exchanged over 3 weeks to come up with this version.

2 Likes

Vous avez eu de la chance, on a failli vous solliciter pour faire un petit tutoriel de présentation.
D’ailleurs il n’est jamais trop tard, un joli tutoriel en anglais sous-titré français et une intro avec une casquette SC ça pourrait être très utile pour le promouvoir

You were lucky, we almost asked you to do a little presentation tutorial.
By the way, it’s never too late, a nice tutorial in English with French subtitles and an intro with a SC cap could be very useful to promote it :heart_eyes:

3 Likes

I got your back!

1 Like

Nice :+1:

1 Like

I hope I did you justice!

4 Likes

Great !!!
Merci @Namna @MusicalBox, I was waiting for that for a long time !
(Maybe with a keyboard shortcut to insert them ?)
Merci encore

2 Likes

Nice work, but why not make it a parch & make github pull request to get it included in the upstream code.
making a file replacement hack is not a very useful way to work with open source development.
It is much better to work with the upstream developers to get the code included in the upstream code.
The next time upstream make changes to the timeline .qml then your changes will overwrite these upstream changes and might break things and all your great work will be wasted.

Thanks !

1 Like

Does it save the markers in the project file?

:+1: Excellent, good work and also done quickly.
Thank you very much @bentacular

Well done Ben. :+1: :+1: :+1:

There is a usefulness to the Markers timer.
If you click on the timer, a new menu opens, asking you to choose a reference.

If you choose the blue marker for example, a blue outline will appear on the timer and the timer itself will display the distance between the Playhead and the blue marker.

1 Like

No, I can’t, the file(s) where the shortcuts are stored are not in the “share” folder.

Alas no, I did not find a way to write to the project file.
You will be better able than I to make a more complete official version.
:wink:

1 Like

Je ne connais pas le fonctionnement de Github et je n’ai pas de compte.
Si vous avez un compte, vous pouvez bien sûr le faire pour nous.

I don’t know how Github works and I don’t have an account.
If you have an account, you can of course do it for us.

Bonjour,
It works perfectly, thank you for this tutorial, the explanations are for its installation and use are clear and explicit it’s great on your part.
Thank you very much for this tutorial.
cordially

3 Likes

Did a quick test, made a fork of the original shotcut git repository and made a branch and added the updated .qml files, it need some work because it they roll back some changes made to shotcut upstream

You can see the changes from upstream here.

It will properly need some rework before it can be accepted upstream, in other part of the code, so the number of markers is not limited to 5 and marks can be saved as part of the .mlt file.

But still a great prof of concept for how markers could look in shotcut from a ui point of view

5 Likes

Great add-on!

2 Likes