This filter is available since version 20.06.
About wavelet denoising
Wavelet denoisers are excellent when decent-bitrate footage comes from a decent-quality camera, and the only real problem with the footage is high ISO noise or high thermal noise or photon shot noise. Wavelets are great at targeting inconsistency at the pixel level, as opposed to algorithms that average patches or regions, and end up smearing pixels in the process. A nice side effect of this precision is that gradients (especially skin tones and out-of-focus areas) are rendered extremely smoothly, which is a benefit that cannot be overstated. My primary use for this filter is to clean up low-light video. It usually increases the level of realism in the process.
That said, wavelets are not the best tool for making VHS tapes or 19th-generation MPEG-2 videos look great. Wavelets will usually perceive blocky borders as intentional detail and preserve them rather than eliminate them, hence the need for a decent-quality start point. Use NLMeans or HQDN3D for restoration purposes.
Demonstration using the attached images
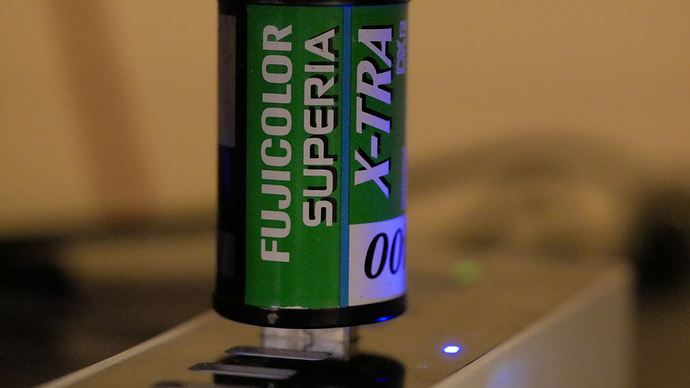
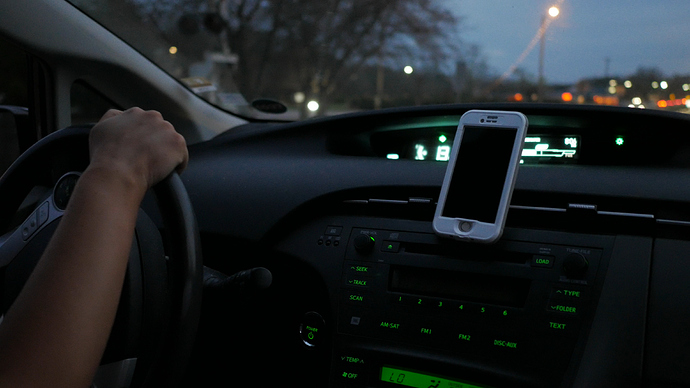
Below are attached two high-ISO images to give everyone a common reference point. Film.jpg was shot at ISO 8000, and Dashboard.jpg is a frame grab from an ISO 6400 video, both from Micro Four Thirds cameras.
Using a 2160p UHD video mode, add the following filters to Film.jpg and compare them one at a time to the original:
- “Reduce Noise: Wavelet” at Heavy preset
- “Reduce Noise: HQDN3D” at 70% spatial
- “Reduce Noise: Smart Blur” … any
Then using the same UHD video mode, compare Dashboard.jpg with these filters:
- “Reduce Noise: Wavelet” at Medium preset
- “Reduce Noise: HQDN3D” at 25% spatial
- “Reduce Noise: Smart Blur” … any
Naturally, this is best observed with a full-screen external monitor.
Observations to help choose between HQDN3D and Wavelet
-
On the Film image, Wavelet converted the noisy background into liquid gold. Very smooth gradients at the left and right edges. When HQDN3D tried the same thing at 70% strength, it got very close, but there were still some banding and macroblocking artefacts inside the gradients. This becomes more evident during video playback when the bands wiggle like worms.
-
On the Dashboard image, HQDN3D had to be dialed back to 25% because more strength would cause the skin tones to look like a plastic doll. Being scaled back this far (compared to 70% in the Film image) left many more bands, macroblocks, and color patches on the dashboard compared to Wavelet. Skin tones frequently prevent HQDN3D from being used at a higher strength.
-
On both images, HQDN3D shifts the image down and right by a noticeable amount (several pixels) compared to the original, which makes me very uneasy. When applied to video, the shift is not constant either, so the video shakes. I don’t know if this is the usual temporal ghosting issue or if this is an implementation issue. Maybe @Paul_B_Mahol has some ideas. It also happens with command-line FFmpeg. Meanwhile, Wavelet “just works” every single time.
-
The main downside of Wavelet is that it takes 2.75 times longer to process than HQDN3D (on my hardware at least). For longer clips, I sometimes process them separately, then bring them back into the main Shotcut project as DNxHR intermediates.
-
I could not find any combination of settings that made Smart Blur even remotely match the quality of HQDN3D and Wavelet. Smart Blur produced blocky gradients and blurry edges by comparison. As for export speed, it was only 30% faster than HQDN3D on a 16-core server, and identical in speed on a 4-core laptop. I struggle to find a use case for Smart Blur when much higher-quality options are available.
Why bother with another denoiser filter when Shotcut already has two:
HQDN3D and Wavelet use different techniques to serve different needs for different audiences. For video with significant motion, I’ve found that HQDN3D and Wavelet produce results that are visually similar. My eye can’t track the finer details during motion, so I’ll sometimes take the speed benefits of HQDN3D. But for a slow dramatic shot of a fancy restaurant interior in low light where the audience wants to see every detail of fine gold without artefacts… Wavelet scores a clear win. So this duo of filters satisfies the “Fast” crowd (HQDN3D) and the “Quality” crowd (Wavelet). Since my audience wants “Quality” 95% of the time, I made this interface to get it. Whether it’s the right choice for you depends on your use case.
Happy low-light filming!


