Please test the BETA for version 22.06

Rules of Participation (Important)

  • We are primarily interested in major bugs in new features and changes specific to this release.
  • We are also interested in major regressions since version v22.01.
  • Do not report about existing bugs that have not been indicated as fixed by this version.
  • Provide all feedback as a reply within this thread or as a GitHub Issue.
    If using a GitHub issue, make sure you indicate the version.
  • The beta period will end by June 10, after which there will likely be a release candidate.

Download

Get the beta release from this GitHub page that also includes the list of fixes, changes, and additions.

Thank You For Your Help!

4 Likes

Hi, I’m on Archlinux 64bit and I’ve managed to use the build-shotcut.sh script a few days ago. I had most of the requirements because I build a lot of my crucial packages from scratch. I only needed to install meson and nasm which pulled in any other required dependencies. Following the 2 stage build and (local) install as layed out in the thread where Brian and Shotcut helped s/he build worked very well. It makes a binary inside the folder which is then locally linked to the libraries required. I build mlt-git separately and it works well

I want to try the new multiple audio syncing multiple tool. A preliminary test showed it works. I need to spend a bit more time testing it for my use-case. But this new tool is very welcome and I will spend some more time trying it out and hopefully be able to provide feedback.

As already said thanks for “select all clip on track” and the fix of moving multiple clip!

And did a small donations, 25$. First time I donate to a FLOSS project in ages.

2 Likes

Some questions about Glaxnimate:

  • How do I extend a rawr clip after it’s created? If I create one in Shotcut and set the clip at 5 seconds then I want 10 seconds later on how do I get Glaxnimate to show 10 seconds in its timeline?

  • That video you posted on Glaxnimate was useful but will there be more tutorials for the basics of Glaxinmate by the time of official release? Most don’t know what Glaxinmate is yet so it’d be great to have at the very least some basics down on how to work with Glaxnimate so that people can start reaping the benefits of having it included once this Shotcut version is officially released.

  • Are Glaxinmate animations like vector graphics in the sense that whatever animation that is made in Glaximate always scales exactly to a Shotcut project’s resolution? If I create a Glaximate animation for a 720p Shotcut project can it be used for a 4K project and the image quality of the animation not degrade?

Some things I noticed while I was quickly giving this beta a spin:

  • With Align To Reference track, put the full length of clips that are meant to be aligned on the same track. Select them then process and apply to align the clips. Pic 1. It’ll only align one clip and delete the others. Pic 2. This is an issue if the clips that are on the same track that are to be aligned will overlap with each other. So I think it’s better to give some kind of warning to the user that in that kind of a situation the clips will overlap. This is not an issue if the clips on the same track that are to be aligned are fragments of different parts of the reference track since they won’t overlap.

  • The new keyboard shortcut Ctrl+Alt+A to select all clips on the current track should be added to Timeline > Selection.

  • Something I just noticed because of the above Ctrl+Alt+A is that in Timeline > Options it has “Ripple All Tracks” which turns on and off just one of the the 3 Ripple buttons, Ripple All Tracks. This is a holdover from at least a couple of years ago when there was no button for it on the toolbar. In its place, I suggest putting there a listing for Ctrl+Shift+R which turns on and off both Ripple and Ripple All Tracks. Also, there should be a listing under it for Alt+Shift+R which turns on and off all 3 Ripple buttons. Ctrl+Shift+R could be named “Ripple Mode & All Tracks” and Alt+Shift+R could be named “Ripple Mode, All Tracks & Markers”.

  • The new Timeline > Output > Properties > Edit just brings up the existing Add Custom Video Mode window. Maybe this could instead bring up a slightly modified version called “Edit Timeline Properties” that has everything in the other window except for the Name field? I suggest this because maybe it could confuse users who want to just edit the Timeline Properties and see a window that says “Add Custom Video Mode”. If a user wants to add a custom video mode then they could do it at Settings > Video Mode > Custom. This just to help avoid any possible confusion.

And may I suggest a different name for the Mask: Rotoscope filter? How about “Mask: Draw”? It’s essentially the same meaning but simpler and everyone understands what “Draw” means as opposed to “Rotoscope”.

You need to change the duration in Glaxnimate’s menu Document > Timing… You also need to change it in Shotcut Properties in the beta, but for the release candidate I will make it update the duration when the animation is reloaded (automatically on file save or with Reload button) and longer. Someone could have have made it longer. You are supposed to be able to make it longer in Shotcut, and the animation will loop to fill but I see that is not working. That is an easy fix I will make (both updating duration and looping).

will there be more tutorials for the basics of Glaxinmate by the time of official release?

Probably, but not by me except probably a new updated demo.

Are Glaxinmate animations like vector graphics in the sense that whatever animation that is made in Glaximate always scales exactly to a Shotcut project’s resolution?

Yes

I’m getting a crash similar to


with the nightly version 22.05.26 on Github Actions, which has a commit that addresses the above issue.

Open Other > Animation > OK on Shotcut dialog > Cancel on New Animation dialog
causes a crash. Glaxnimate doesn’t even launch in this case.

Tested on Windows 11.

The fix was for the OK case. Cancel is an easy fix for tonight’s build, and Glaxnimate is not supposed to launch in that case.

Technically (under the hood) it is not deleting them. It is placing them down, and then overwriting them with the next clip. That is why camera 3 survives. Camera 1 is placed. Then it is replaced with camera 2. Then camera 2 is replaced with camera 3.

This replacemnt can also happen if you just leave a random clip on the timeline (without selecting for alignment) and then one of the aligned clips is placed on top of it.

I am not sure if it is worth the effort and complication of adding the warning. This is a bad practice. Each camera angle should be on its own track. I have already written this into the documentation:

Anyone who does not read the documentation will soon learn it for themselves through trial and error. In case someone does not put each camera on its own track, then can use “ctrl-z” to undo the alignment and get their clips back.

Done

We could add Ctrl+Shift+R and Alt+Shift+R, but those are not actually “options” like the other entries in that sub menu. They are convenience actions to toggle multiple options. For that specific menu, it might make more sense to add Ripple (Ctrl+R) and Ripple Markers (Alt+R) since those are individual options.

I disagree because Ripple and Ripple Markers are already on the timeline toolbar. It’d be redundant. “Ripple All Tracks” was only put in Timeline > Options originally because at the time there was no button for it on the timeline toolbar. As you say Ctrl+Shift+R and Alt+Shift+R are for convenience but how convenient is it really if no where in the program itself does it let the user know that these shortcuts exist? Most people are not going to read the whole the keyboard shortcut list on the website.

We have a roadmap item to add editable keyboard shortcuts. So if we ever add that, that would expose them all.

I am not saying that the actions should not be in any menu. But they should not be in the “options” menu because those all map to individual options with checkboxes. We could not put checkboxes for Ctrl+Shift+R and Alt+Shift+R because they do not map to a specific enabled or disabled state. They map to three options that could be in different states. Maybe we could add them to a different submenu or make a new submenu.

Suggestion: Add audio react, so that bass(/audio) shake effect can be applied directly to the audio/mp3 file in project. Also, add audio visualization filters to react according to audio file in project.
Hope you’ll consider it. <3

Regarding this fix:
Final2

As soon as I undo a speed change on a clip a Crop: Source filter is applied to, the filter gets erased.

Tested on Widows 11.

Crash from Open Other > Animation (Glaxnimate) > OK > Cancel has been fixed, but the timeline becomes unresponsive after Cancel if there is at least one clip on it.

Steps to reproduce:

  1. Launch Shotcut.
  2. Open Other > Color.
  3. Drag a color from the Source tab to the timeline.
  4. Open Other > Animation (Glaxnimate) > OK > Cancel.
  5. The timeline becomes unresponsive like this:
    Final3

Tested with nightly 22.05.29.
Tested on Windows 11.

fixed

@brian, in the documentation you say that the Calculate Speed Adjustment can detect the clip speed difference up to +/-0.5%. Can this be increased to detect speed changes at a higher percentage? The specific use case that this increase could address is converting PAL speed to NTSC speed. When I try to do it as is, it does not calculate the speed adjustment accurately at all but it goes ahead with the whole process anyway as if it was correct and aligns the clip even though the speed calculation was off.

I and others in the past here have brought up the issue of PAL speed up versus NTSC speed. Here’s the wikipedia article on PAL and here’s the one on NTSC in case you don’t know what I’m referring to.

Media on PAL DVDs run faster than they actually should. So a movie for example that is 100 minutes runs about 96 minutes on PAL whereas on an NTSC DVD it runs at pretty much its original speed.

I found a good short explanation on the internet that explains why this is the case:

The actual speed of movies is 24 Hz, for NTSC 24 * 2.5 = 60, which is manageable because frames get alternatingly displayed either 2x or 3x.

For PAL which is 50 Hz only one out of 24 frames would have to be duplicated to preserve speed and that would not look good so they just sped the whole thing up to 25 hz to get an even factor of 2.

Here’s another quote regarding PAL speed up from wikipedia:

Motion pictures are typically shot on film at 24 frames per second. When telecined and played back at PAL’s standard of 25 frames per second, films run about 4% faster. This also applies to most TV series that are shot on film or digital 24p. Unlike NTSC’s telecine system, which uses to convert the 24 frames per second to the 30 fps frame rate, PAL speed-up results in the telecined video running 4% shorter than the original film as well as the equivalent NTSC telecined video.

Depending on the sound system in use, it also slightly increases the pitch of the soundtrack by 70.67 cents (0.7067 of a semitone). More recently, digital conversion methods have used algorithms that preserve the original pitch of the soundtrack, although the frame rate conversion still results in faster playback.

Conversion methods exist that can convert 24 frames per second video to 25 frames per second with no speed increase, however image quality suffers when conversions of this type are used. This method is most commonly employed through conversions done digitally (i.e. using a computer and software like VirtualDub), and is employed in situations where the importance of preserving the speed of the video outweighs the need for image quality.

Here’s the link to that wikipedia article.

If the percentage of speed difference can be increased then I could pass on to you in private message a movie file that I was testing this with in two sources. One in its proper speed and the other a PAL source that is 4% faster.

One thing that was nice to see was that the Align To Reference feature was still able to properly sync up audio tracks of movies together even if the audio track chosen to be aligned is in a different language (like a dub) than the reference.

Yes. Please send me some example files and the corresponding mlt project and I will try it out. I will test it out and see if it even works at all.

The speed correction algorithm tries different speeds to find the one that matches the best. So searching a wider range will take much longer.

Sent. :slightly_smiling_face:

I’m not sure if this is a bug or some thing im not learned in yet.

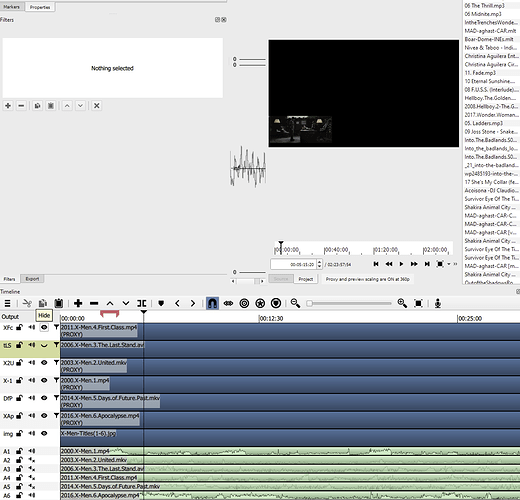
I have 6 movies imported to timeline.
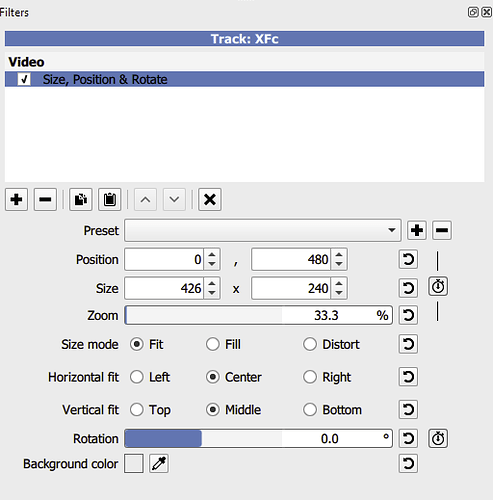
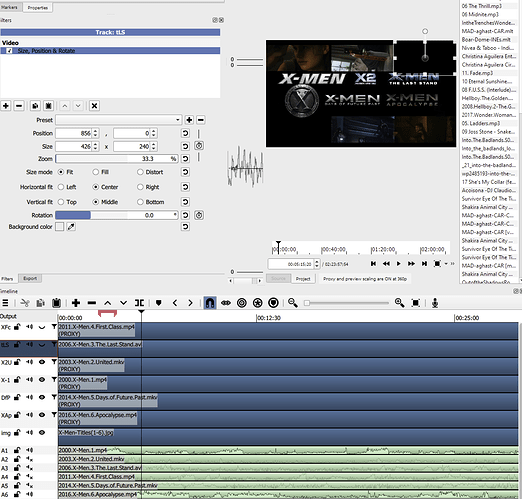
They are all scaled to 33.3% and positioned across top & bottom of stage.
Only 4 of the films can be visible at a time, the top two film layers block all others.
NOTE - the SIZE filter is applied to the Layers. This is because I potentially want to use a different one on the clip, swapping between them for editing sessions.

The 2 offending videos hidden.
Unhide one or the other of the top 2 video layers & all others go black.
I have Even tried using a Mask to make the exterior of the films transparent to no effect.

Renders prove it is not a display glitch.

I thought it might be color space differences between files but I moved the top 2 videos to the bottom of the stack and instead the problem reaffirmed at the top 2 videos again. Colors spaces vary between videos but resolutions and formats are the same.

Filters are all identical except for position:

I recreated this. It is not a regression in this beta as this problem occurs in past releases. Also, it is not specific to the Crop: source filter. It fails with any filter. You found a latent bug! I have a proposed fix for this, but I do not know if it will make it in the next release.