Hi folks,
I just uploaded my new “baby” … Part 1 of a tutorial showing how to create text logos featuring moving lines. I’ve used a different method to @awake’s excellent tutorial he posted recently, so I hope this will be a useful alternative for users.
I’ve put it on YouTube as “unlisted” for a day or two to give me a chance to proof-read it and check all is OK before setting it as a “public” video. To that end I’ve temporarily disabled comments because there’s a high chance I’ll find something I’d like to amend, in which case I’ll amend, re-upload and then allow comments.
If anyone is kind enough to want to leave a comment on Youtube, could you please wait until the “public” version is up and running? Thank you! Comments are welcome on this forum, though!
This has taken a long time and I’ve been working on it for quite a few weeks. I’ve tried to make it as concise as possible and I hope I’ve paced about right for the general public.
Any (constructive) advice would be welcomed!!
Really looking forward to getting down to work at Part 2!..
Great job. Excellent use of illustrations and good pacing.
I know you asked for constructive advice. I don’t have much to offer. My only comment would be to be mindful of the video length. It would be good if it could be shorter. But I do not have any advice of what to cut out because all the parts seem valuable to me.
Although you have split the video using YouTube’s “chapters” feature, a way to make it shorter as Brian has suggested — split each section into its own video and keep this particular video as a compilation or summary of sorts for those who want it all in one video.
This would leave you with 4 videos out of this part:
How to create the two resource videos
How to import the resource videos & manipulate them
Loved it. What a great tutorial.
I’m impressed by all the work you put into creating all the graphics you inserted in the video
Love that you took the time to include the hot tips. There are not essential to the actual subject of the tutorial but they’re a great and subtil way to help users of all levels improve their Shotcut skills.
About the length. I personally don’t mind long tutorial videos . This one shows a technique that is not particularly difficult to use, but you nevertheless need to learn all the steps.
If someone can’t be bothered to spend 25 minutes learning a new skill, then video editing is probably not for him/her. You don’t become a brain surgeon by watching 5 minute videos
Thanks for sharing. I learned a lot of new useful tricks.
Thanks, @brian for the feedback!! Much appreciated. Yes, I was aware of this and already tried to cut it down in length as much as possible but there were so many tips I wanted to show! It’s a difficult problem…
Thanks @GordC for the advice. Certainly an idea worth looking into.
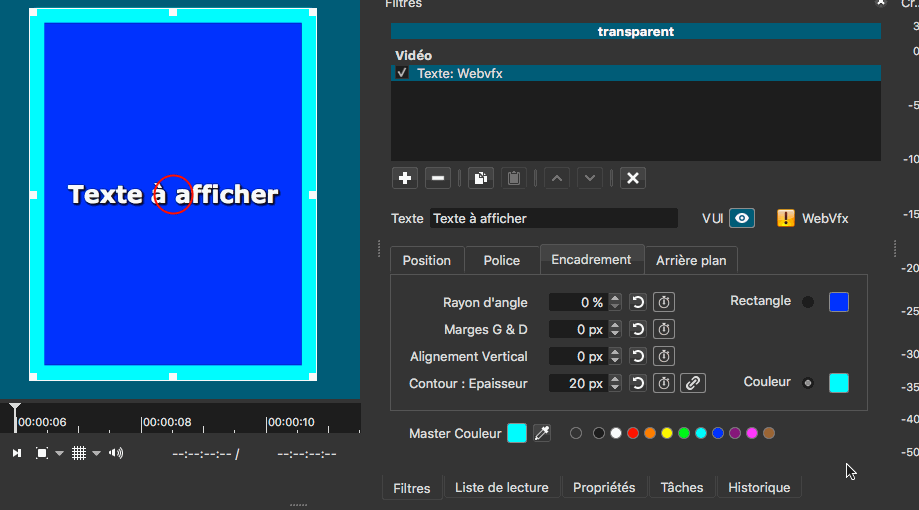
Thank you @musicalbox! I was proud of my “blue box” animated explainer graphics for the “Hot Tips!” Did you notice the white border on the blue box stayed constant even though the box itself changed in height? I had to think “out of the box” (excuse the pun..) to get that effect … I’d love to show how I did it! Maybe I could make another tutorial about it ..
I did notice!
But I thought that maybe you got your hands on @Namna 's Text: Webvfx filter, which would work very well for this kind of job.
Are you telling me you did it entirely with version 21.03.21 of Shotcut? (Namna’s filter works on versions 20.09.27 and older).
If so, I’m very intrigued. And yes, I would love to see how you did it. Please and thank you
C’est encore un très bon tutoriel. Personnellement je ne le trouve pas trop long, comme le dit @Musicalbox, on n’apprend pas en 5 minutes. J’ai même passé plus de temps avec les arrêts sur images et les retours arrières. J’ai aussi découvert l’utilité du filtre Mode de fusion. Effectivement, le filtre Text: Webvfx permet d’avoir le contour du cadre constant ou proportionnel à la hauteur selon l’état de la checkbox. Seul @Musicalbox a eu la version beta. J’ai encore quelques modifications à faire (je m’y met dès que possible). Je suis par contre plus intrigué sur la réalisation des boites rouge et bleu avec une forme trapézoïdale et un demi contour sans l’aide du filtre webvfx forme simple Bravo @Jonray et merci pour le partage
This is another great tutorial.
Personally I don’t find it too long, as @Musicalbox says, you don’t learn in 5 minutes. I even spent more time with the freeze frames and backspaces.
I also discovered the usefulness of the Blend Mode filter.
Indeed, the Text: Webvfx filter allows to have the frame outline constant or proportional to the height depending on the checkbox state.
Only @Musicalbox had the beta version. I still have some modifications to do (I’ll get to it as soon as possible).
I am more intrigued by the realization of the red and blue boxes with a trapezoidal shape and a half outline without the help of the webvfx simple shape filter.
Thank you for showing this interesting tutorial. I am not that experienced in Shotcut, so, and therefore I may be wrong. But lately we had a thread here, and I reported some findings on recording simple graphics and saving it as a video. And I noticed that saving with a GIF encoder got better results. The other encoders tend to do some artifacts on the edges. So I just suggest to use that when you export these graphics to a video.
SPR filter - distort, move around and resize to cover red colour and create top edge by slight rotation (say -3 degrees)
Copy clip, paste to V3
resize/move to create bottom edge. Slight POSITIVE rotation (say 4 degrees). (Artistic flair required…)
Repeat last 2 steps for the side edges.
Export as a frame (PNG).
Add white colour clip to V1.
Export the same shape as a white PNG.
Import the red and white PNGs - white on V1, red on V2.
Chroma-key to remove the black on the red clip.
SPR filter, offset the white PNG (10 pixels right, 10 pixels from top)
Add a text clip on V3 and position above red shape.
Export as a frame.
(Repeat all the above for the blue and purple boxes)…
New project...
12. Main video on V1
Import all 3 PNGs onto V2, V3, V4.
Chroma-key out the black.
13. SPR filter, keyframe the vertical positioning and horizontal movement.
DONE !
//////////////
Comment j’ai créé les fenêtres contextuelles de texte de forme irrégulière.
Créez 5 pistes vides (!)
Clip de couleur rouge sur V1
Clip de couleur noire sur V2
Filtre SPR - déformer, déplacer et redimensionner pour couvrir la couleur rouge et créer le bord supérieur par une légère rotation (disons -3 degrés)
Copiez le clip, collez-le dans V3
redimensionner/déplacer pour créer le bord inférieur. Légère rotation POSITIVE (disons 4 degrés). (Fil artistique requis…)
Répétez les 2 dernières étapes pour les bords latéraux.
Exporter en tant que cadre (PNG).
Ajoutez un clip de couleur blanche à V1.
Exportez la même forme qu’un PNG blanc.
Importez les PNG rouges et blancs - blanc sur V1, rouge sur V2.
Chroma-key pour supprimer le noir sur le clip rouge.
Filtre SPR, décalage du PNG blanc (10 pixels à droite, 10 pixels du haut)
Ajoutez un clip de texte sur V3 et positionnez-le au-dessus de la forme rouge.
Exporter en tant que cadre.
(Répétez tout ce qui précède pour les cases bleues et violettes)…
Nouveau projet...
12. Vidéo principale sur V1
Importez les 3 PNG sur V2, V3, V4.
Chroma-key sur le noir.
13. Filtre SPR, keyframe le positionnement vertical et le mouvement horizontal.
jonray, superbly done. I learned a whole bunch of new things that Shotcut can do! And having struggled through my own much, much simpler tutorial videos, I am in awe of the amount of work you put into these. I too would love to see “behind the scenes” for how you animated the hot tips.
One small suggestion, not for the tutorial, but for workflow - rather than C, B or C - Source - Drag, you can also use Ctrl-C and Ctrl-V to copy and paste without going through the Source. May or may not save any time …
I find it great @jonray, but does anyone know how to translate it into Spanish? My English level is very bad and I am very interested in introducing these effects to my videos. Thank you.
I hope this helps you @ANIE , I don’t know Spanish, it was only translated in google translate.
“Espero que esto ayude a @ANIE, no sé español, solo se tradujo en el traductor de Google.”
Translation
Cómo hice las ventanas emergentes de texto de forma irregular.
Crea 5 pistas vacías (!)
Clip de color rojo en V1
Clip de color negro en V2
Filtro SPR: distorsiona, mueve y cambia el tamaño para cubrir el color rojo y crea el borde superior con una ligera rotación (digamos -3 grados)
Copiar clip, pegar en V3 cambiar el tamaño / mover para crear el borde inferior. Ligera rotación POSITIVA (digamos 4 grados). (Se requiere talento artístico …)
Repite los 2 últimos pasos para los bordes laterales.
Exportar como marco (PNG).
Agregue un clip de color blanco a V1.
Exporta la misma forma que un PNG blanco.
Importe los PNG rojos y blancos: blanco en V1, rojo en V2.
Chroma-key para eliminar el negro del clip rojo.
Filtro SPR, desplaza el PNG blanco (10 píxeles a la derecha, 10 píxeles desde la parte hasta)
Agregue un clip de texto en V3 y colóquelo sobre la forma roja.
Exportar como marco.
(Repita todo lo anterior para los cuadros azul y violeta)…
Nuevo proyecto…
Video principal en V1 Importe los 3 PNG en V2, V3, V4. Chroma-key hacia fuera el negro.
Filtro SPR, fotograma clave del posicionamiento vertical y movimiento horizontal.