I have created a short (4 minute) video of how to use the “Chroma Key: Simple” filter to overlay a “green-screen” video on top of another.
I have created a short (4 minute) video of how to use the “Chroma Key: Simple” filter to overlay a “green-screen” video on top of another.
This is nice, thanks!
If you also master the Chromakey: Advanced filter, I’d really like to see a tutorial on that one. 
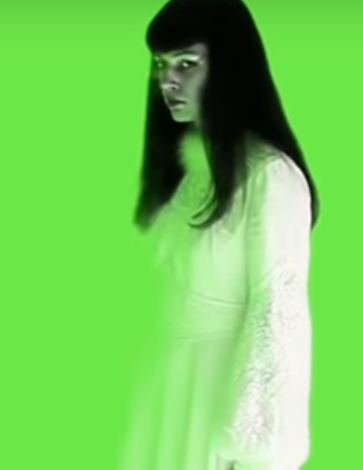
I have never been able to successfully chromakey a clip like this one for example. There is a video (see at the bottom of my post) where it is applied to a sort of haunted house background and it looks pretty amazing. The subject should be semi-transparent in the end result. Especially in parts like the dress here, where the green is kind of mixed with the white color.

Or here, when the subject get’s blurry:

Anyways, no matter what I do I all I get is results like this:
There must be a way to do better than that…
PS: I know I can add a Key Spill filter and a Opacity filter. It look better, but not AS good as I’d like.
This is the video I talk about above. Low quality, sorry. On the first part we see the effect applied. Then they show only the green version.
(Lower the volume first if you’re wearing headphones)
https://streamable.com/d8tmvp
hmmm… I’ve added a Alpha Channel: Adjust filter with the Blur mode and it’s getting pretty decent.
Should have thought of that before…
Better, but still not quite there…
The Chroma Key Advanced filter is a frontend for the “frei0r Select0r” filter. As you can see it has quite a few parameters. In general I find the following to work best in most cases:
Color-space: Red Green Blue
Shape: Ellipsoid
Edge: Normal (or Slope)
Operation: Overwrite (or Minimum, which is usful if you have other filters applied that modify alpha)
The various parameters (obtained from the source code and modified to correspond to Shotcut’s terminology) are:
Color to select:
the color to select. This is the center point of the selected color subspace.Delta XXXX:
These three parameters determine the size of the color subspace along each axis. Bigger value means bigger tolerance on that axis. For example, setting a high I delta (in HCI), will allow the selection of a specific color in both light and shadows, but will also discard most of the high-bandwidth luma signal, making the selection less spatially accurate.Selection subspace:
specifies in which of the two color spaces (RGB, HCI) the delta controls will work. HCI is separated luma/chroma (a cylindrical “Hue Chromacity Intensity”) space. It suffers from chroma subsampling, and will give less sharp results than RGB.
NOTE: chroma subsampling is not a fault of this plugin. Frei0r plugins work in RGB 4:4:4. If you supply it with a truly 4:4:4 video, it will produce perfectly sharp alpha from both color spaces.
NOTE: HCI is slow, because it has to calculate atan2() and hypot() for each pixel.Subspace shape:
determines the shape of the color subspace. Options are: box, ellipsoid or diamond. Box is the biggest of them (by volume) and diamond the smallest. Imagine an octahedron inscribed inside an ellipsoid, which is in turn inscribed in a box. The tips of the diamond touch the ellipsoid, and the box, at the center of the sides of the box.Edge mode:
has five options: “Hard”, “Fat”, “Normal”, “Thin” and “Slope”. “Hard” means the alpha channel will be thresholded to two values only, fully opaque and fully transparent. This is mainly useful for keying. The “Slope” mode is also intended for keying. It is particularly useful when keying partly transparent or fuzzy (like hair) objects. The remaining options (“Fat”, “Normal” and “Thin”) create a gradual transition between transparent and opaque. Alpha will be a function of the difference of color from the selected color, with cutoff at the delta points.The fatter the choice, the more the selected areas are filled towards the rim. This is useful with alpha controlled color adjustment tools.Slope:
When edge mode is set to “Slope”, this parameter controls a gradual transition between opaque and transparent. Slope=0 gives a “hard” key, increasing the value of this parameter increases the range of colors around the selected color, that will be rendered partially transparent.Operation:
determines the way in which the alpha channel will be written. The “minimum”, “maximum”, “add” and “subtract” options allow cascading of select0r plugins (or combination with other alpha-writting plugins), “overwrite” does not. These options combine the current selection with the pre-existing alpha of the source material. This way complex selections can be built.Invert selection:
When ON, the selected color will be transparent, as normally used with keying. When OFF (default) the selected color will be opaque, for exmaple for alpha controlled adjustment of that color only.
Thanks!