Change speed of a clip

Is it possible to change the speed of a clip so that it fits exactly in the space provided?


In many video editors, you can do this by grabbing the clip at the beginning or end and pressing Ctrl at the same time. This changes the speed, the clip either slows down or speeds up and you let go when the length fits.
If I do it with Properties > Speed > Apply, then it’s an eternal trial and error and it doesn’t really fit well.
How do you do it?

I first create a new track, copy the clip there, and then I adjust the speed. And when it is perfect, I create a new track at the bottom and move the original video to that track and than add the speed adjusted video to the track I want. And then I turn the view off for the bottom track and lock it. So I have access to both the clips.

1 Like

This is a perfect place to use the Time Remap filter. It only takes a few seconds to accomplish this task once familiar with it. The final setup is shown above.

Here’s the process:

  1. Make the clip fit into the space provided. This can be done by using the right-side clip handle to shrink the clip, move it into place, then expand the right edge to maximum width. Or the clip can be aligned on a higher track, split where the next clip begins, delete the tail part, then drop the remaining part down into the space provided. Either way, part of the clip will be chopped off by doing this, but that’s okay for now.

  2. Add a Time Remap filter to the clip.

  3. Go to the Keyframes panel.

  4. While holding down the Ctrl key, click and drag the ending keyframe diamond as high as possible (indicated by the green arrow in the screenshot above). If needed, hold the Ctrl key then click and drag the starting keyframe as low as possible. The Ctrl key locks movement to only the vertical axis. The Alt key locks movement to only the horizontal axis.

  5. Done.

The effect of this filter says “at the start of the clip span, seek 0% into the source video; then by the end of the clip span, seek 100% into the source video” and the filter figures out which frames to display to make that happen. The filter lets us “remap time” so that, in our case, 100% of the source video is played in a span of time that is shorter than the source video. This means frames will be dropped. Had the clip span been longer than the source video, frames would have been duplicated to pad the time.

Raise the starting keyframe diamond to start the clip partway into the video rather than the beginning. Lower the ending keyframe diamond to stop the clip before the actual end of the source video.

Note that Time Remap is not supported for source videos that have B-frames in them. Use “Convert to Edit-Friendly” to remove B-frames if needed.

1 Like

Thanks Austin, I thought you were the audio specialist - now I see you can do everything. Great.
I’ll have to work out your suggestions piece by piece. I’ll keep at it and work my way in vigorously. Time remap interests me a lot because it does stepless speed changes. That is great. So far, converting to “Convert to Edit-Friendly” files has put me off - the data gets huge. But I’ll give it a try.

It can also play video in reverse! And a flat line can be used to create a freeze frame.

Yes, that can happen. For the clips you’re doing, which don’t feature a lot of camera shake or high-action sequences, the Good setting in Convert should be sufficient for you. Those files are significantly smaller than the Best setting.

Hopefully, you won’t need Convert at all. It’s just the backup strategy if Time Remap refuses to load. The reason is usually the presence of B-frames.

Time remap overwhelms me a lot. But I want and will learn it, because it is a great tool to correct small speech errors. I had already used it in Kdenlive: Sometimes it worked, sometimes it didn’t. This may be due to the B-frames, K. does not require any conversion beforehand.
I will learn to understand Time remap, and with my good teacher it will even be a pleasure. Now it’s time to practice!

Hello Ar_D,
Thanks for the tip about copying the clip to a new track. That creates security.
But that’s exactly the problem in Shotcut: I have to guess which value I enter for Speed: 0.3000 or 0.37482? I have to try it x times until it roughly fits. But exactly the clip will not fill the gap, so single frames are missing and it will not work smoothly.
I also used to work with Vegas. You could just grab the beginning or the end of a clip and drag it with Ctrl, and everything fit perfectly.
I will work with Time remap, even if I have to get used to it first.

Hello @Austin,
Oh, Time remap is much harder to understand than I thought!!!
Is it possible to use time remap to change the duration of only one passage in a clip - before and after that everything should run at normal speed? If I decrease the speed at a certain point, the whole clip in the timeline should become longer. (And if I increase the speed, shorter).
So I just want to change the duration of a certain passage, mostly shorten it, to temporarily increase the speed in case of a short slip of the tongue? It wouldn’t do me any good if I could make one passage run faster, but have everything run slower in the passages before or after it.

Hello Dan,
Of course I had already discovered and read your text. I scare very much because I see how little I understand, unfortunately.
Please allow me to ask: Can I increase the speed (of a clip of a conversation, for example) with Time remap at one point without reducing the speed at other points? Then only the total length should be reduced. Can Time remap do that?

(Oh, Dan, what I also want to ask you: You are always there in the forum, even for the questions of beginners and are never annoyed by their little problems. You develop the software and lead the team. How do you manage all this?)

I am making great progress with Time remap. I can now reduce speed in the middle of a clip. Unfortunately, it then increases the speed in other places. How to avoid this?
And then I still manage to bring everything to 100% except for the desired spot. Now comes the big question: How should it be possible to play back a passage slower in between with a constant clip length of e.g. 15 sec. without making the clip longer? A miracle?

You described the problems perfectly. A clip with slow-motion in the middle needs to be made longer to accommodate the slow part. Also, the part after the slow-motion section will play faster than 1x speed to make up for lost time.

Here’s the process I use to introduce slow-motion sections. I admit it is a little convoluted. I would love to know if someone else has a faster way. However, this method is all-powerful for anything you want to do.

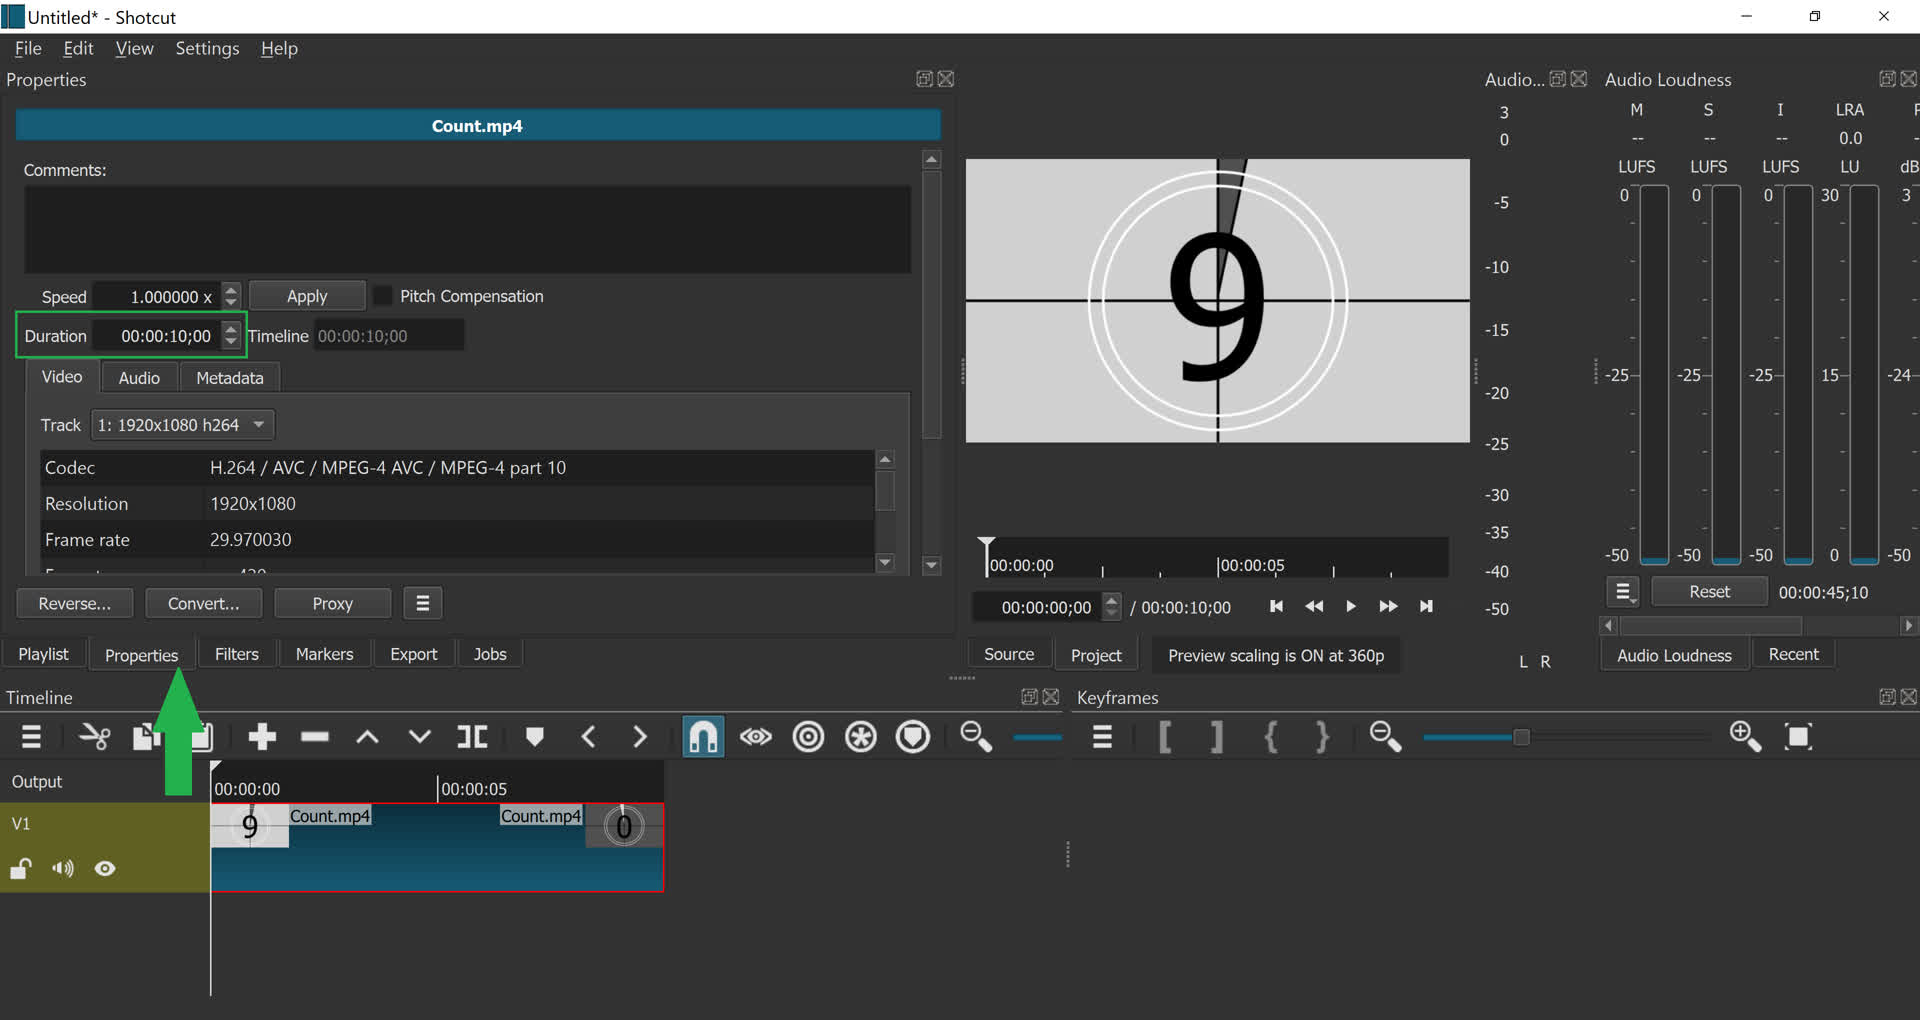
This is the start point of my project. The clip is the standard 10-to-Zero countdown timer, with one second of screen time per number. As noted in the Properties panel, the duration is 10 seconds.

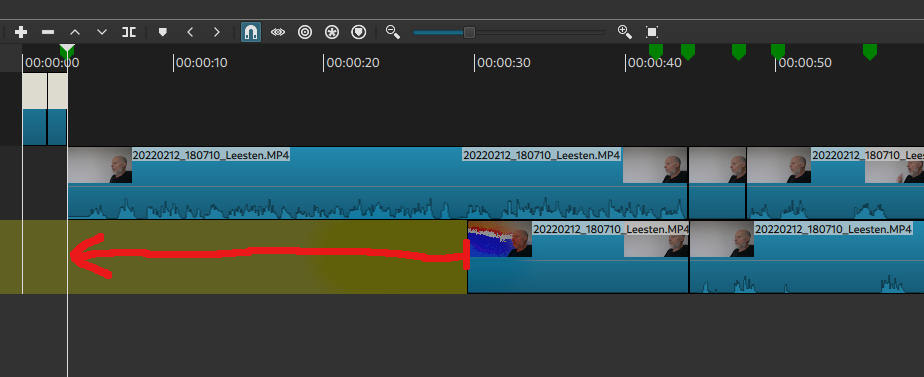
The clip must be extended to accommodate a slow-down section in the middle. This is done by manually changing the Duration in the Properties panel to something large enough to hold my modifications. Sometimes I just double the value and call it a day. Then, I stretch the clip on the timeline from the 10 seconds it was imported as, into the 20 seconds I manually changed it to. The extra 10 seconds will be filled with a freeze frame of the clip’s last frame. Now, we have room to work.

Note: If doing Time Remap on a busy timeline, it may be best to create a new empty track at the top and get this clip set up with plenty of open space on the sides.

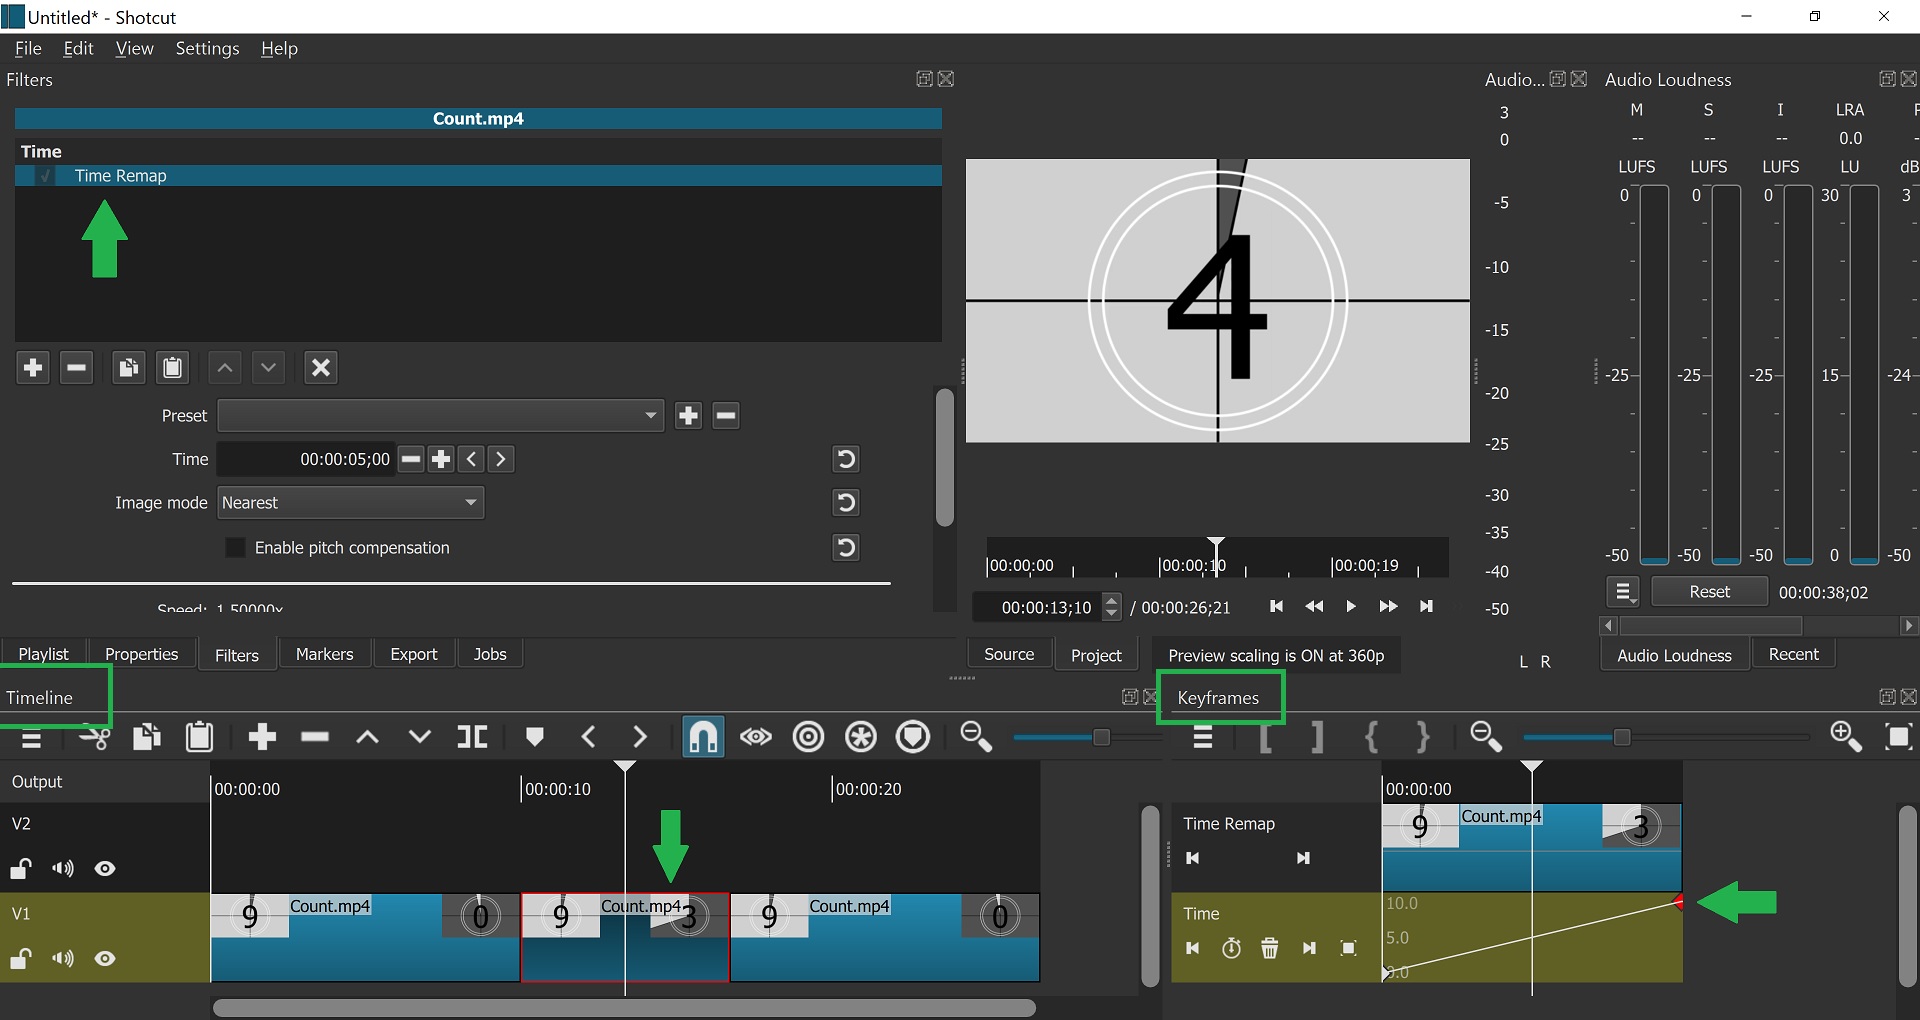
Now I add the Time Remap filter. Notice that the speed defaults to 1x, but that 1x applies from 0-20 seconds rather than 0-10. This is convenient because it gives us a keyframe automatically at the very end.

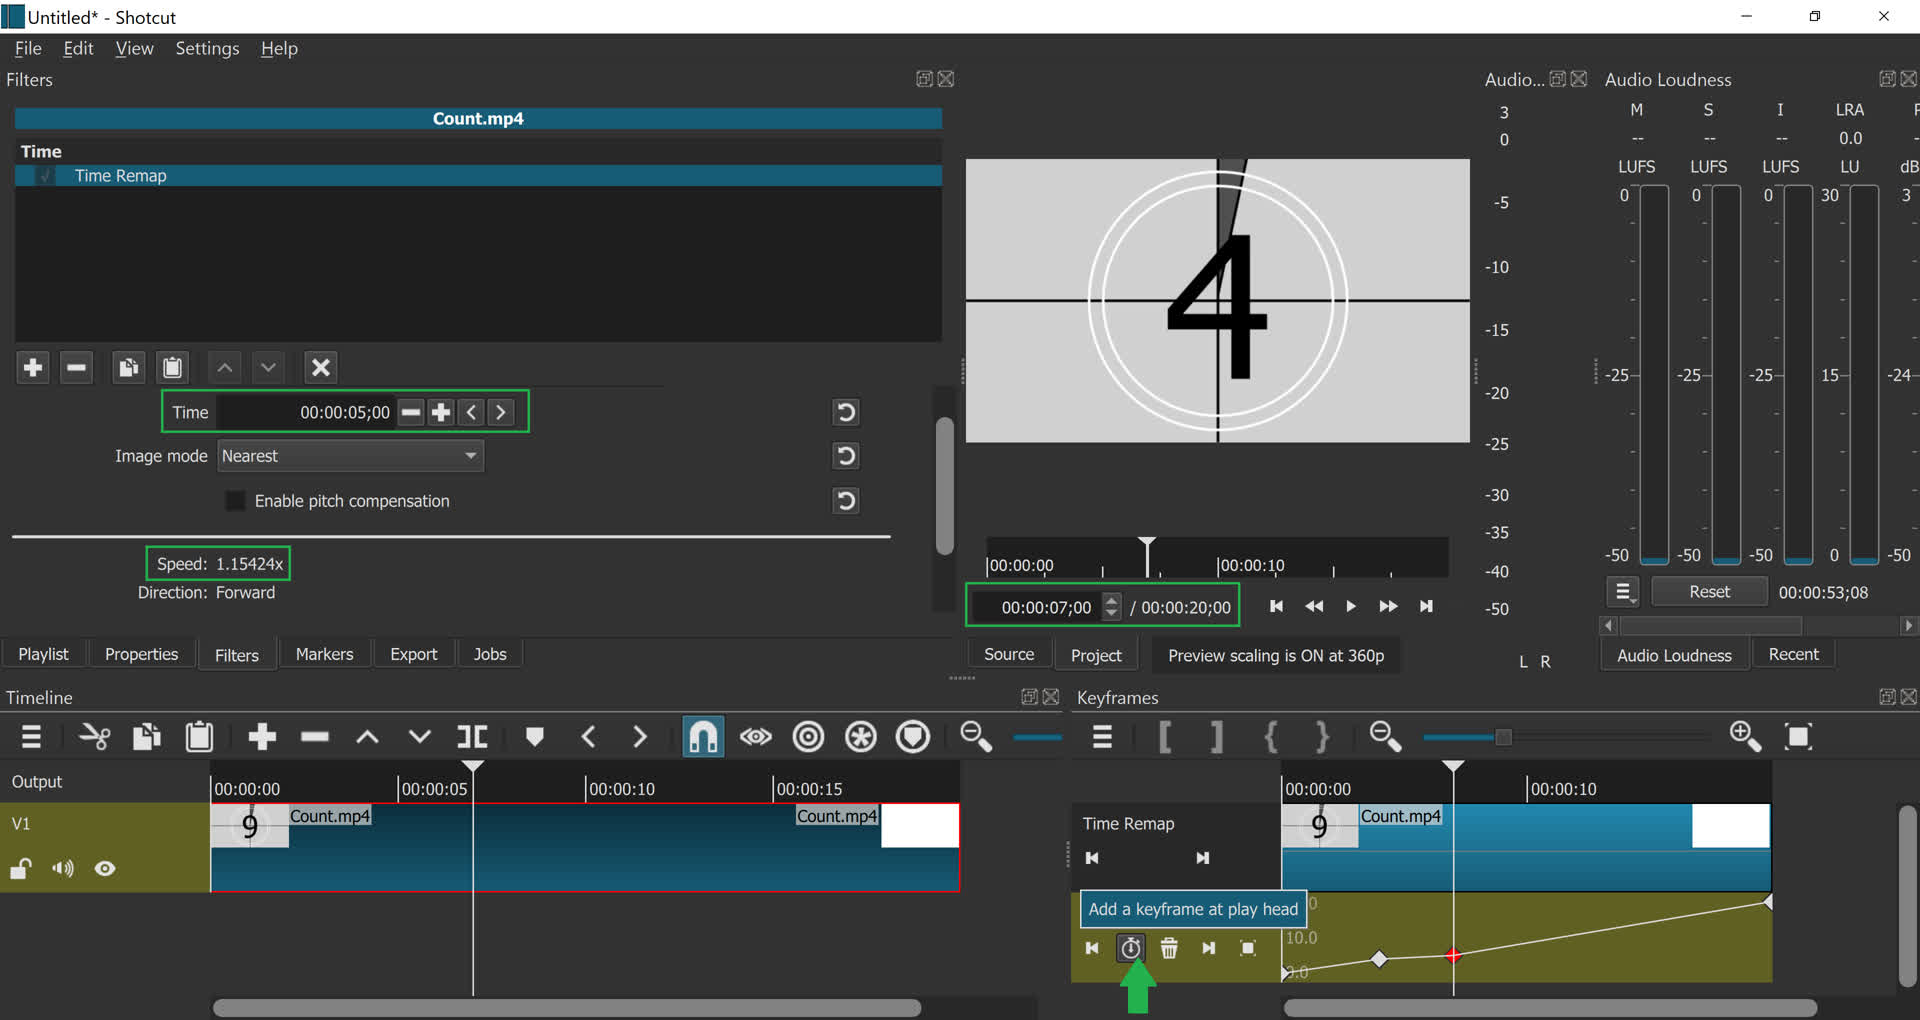
For this example, I want the #5 in the countdown to take three seconds instead of one second. I put the playhead at the beginning of the #5 section, add a keyframe at the playhead, and note that #5 started at the 4;00 input timestamp in the Properties panel.

Now I advance the playhead by three seconds. I want this to be the end of #5 and the beginning of #4 in the countdown. But it currently shows #2 because the video is playing at 1x speed. So I drop a keyframe here and change the input time to be 5;00 (which is an advancement of only one second since the last keyframe). As we can see in the Keyframes graph, we have a flatter spot on the graph that represents the slower passage of time.

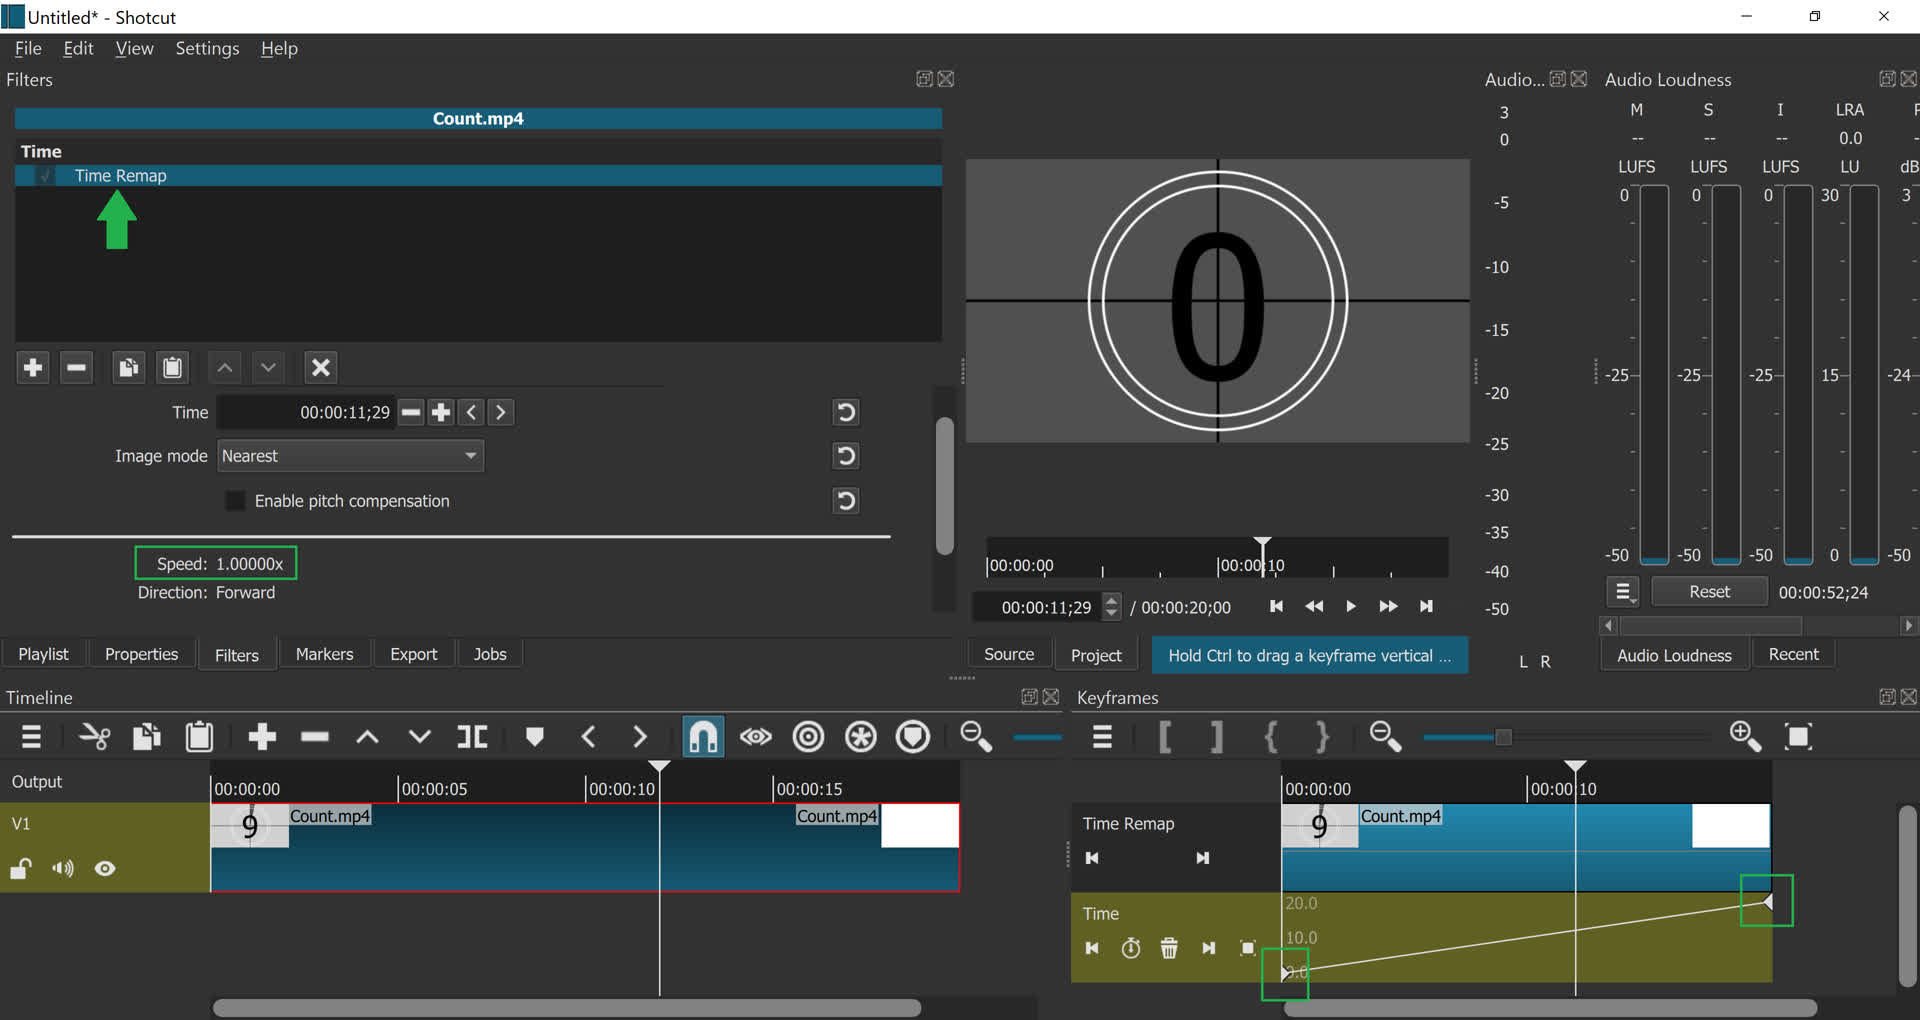
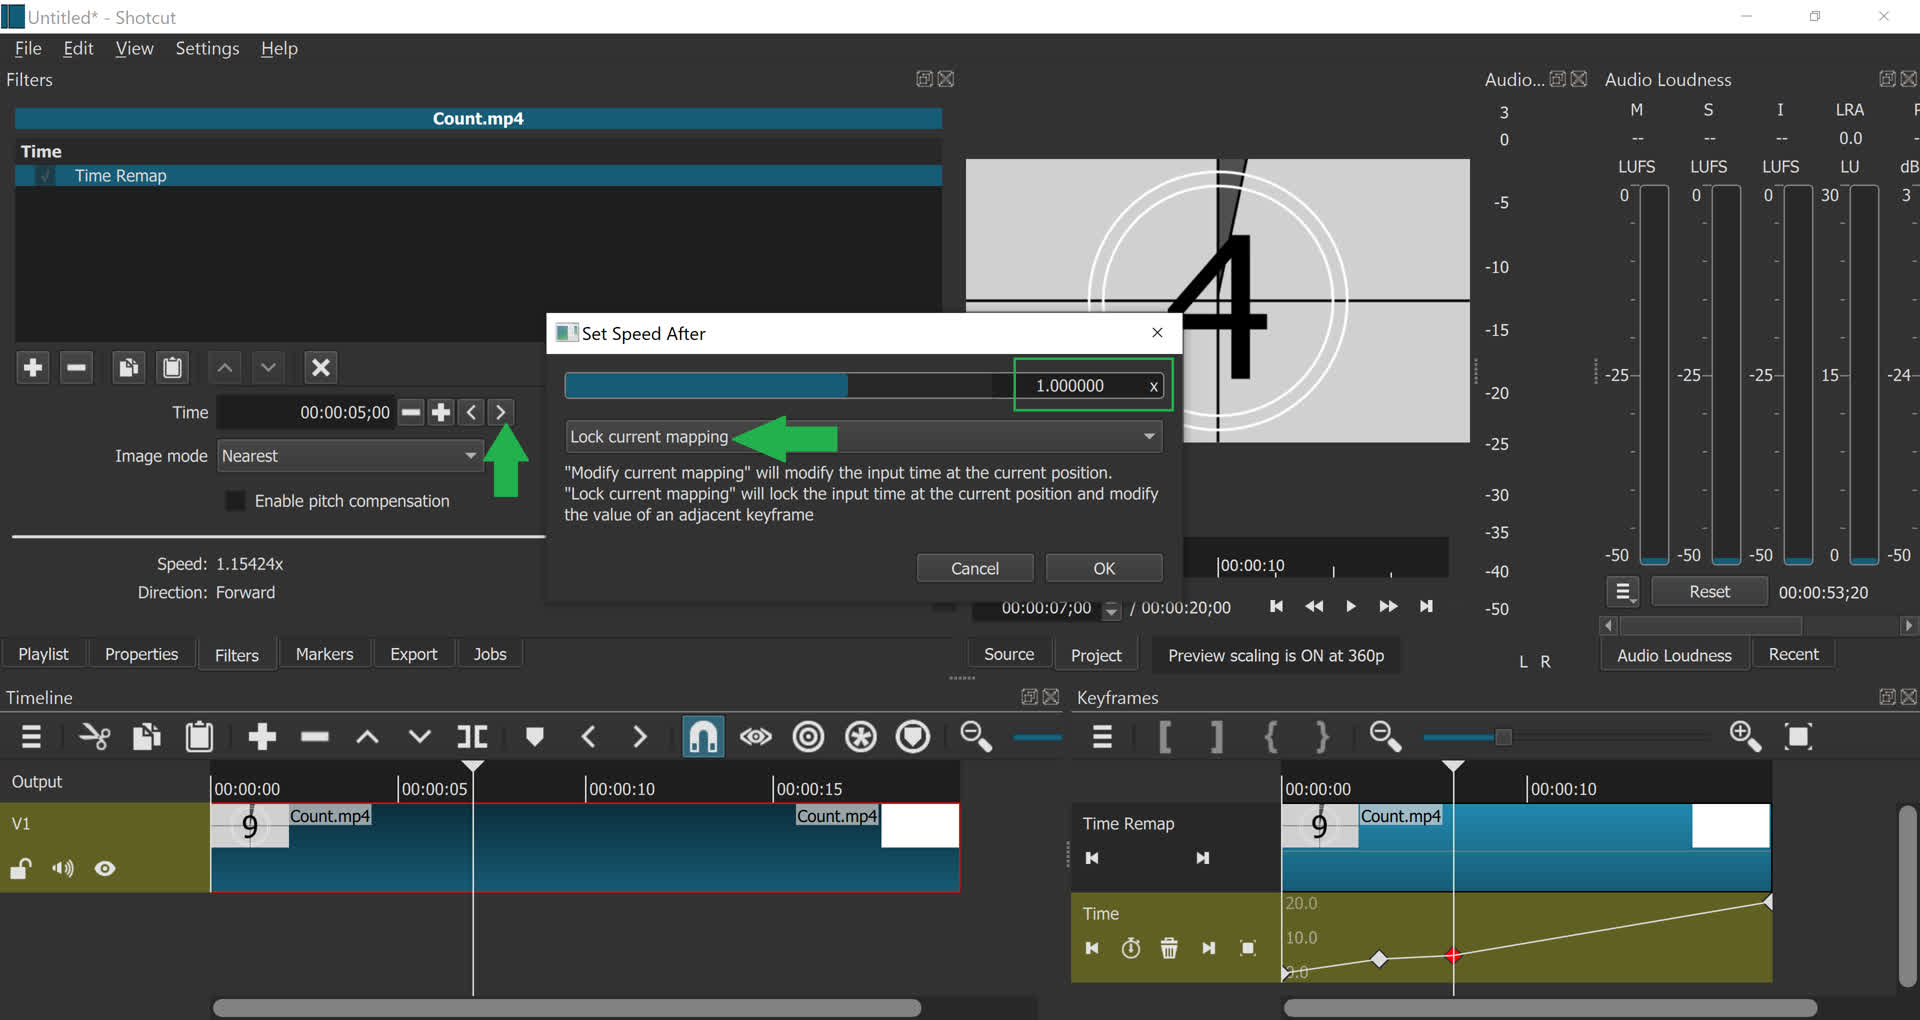
However, we also notice that the speed of time for the remainder of the clip has changed to 1.15424x in order to make up for the slow part and still reach 100% playback by the end of the clip. What we need is a way to change the “outgoing speed” of this keyframe to 1x instead of 1.15424x.

Click the right-arrow button in the Time Remap filter to get the Set Speed dialog. By choosing “Lock current mapping”, we tell Shotcut to modify the next keyframe in whatever way necessary to restore the graph to 1x playback speed. Visually, this means the final keyframe will be lowered, which means 100% playback will not be accomplished by the time the clip ends. This is okay, because the end of the clip is a freeze frame that nobody is going to see anyway.

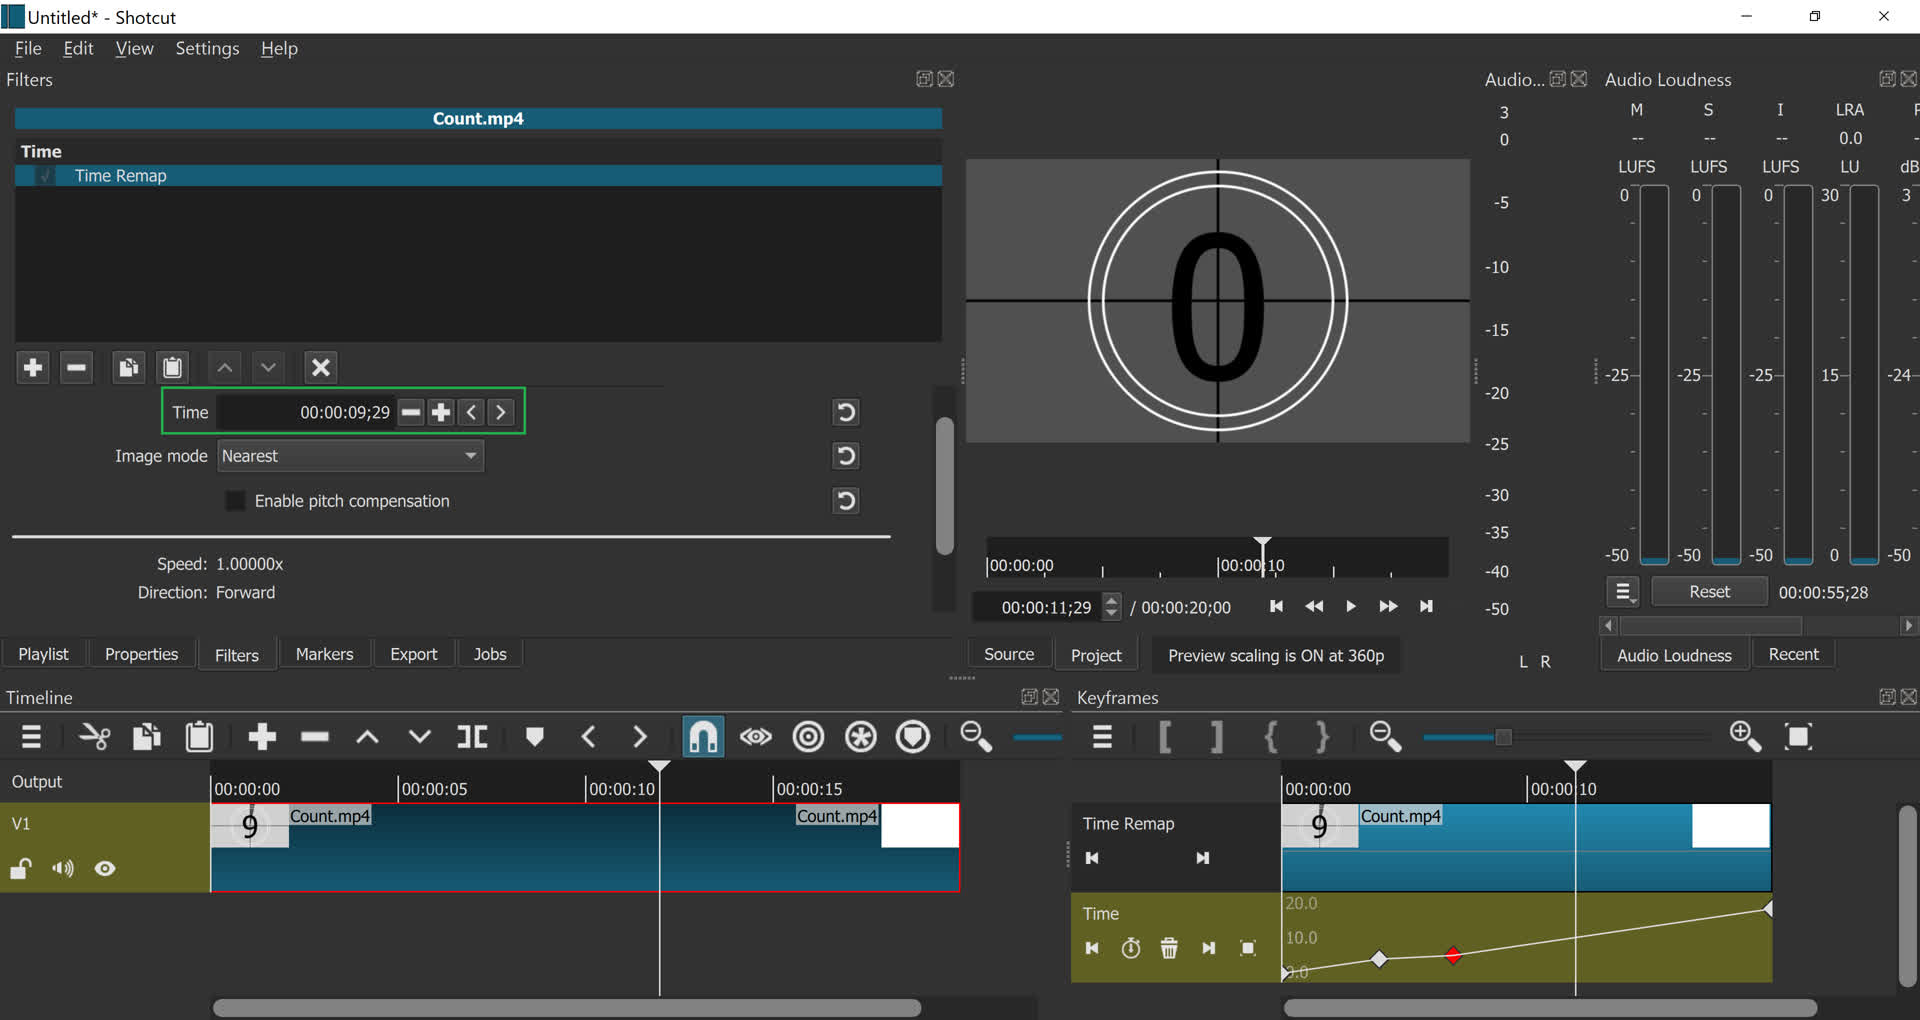
Now that the graph is at 1x speed after the slow-motion section, all we need to do is find the end of the clip (or whatever point we want to stop at), and hit the “o” key to mark this as the clip’s Out point. The freeze frame portion will now be chopped off, and the clip will look normal.

Depending on where and how these settings were edited, keyboard focus may not be on the timeline, causing the “o” shortcut key to not work. Either click in the timeline area, or use the Shift+Esc shortcut to reset focus for the “o” key to work again.

At this point, the clip can be moved to its final position in the timeline among other clips.

The main complication is first extending the clip to give yourself room to make adjustments. It’s pretty straight-forward after that. Not to say that it’s simple or intuitive, but at least the tools work as expected once the clip is long enough to play around.

Here is the countdown clip if anybody wants to follow along with the screenshots. The player widget provides a Download option.

1 Like

You are the greatest! But do not think that I immediately understand what you wrote to me. I need some time for this, I will take it. First translate, then comprehend, then hopefully understand. I just want to answer you immediately and assure you that you are not struggling in vain for me and my understanding. I am looking forward to it.
(Tell me, in which country do you live? With me you know it for sure already: D).
Micha

How do you add time remap to this count? It does not work for me.


Question: How do you make a Count.mp4 from a Count?

1 Like

Export the timeline to a file called “Count.mp4”, then open this video in Shotcut.

1 Like

Or click the 3 dots in Austin’s video, select download and use that.

Hello Austin,
I did it!!! I followed your very detailed explanation and everything worked precisely. I’ll practice some more and then get to work on a project where I need a part faster or slower. I am curious. Big thanks to your efforts.

1 Like

Time remap can apparently be explained more simply than some claim; provided you really want to make others understand it, as @Austin does.

But one big question remains: For me, the speed is 1.0x, then 2.0x, then 1.0x again, for example, so it’s jumpy. If that doesn’t give you smooth transitions, then you could just as well split the clip into three parts and give the middle one the desired speed, then put the parts back together. Why the effort with time remap?