Then you would make up various lengths of presets for that specific filter. After you select a preset, you can still edit those settings via the Keyframes window. It doesn’t change the preset by doing so.
If you have a 1:20 clip
using a preset set for :10, :30, 1:20
then shorten the clip to :30, then the value you have set at 1:20 will not be seen.
Shortening the clip doesn’t change the values of the preset.
If you were to use Fade 1 preset on Opacity, you can go into keyframes and move each keyframe node. It doesn’t update the Fade 1 preset at all. After you move each the nodes where you want them, just simply save with a new name.
You can modify preset values manually with a text editor (e.g. Windows Notepad). All of the filter preset locations have been listed here.

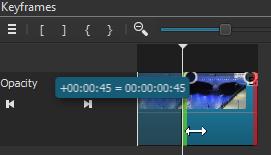
In this preset I have set for a 2 second clip. (60 fps)
0:00 - 0:15 Level 0 (No Change)
0:15 - 0:45 Level 0 to Level 100
0:45 - 1:00 Level 100 (No Change)
1:00 - 1:50 Level 100 to Level 0
Not unpredictable, because that is filter trimming.
If you trimmed the filter from 0:00 to 0:45 (left most trim handle moving to the right) using Fade 1 preset, the opacity filter will only start showing at :45 with a level of 100% (Solid white screen).
When you start making multiple presets, it might be wise to come up with a naming format that best suites what you need to easily find the right preset.
Examples:
_2s blue (Starting with _ makes the filter go to the top of the preset list).
2s fade
3s fade
4s fade
2s white
2s blue
I hope this helps. With some practice you’ll be a professional at keyframes and presets in no time. ![]()