Need to create video in less than 20 hours, and screwed

Also I updated the thumbnail, mostly visual effect but in case it’s needed for editing my .mlt file linked above:

@ineedhelp, did you try @Namna’s approach?
Aside from the transition showing some of the pink colors of the background (thumbnail.png), it solves pretty much all the problems.

That was my latest attempt - it resulted because of step 1, adding the background image to V1, making the scrolling pictures in front invisible, which I could only solve by putting the “screen / overlay” bend mode back on, which makes the entire background come through and renders the whole purpose of the video useless.
I wish I could add bend mode to track V2, I feel like it would potentially solve this issue, but can’t seem to work around it.

Putting aside the conventional way of adding transitions, I came up with this:

It involves using the Mask: Simple Shape filter (with keyframes) instead of transitions.
But honestly, because your images don’t have the same height, it’s a pain in the butt to implement.

If you’re transitioning from a tall image (1.png) to a shorter image (2.jpg):

  • You need to get a 1-second copy of 1.png an put it on V2 on top and at the beginning of 2.jpg.
  • To move the mask, you need to keyframe the Horizontal value from 50% to 200%

If you’re transitioning from a short image (2.jpg) to a taller image (5.jpg)

  • You need to get a 1-second copy of 5.jpg an put it on V2 on top and at the end of 2.jpg.
  • To move the mask, you need to keyframe the Horizontal value from -100% to 50%

If you had to make transitions that way between only 4 or 5 images, that wouldn’t be so bad.
With 40 images though? It’s doable of course, but that would involve a lot of work, time and hair pulling.

But… It works. And it meets (I think) all your requirements.
I don’t have time in the next few days to make a step by step tutorial for you, but I’ll share my project files. Maybe you can figure it out by studying it.
Good luck :slight_smile:

Mask-transitions.zip (5.6 MB)

3 Likes

Thank you for the efforts, but it seems the images refuse to stay a consistent size when transitioning - as I am spending too much time and it seems that this software is incapable of doing the kind of editing I need, I can only think of one final last resort which almost certainly won’t work, but it is all I have got - will post the inevitable results of what is probably my final attempt - sadly, I thought I was getting close to a solution but it doesn’t seem like it any more, either way will update soonish.

What do you mean by that?

The images in your video are not the same size as I have gone over earlier as in the following video example I gave:

Hmm… OK, but I used the images you provided. And I seem to remember that you didn’t want to change the size of these images, because if you did, you’d loose important parts.
I understand that.
But that problem should have been dealt with at the very beginning, when you cropped the images from the original sheets of music. They should have all been the same size from the start.

Well, I don’t know. Video editing is a bit like baking a cake for example.
If you use the wrong ingredients, you can’t blame the oven if the cake don’t turn out as expected.

2 Likes

There in lies the difficulty - if I have to crop the images to fit the music, how am I supposed to make them all the same size?
And regarding the last comment, either the software is fit for my purpose or it isn’t - I could understand if I didn’t have the knowledge and ability to do what I need to do, but no one else can seem to figure it out either. Unfortunately

In my opinion, @MusicalBox already gave the best solution.

1.jpg is 1648x458
2.jpg is 1631x408
5.jpg is 1579x585

By default, Shotcut will resize each image to max width or height. You need to apply the Size, Position & Rotate filter to force Shotcut to not resize each photo.

Preparing images through a graphic editor such as Gimp or other programs as MusicalBox has explained, you will avoid all resizing issues.

I used your 1.jpg image with Gimp to make a transparent png image.
Example: (Image may appear to have a white background in the forum)

Used in Shotcut with no filters:

More on Gimp

Here is the file I created with Gimp. 1 border.zip (1.5 MB)

When you create a new project with Gimp, make sure you have these settings:

There are a few awesome people doing tutorials on Gimp. Here is one of the people I learned quite a bit from.
https://www.youtube.com/@DaviesMediaDesign/playlists?view=50&sort=dd&shelf_id=8

But this method just creates yet another issue, of the images not stretching to the sides of the screen,
see my last video attachment to understand what I mean.

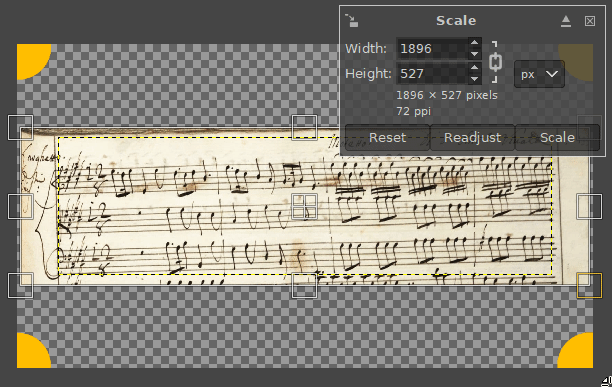
Your images are not proportional.

For a better visual, these are your image sizes within a 1920x1080 resolution. Along with resolution, there is what is called Aspect Ratio, and all three of your images have different Aspect Ratios.

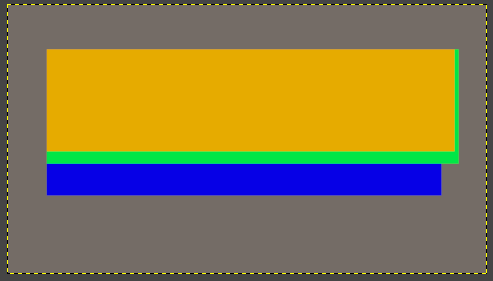
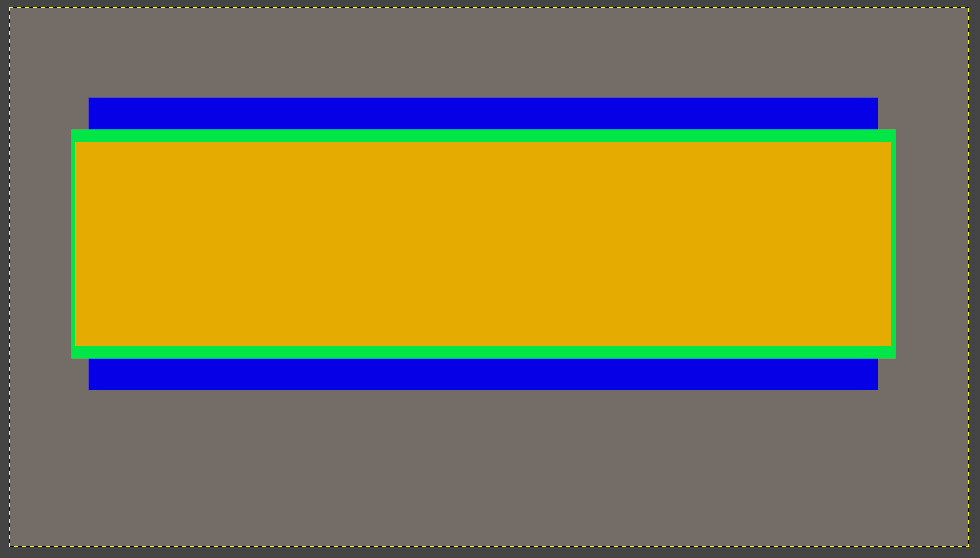
With Gimp and other graphic editors can set a very precise placement of where you want things to be at. You can also scale each graphic layer to what you want.
gimp-2.10_2023-04-13_07-48-30

Perhaps a different approach is to place color on a track below the jpg images. Adjust with the Size, Position & Rotate filter, set to “Distort”. Adjust to the jpg image with the tallest height. The color clip could be split and applied with other filters.

RV 630 - Nulla in mundo pax sincera (Autograph) - Scrolling score - Repaired.mlt (68.7 KB)

1 Like

While it isn’t the most ideal, it is one of the better options posted so far - I have been in contact with the maker of the score-video I am imitating, and I am pursuing his method to try and absolve all of my issues with this software.

At this point I am on the final resort, to re-do the entire score from scratch. I have decided I will have fade transitions for each of the 3 three movements, therefore the aspect ratio need only be the same for all images of the 1st movement, all the second movements the same ratio, the third the same, etc.
Though having issues as usual, need the width for all images at 551, but of course the transparency makes the image much larger.


issue1part2

lucky shotcut is easy to use …
and many videos on your and mine youtube channel :slight_smile:

I would describe it as pain-in-the-ass, rather than easy to use, but I guess sacrifices have to be made

any new tool needs a learning time … not in 24hs :slight_smile:

You probably haven’t noticed but this thread is weeks old, not 24 hours…

This topic was automatically closed after 90 days. New replies are no longer allowed.