WARNING TO MOBILE USERS - lots of images in this post!
I was asked on another thread if there was a tutorial for some of the zoom & pan effects I demo’d a while ago, so here it is. Please forgive any typos  I don’t claim that this is the ONLY way of achieving these results, but I have found it to be quite straightforward working this way and it quickly became second nature. Some of the principles in use can also be used when applying filters other than size&position.
I’ve kept it quite basic because I believe that once a user has grasped the idea they can expand upon it for themselves to produce more complex and imaginative effects than these. I know some of us are already well up to speed on this, but for those that aren’t, I hope this will go some way to making it clearer.
This piece concerns animated zooming and moving objects/video (which also can be used for panning) when the boundaries or object handles may be outside the visible screen area. What I hope to do is explain how I achieved the two effects shown in the video below.
- Zoom into the centre of the screen at 200% of original size.
- An object (video) smoothly travelling from offscreen on the left to off screen on the right
.
These effects can be combined with one another to allow zooming in on a particular area of interest or to zoom then pan across etc…
First the video:
The key to working with offscreen objects is to think of the visible screen as a static camera and manipulate the image it’s focussed on - bringing it closer/zooming in (enlarging the image/video), further away/zooming out (reducing the image/video) or moving the object in relation to the virtual camera to give the appearance of panning.

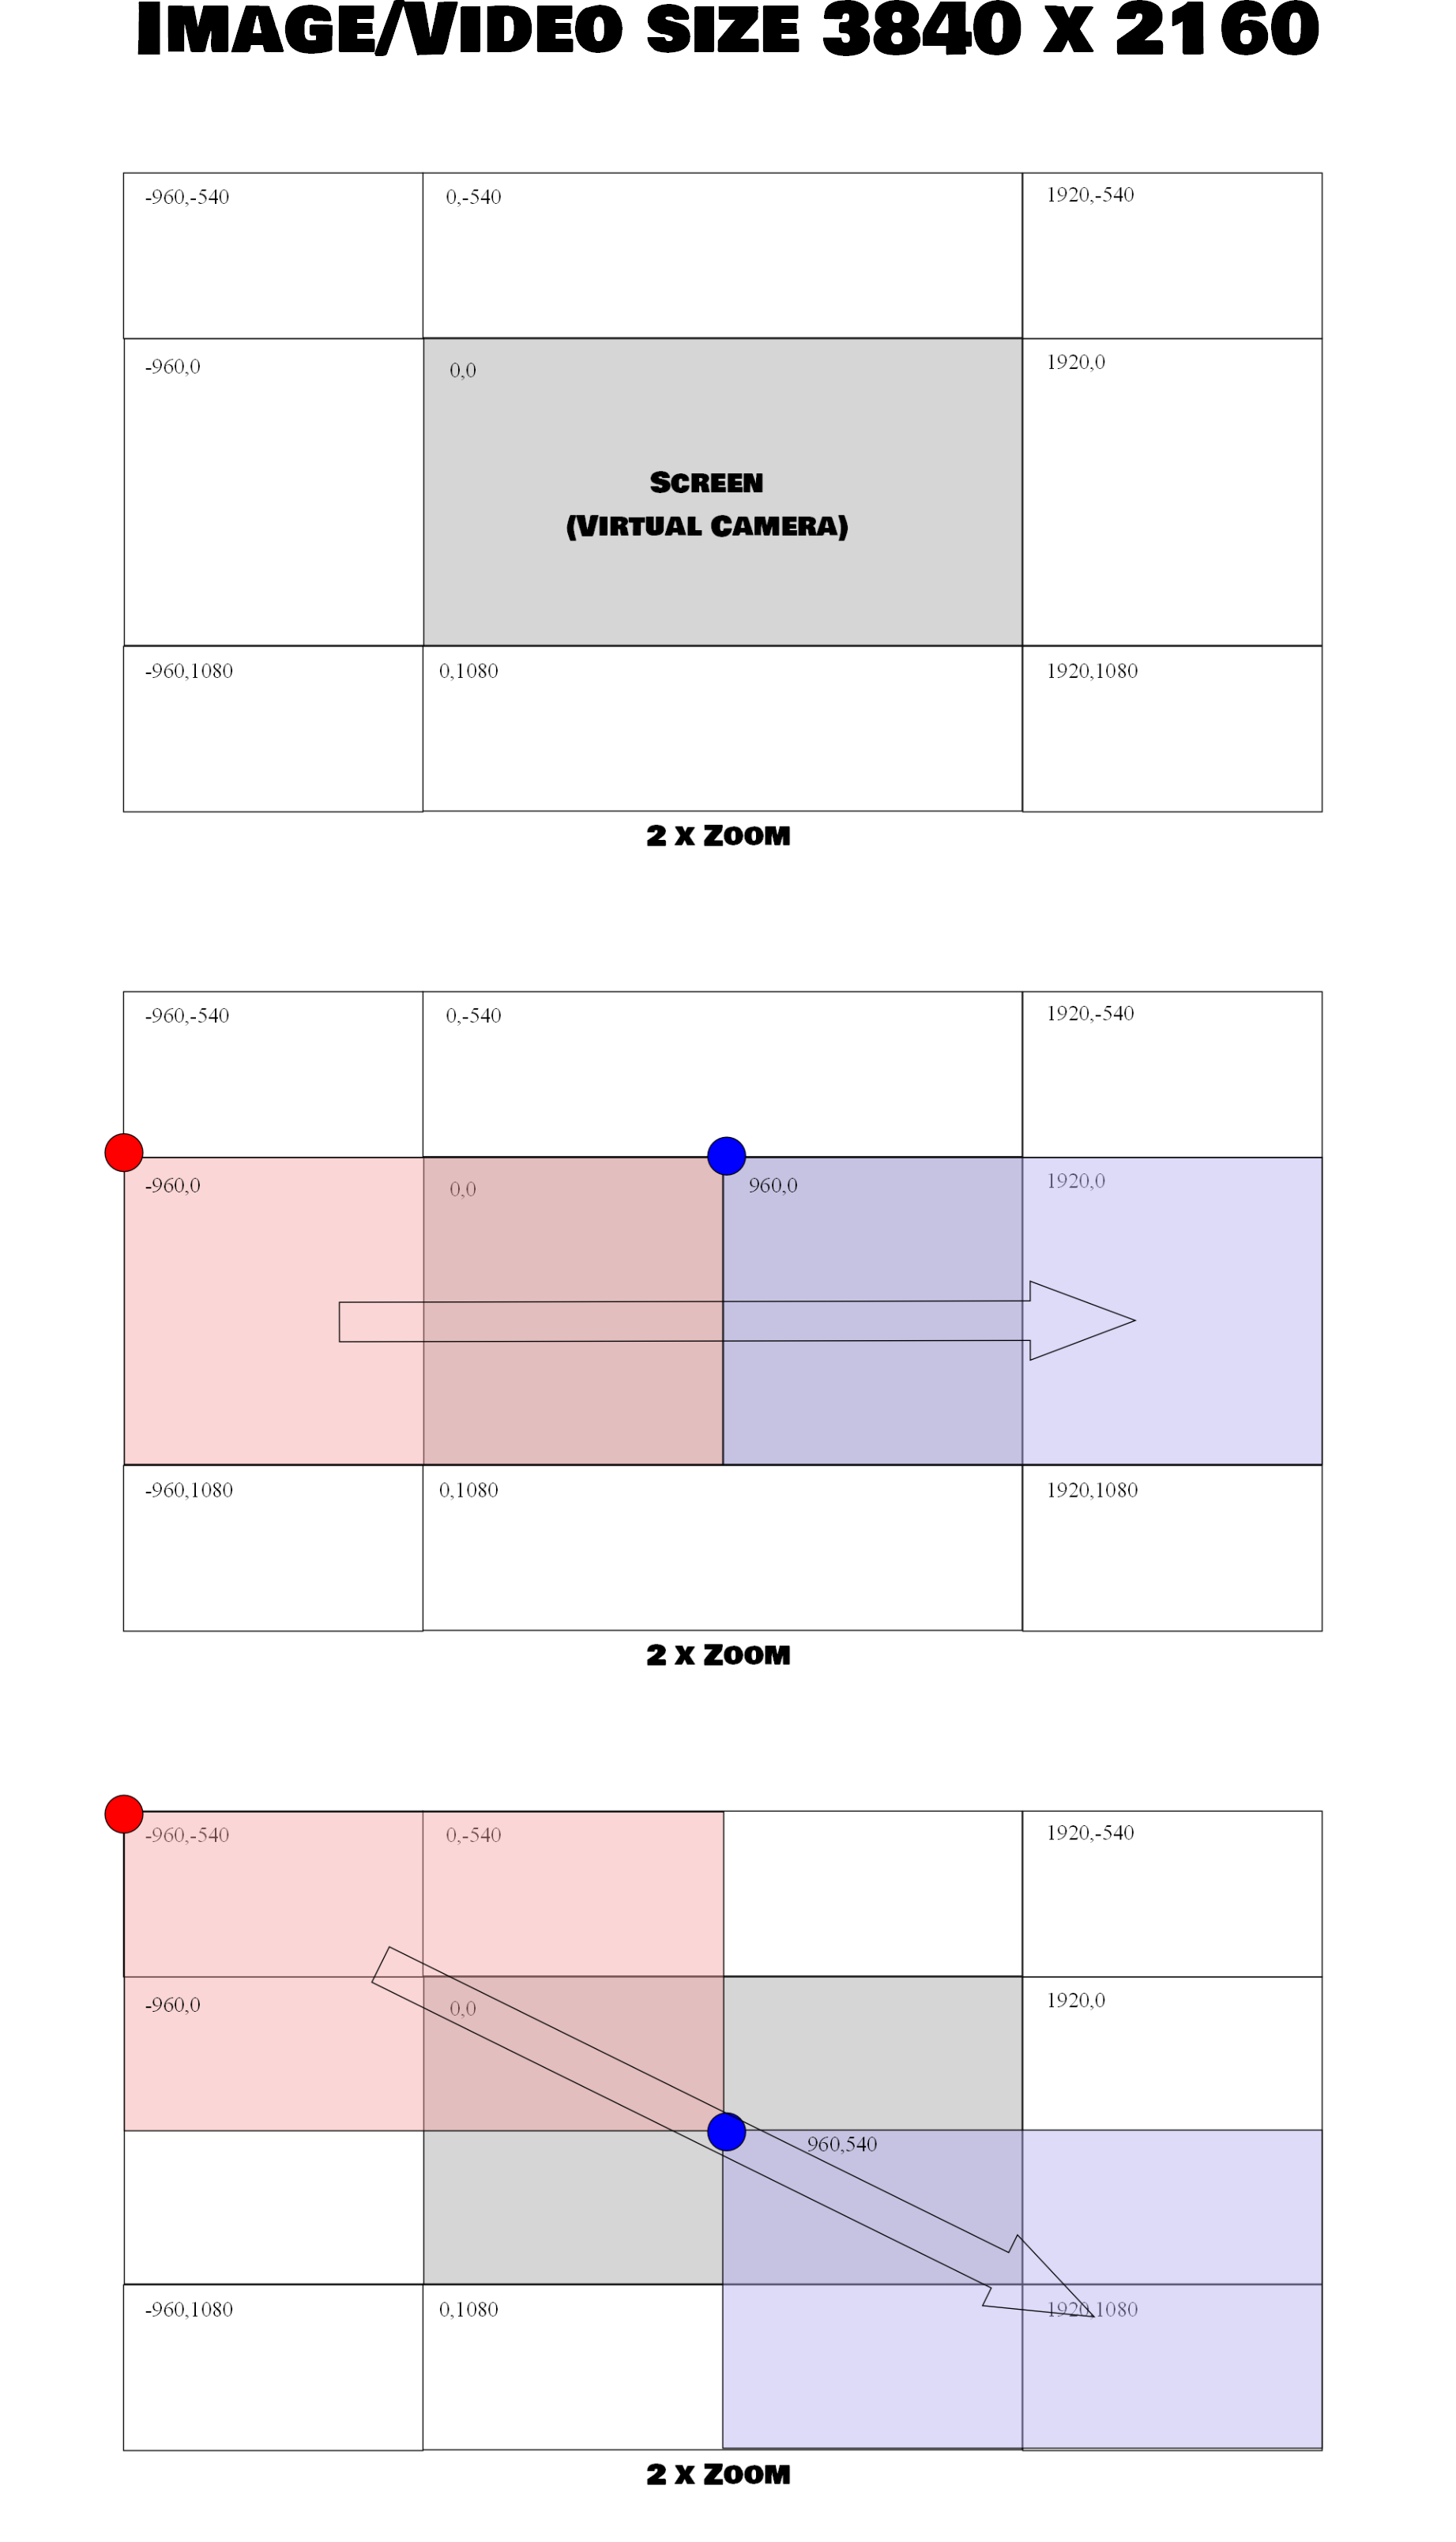
In order to work with images significantly larger than the screen size or off screen altogether we can use coordinates based around the resolution we’re working to, in most cases 1080p (1920 x 1080) and to keep consistency, I always prefer to work with the default anchor position of 0,0 in the top left of the screen. This means that on a 1080p screen a 1080p image will fill the screen. If we want to move the virtual camera to the right we move the image to the left. The X coordinate on the horizontal axis would then have a negative value. If I change the value of X to -960 (half of 1920) then the image is shifted halfway to the left so we will only see the right hand half of the image on the left hand side of the screen, or If I change it to 960 it shifts to the right hand side of the screen and we see the left hand half of the image.
In order to zoom we need to increase the size of the image and position that larger image so that we are displaying the part of the scene we want to highlight. If we want to zoom to 200% we must double both the X & Y size values from 1920x1080 to 3840x2160. When we do that with the position still set at 0,0 we find ourselves looking at the top left quadrant of the screen…
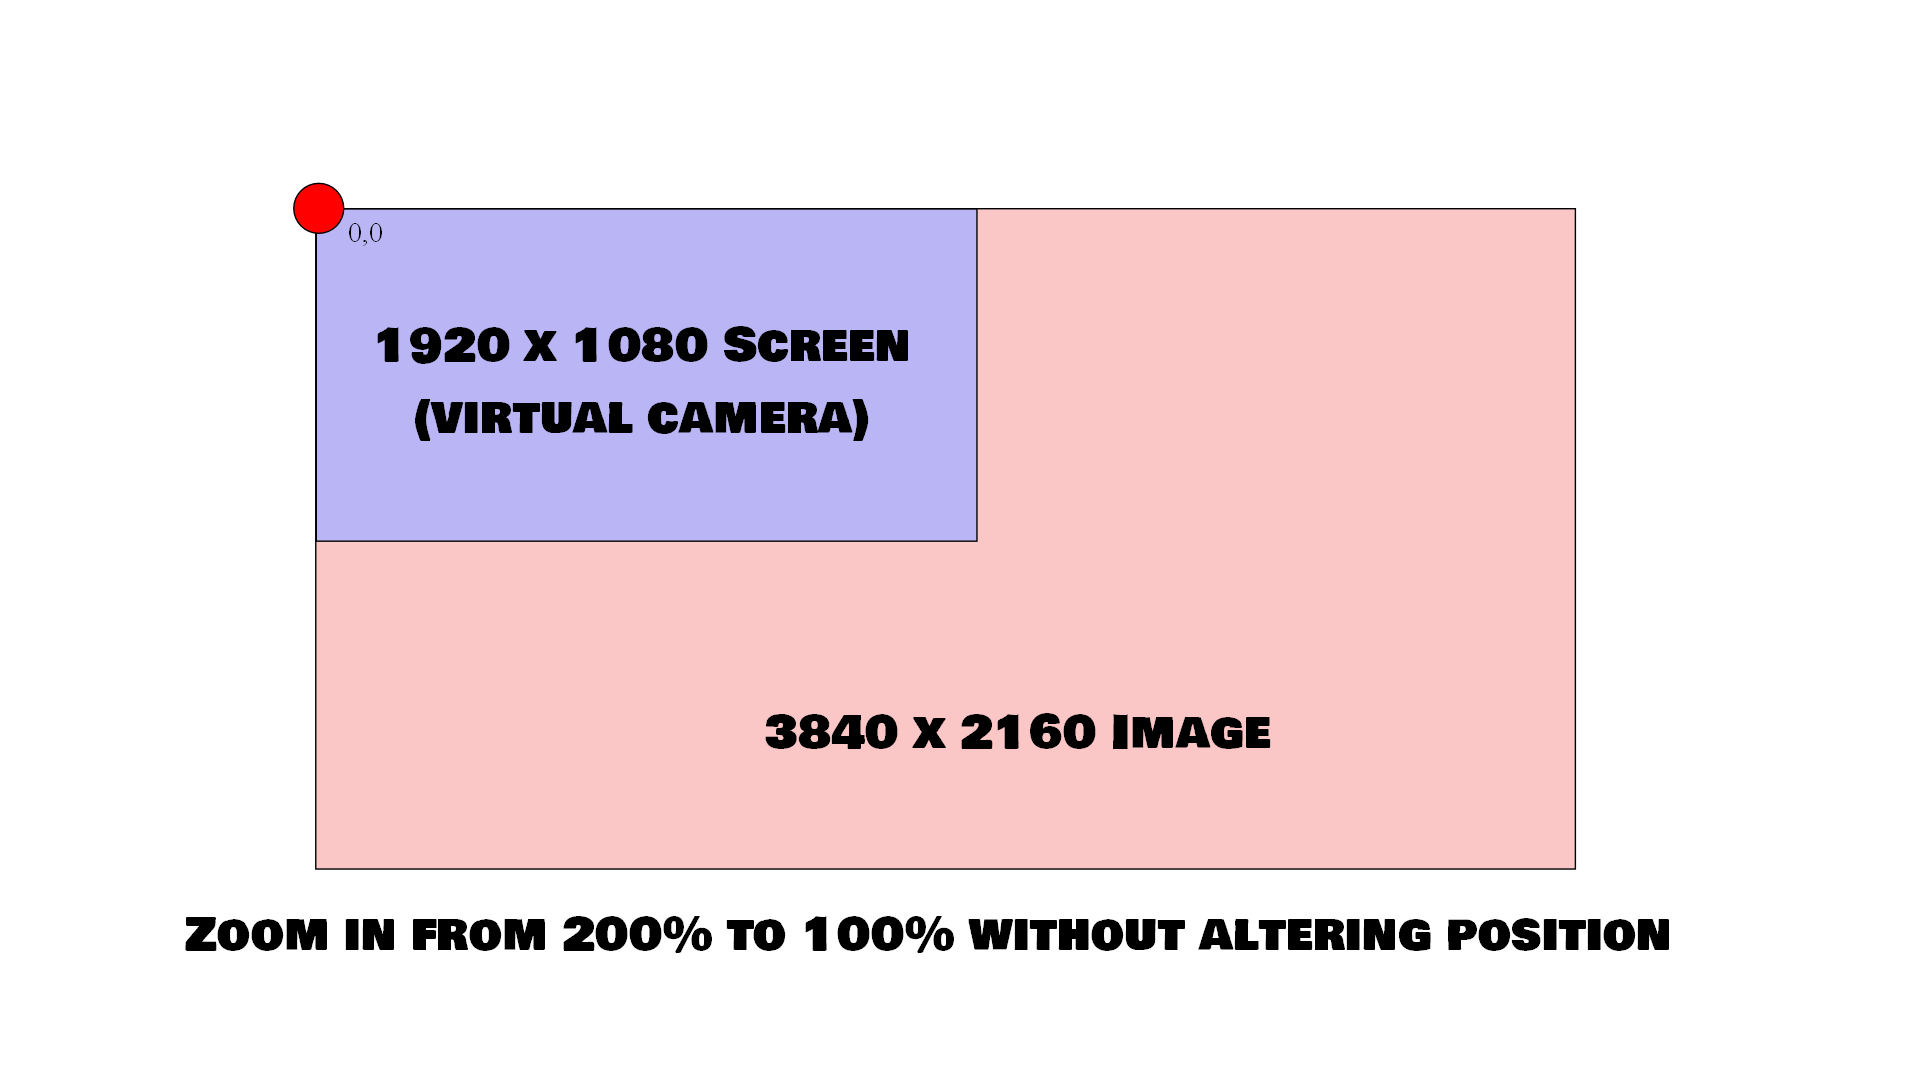
…so we must alter the position if we want to stay focused on the centre of the screen. We must shift the virtual camera back to the centre by moving the image to the left and up.

The formula for calculating the position of the centre is quite simple:
(zoomed image size - screen resolution) x 0.5
so if we are doubling the size of the image from 1920x1080 to 3840x2160 we calculate thus:
X axis (3840-1920)x0.5 =960
Y axis (2160-1080)x0.5 =540
Any move to the left or up requires a minus value whilst any move to the right or down requires a plus value, so to move our image to the left and up both values must be minus. To keep our image central as we zoom , the larger image must be placed at coordinates -960,-540.
If we don’t want to zoom, but want to move an object from offscreen left to offscreen right, we don’t have to do any maths. Simply enter a minus value equal to the X resolution to start our animation offscreen on the left and a positive value to end up on the right. For a 1080p image that means we start at -1920,0 and end at 1920,0 with the midpoint being 0,0.
The same idea applies vertically using the Y axis. If we want to start above the screen we start at 0,-1080 and end up below the screen at 0,1080 with the midpoint again being 0,0.
You could even try a diagonal. Starting at top left would be -1920,-1080 with the endpoint being 1920,1080.
Hopefully the following sketches will help to illustrate some of what I have tried to describe and help make the coordinates a little easier to relate to.

So how to do it with keyframes…
Starting with the centred zoom from 100% to 200%
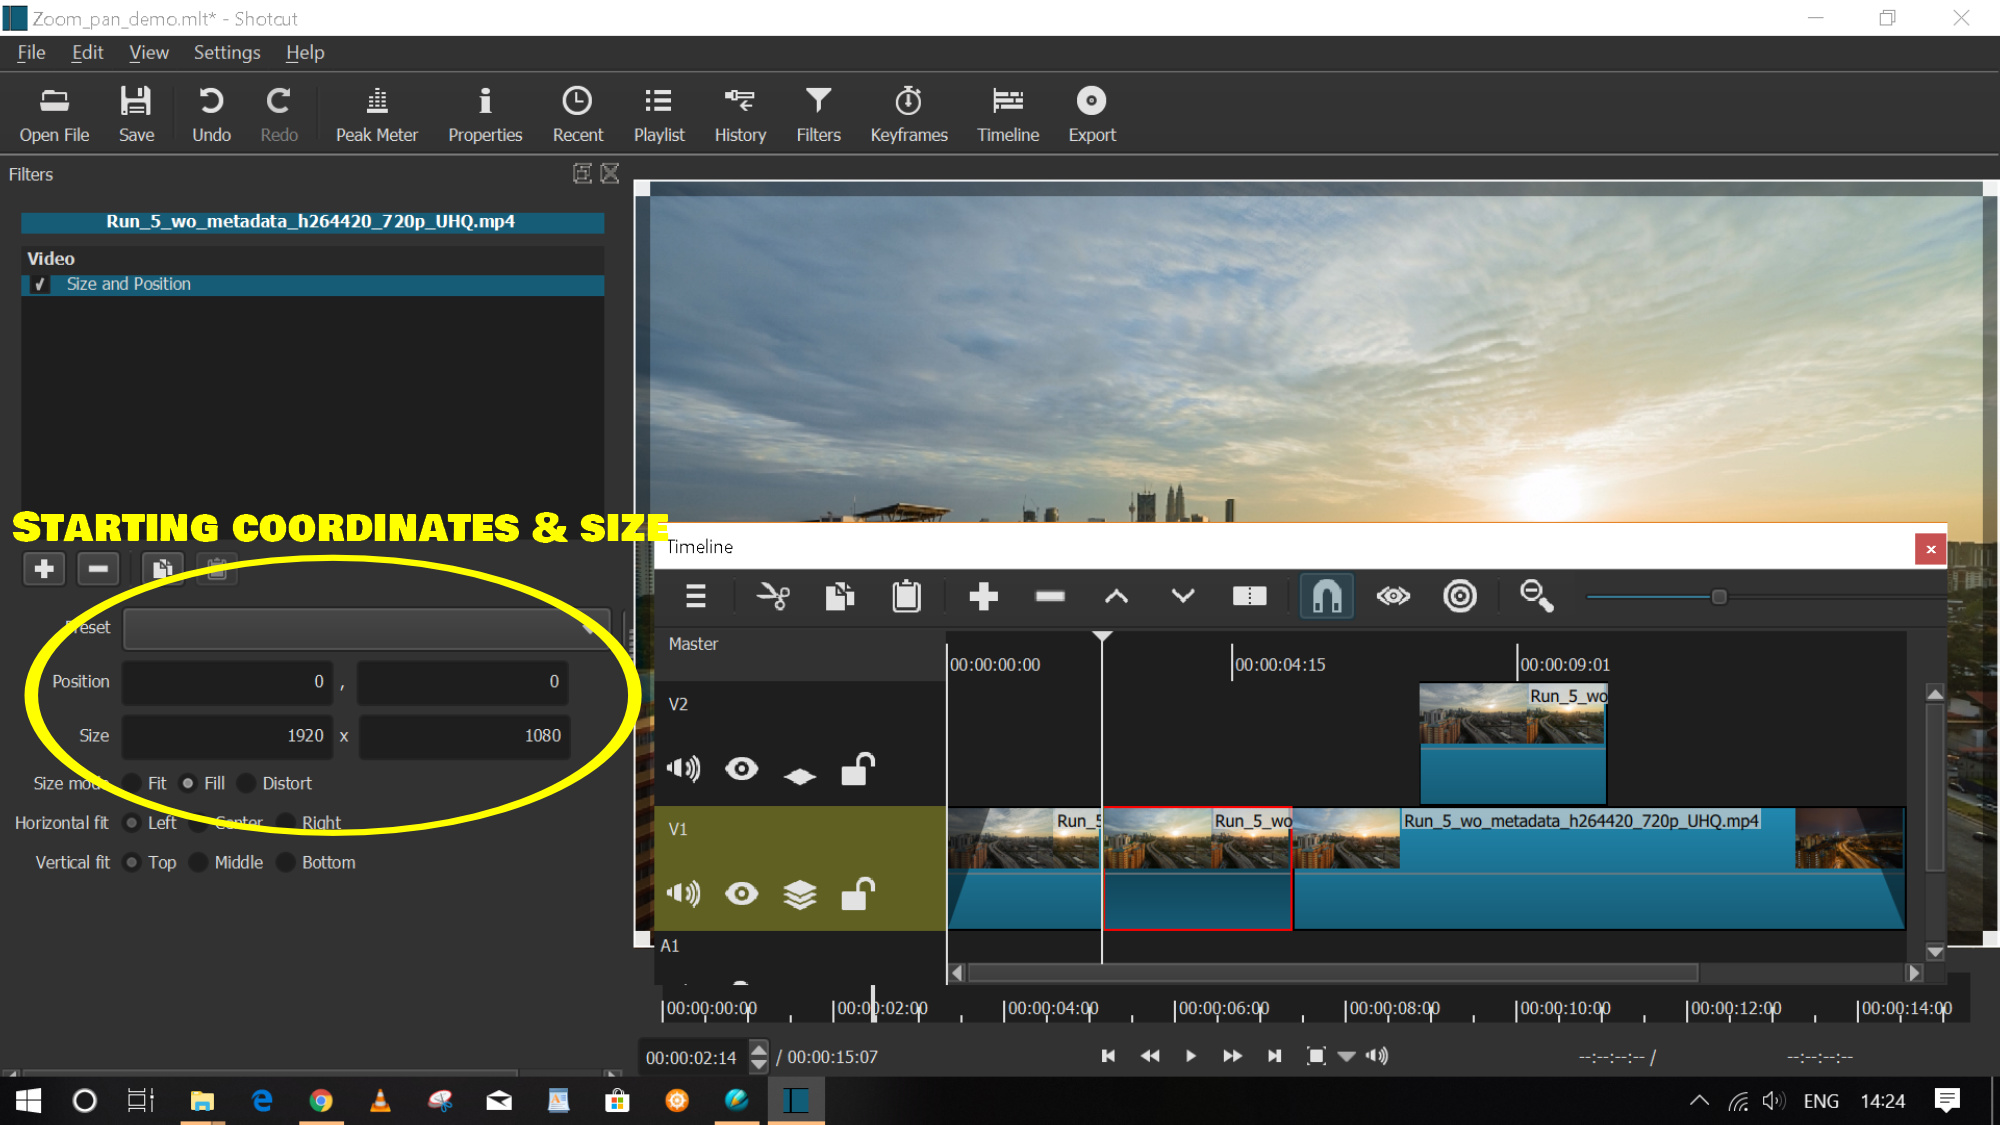
The footage I’m working with is 1080p @ 30fps. I have already imported my clips, the city and the plane, and have split the city clip to make a 3 second long section starting at 2.5 seconds in. You can see I have selected the size&position filter.
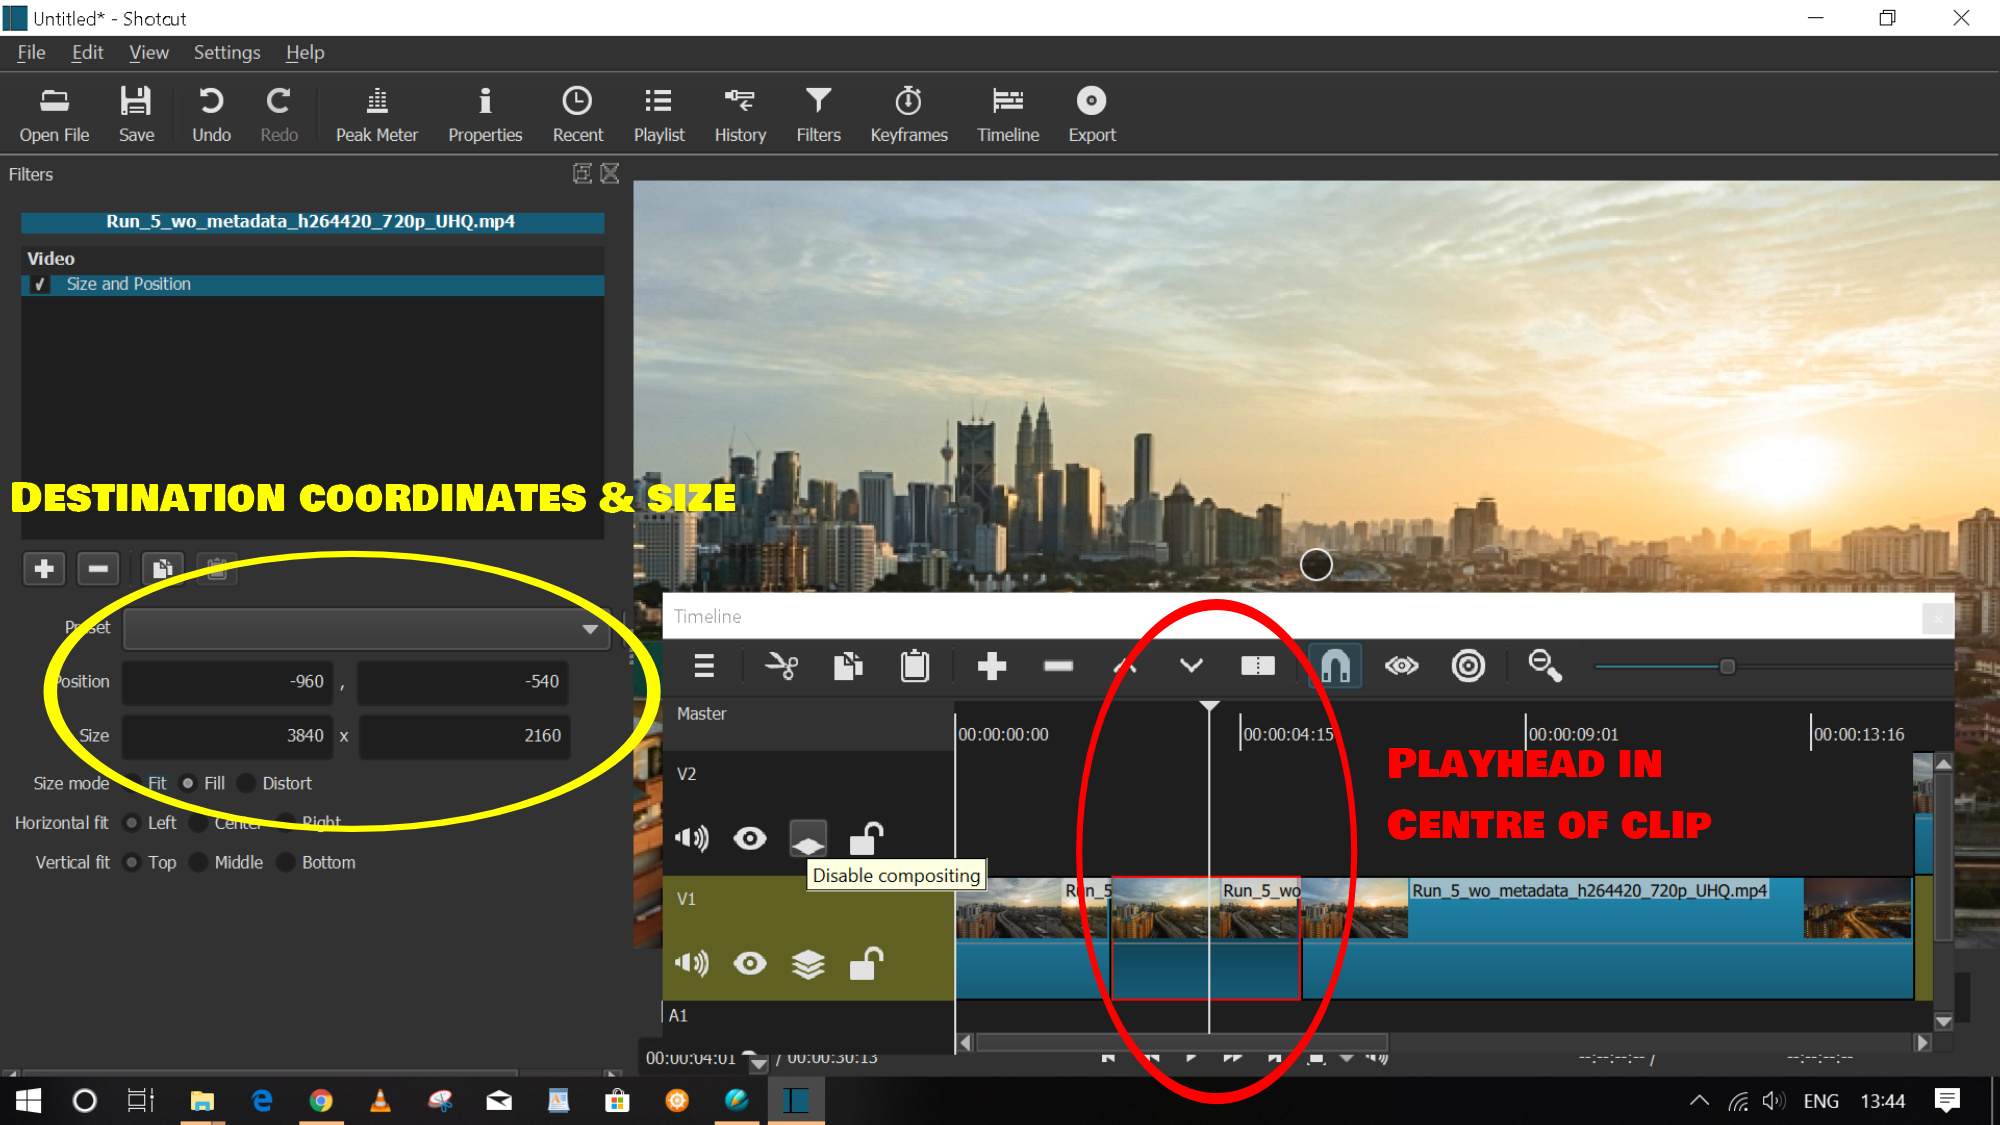
The playhead is placed in the centre of the clip - it’s a 3 second clip so I’m 1 second and 15 frames in (1:15). It’s not vital to be so precise for this particular effect but it’s a good habit to get into as will become evident in the second effect we do.
At this point I set the size an coordinates I want to END at, i.e. where the virtual camera will be and how big the image will be when the zoom is complete, so position is -960,-540 and the size is 3840x2160.
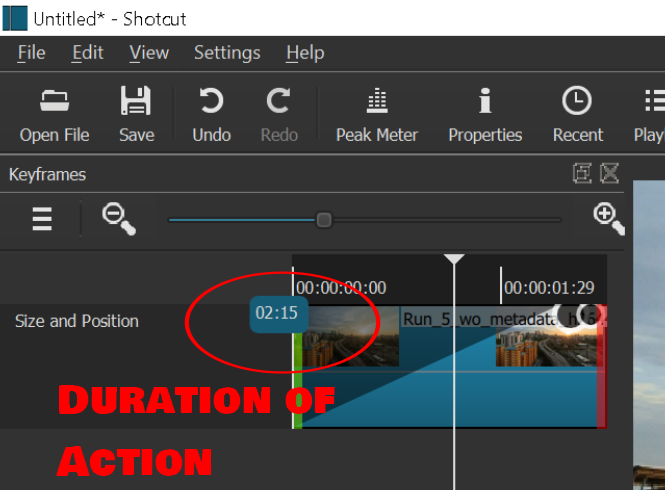
Next I open the key-frames tab and drag the tarball to the 2:15 mark (see the blue counter) to make my zoom effect 2.5 seconds in duration.
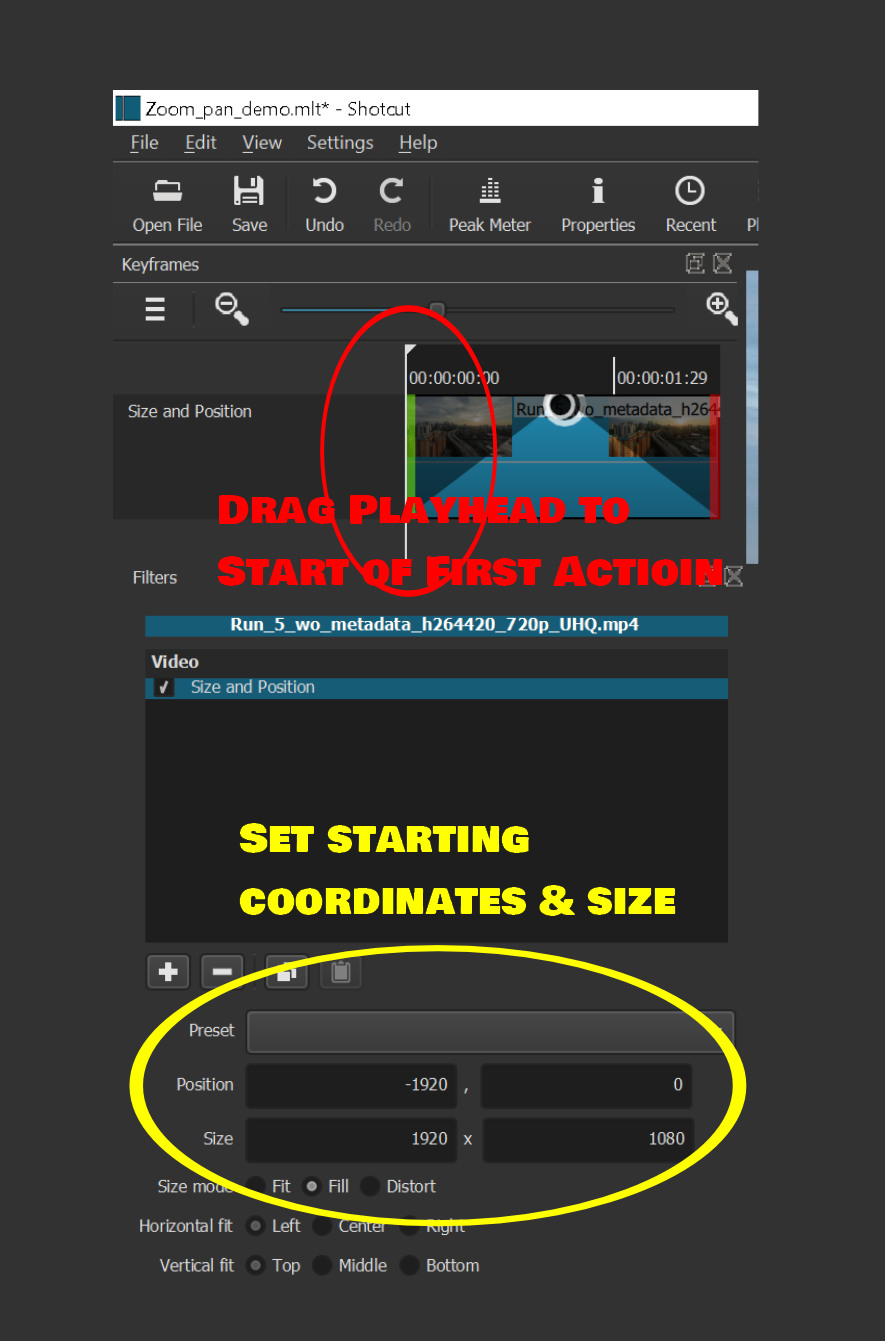
Drag the playhead to the beginning of the clip where we want the zoom to start.

Then set the coordinates and size of the start of the zoom, in this case it’s the default size & position of 0,0 & 1920x1080. Always make sure that this size and position matches the last frame of your previous clip if you are aiming for a smooth effect within the same continuous piece of footage, especially if you are going to use multiple pans and/or zooms.
Finally, if you want the following clip to stay zoomed at the same point, apply a size&position filter set to the same values as your destination values of the zooming clip to that clip also, otherwise as soon as the zooming clip ends the view will snap back to the full 1920x1080 unzoomed view.
Job done. You now have a smooth 2.5 second zoom from 100% to 200% that stays centred.
Next we want our plane footage to sweep across the screen from left to right over the city footage we’ve already done. Not that this effect can be done with any image or video and works in tandem with the crop filter if you wish to use it.
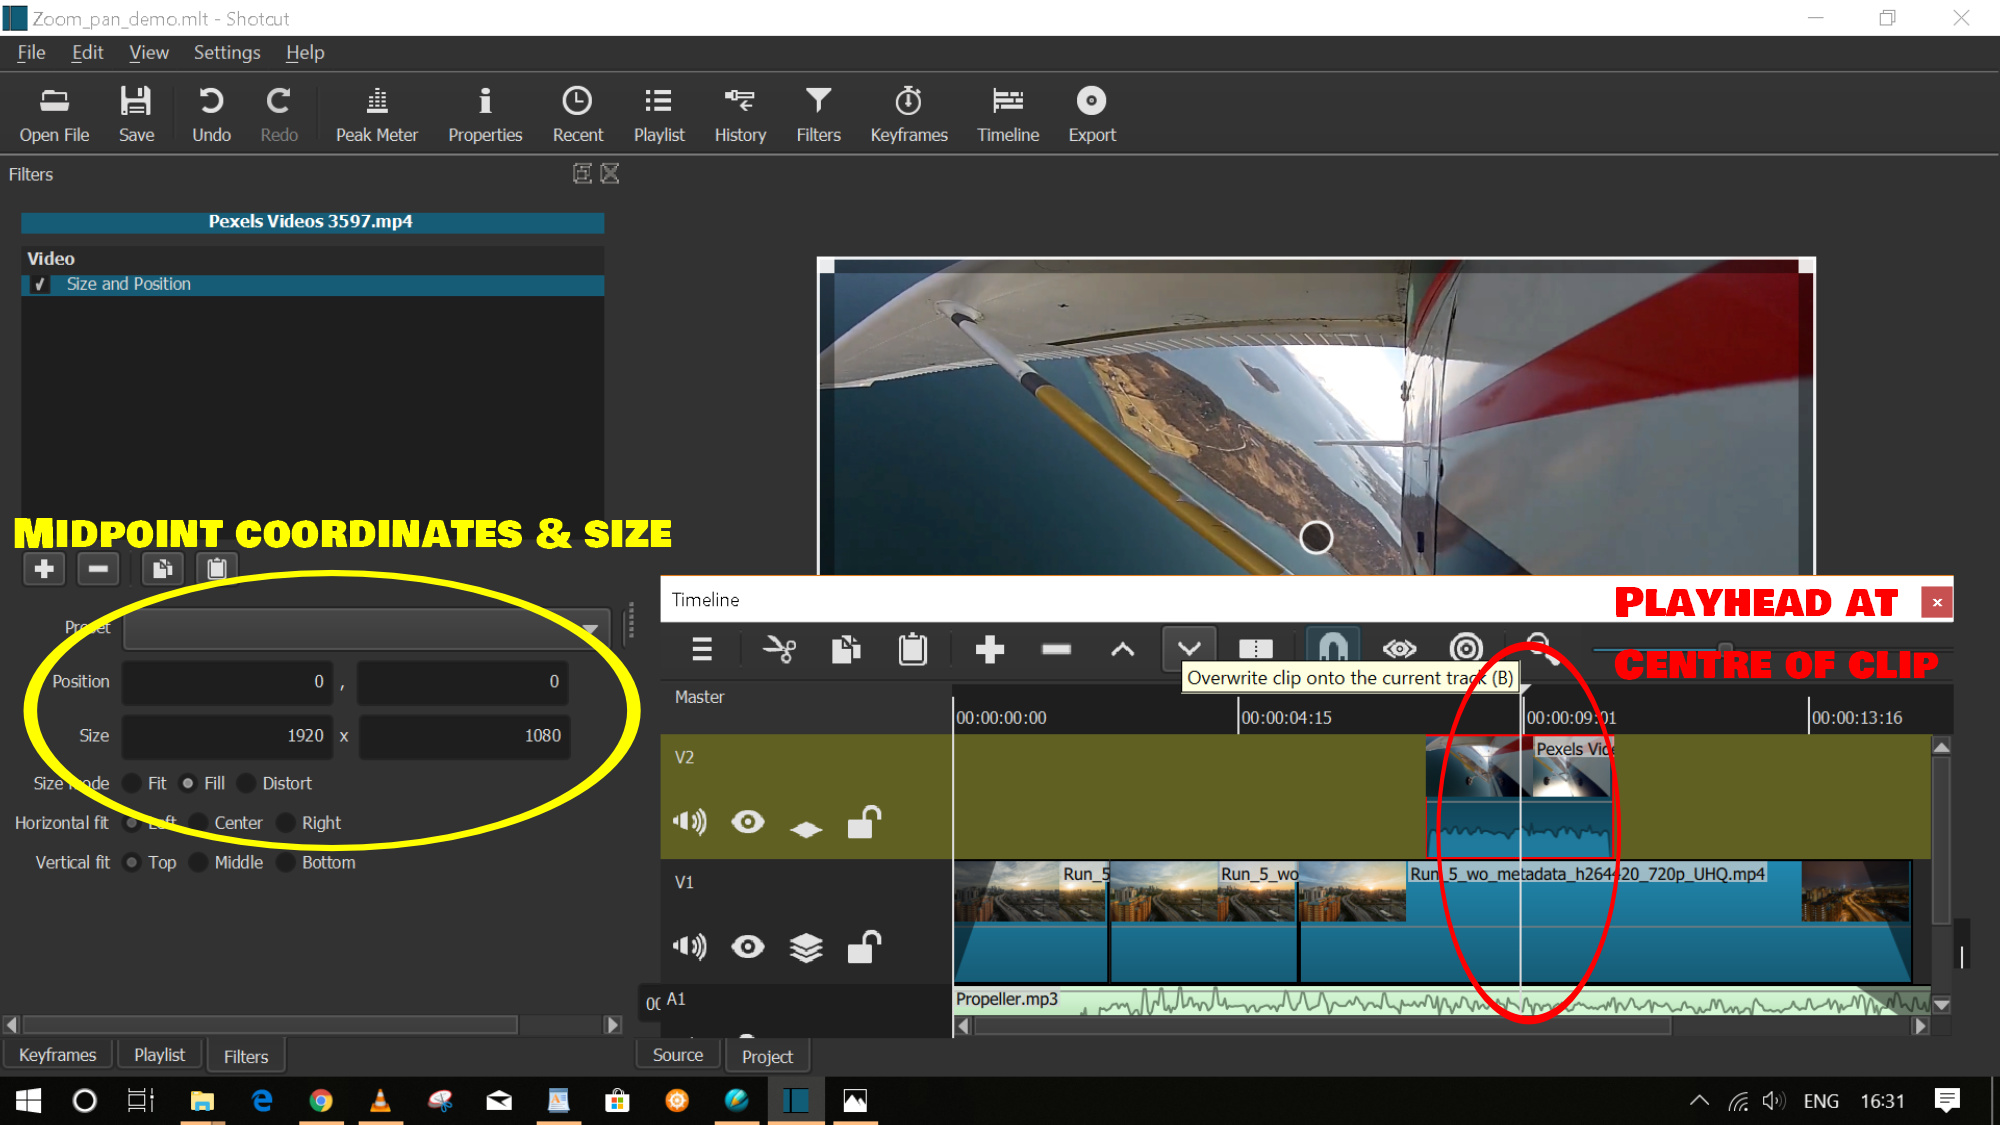
So again I have a 3 second clip and my playhead is centred at 1:15 - for this effect to work it IS important that we start off centred. At this point enter the hlafway coordinates (and size if applicable) - for this effect the midpoint is the default of 0,0 & 1920x1080.
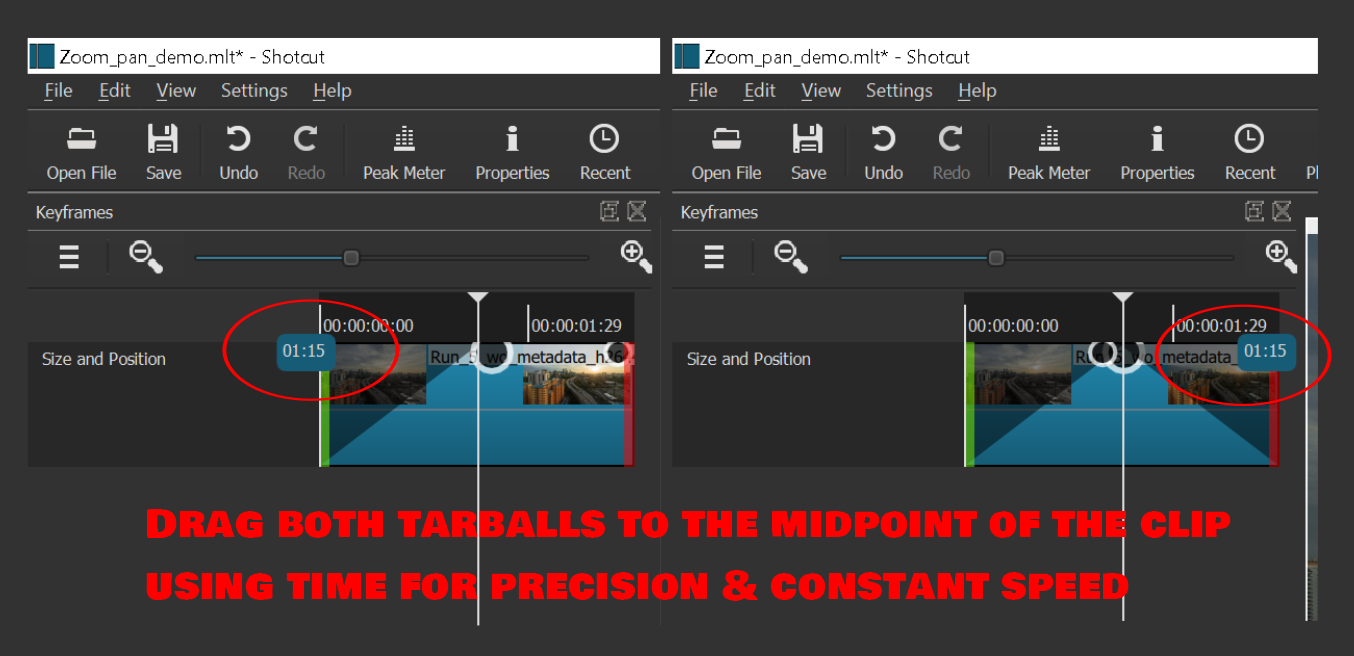
Next call up the key-frames panel and drag both tarballs to the centre of the clip using the time displayed in the blue box to be certain you’re positioned exactly halfway for both the beginning and end movements. We are starting by moving IN to halfway, then ending by moving OUT from halfway.
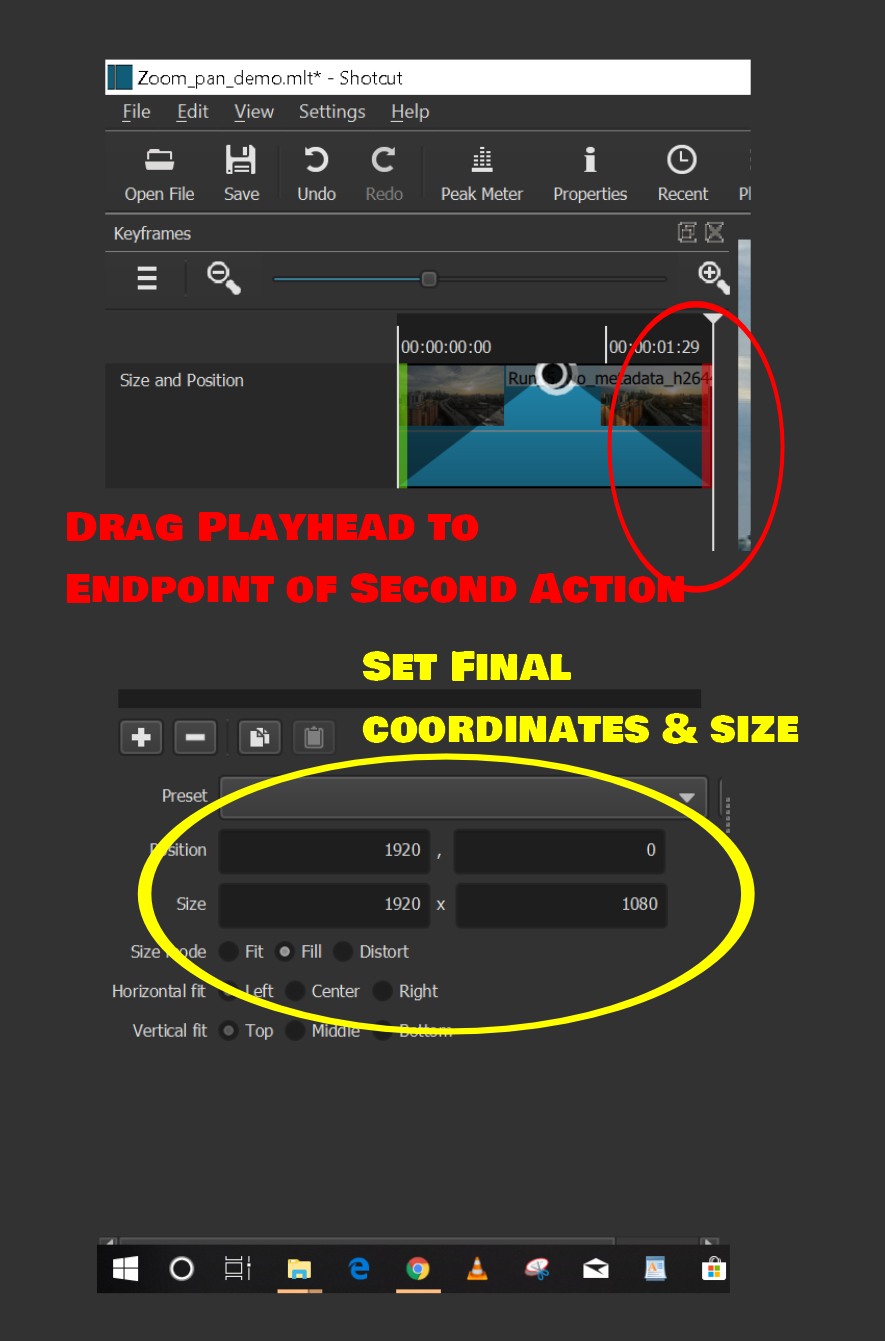
Now drag your playhead to the start of the clip and set your starting coordinates in the filter panel, in this case off the left of the screen at -1920,0. We don’t need to alter the size for this effect.
Then drag the playhead to the end of the clip and set the final coordinates which to go off the right of the screen is going to be 1920,0.
And we’re done. Your clip will now enter on the left of the screen and over 3 seconds will slide over and off the right edge of the screen.