Hi there,
I can insert multiple videos in a single job but they
all play at the same time but I want to be able to
play such videos one by one in a series or succession.
how can i do it plz. Thanks in advance.
Regards
Mujeeb
Hi there,
I can insert multiple videos in a single job but they
all play at the same time but I want to be able to
play such videos one by one in a series or succession.
how can i do it plz. Thanks in advance.
Regards
Mujeeb
Are they all on different tracks on top of each other? Place them all on the same track on the timeline
Hi there,
I might have confused my question…actually I want to place four video clips in same video frame at the same time but I want to play them like this one plays and stops then another plays but all their video frames remain on screen that everyone could see that this video played now this will play…
Regards.
Do you want to achieve a picture-in-picture effect when all four videos are visible in the frame at the same time? Then you need to create 4 video tracks, put a different video on each, use the SPR filter to put each video in its place.
Or do you need an effect, similar to how the Internet compares the performance of video cards, when the videos in the joint are horizontally apart from each other? This is also done on separate tracks, but it’s better to do it with a crop:rectangle filter.
@mujeeb do you mean something like this?
There have already been similar questions and solutions. Other inquirers wanted to get picture-in-picture or to split the screen into several parts and display the contents of each window simultaneously.
It was important here to understand what the author of the question wanted to achieve.
@MusicalBox I think you’ve succeeded.
Very good psychological effect. You showed the result, temporarily keeping how you did it a secret. Like Alfred Hitchcock. First an earthquake and then the tension will rise. ![]()
In short. You probably used several video tracks and captured the necessary frames from each video. The icing on the cake is the appropriate arrangement of elements on the timeline and the multiple use of the size and position filter.
It seems to be easy, but the arrangement and configuration of elements requires an idea and some time and effort.
@Roy_Orbison I just didn’t have time to explain in detail how I did it. 
If my demo is what @mujeeb needs, I will make a short tutorial for him. But maybe your description will be enough. You pretty much nailed it. 
I know. I know. The tension rises. The crowd waves ![]()
![]()
At 99%. ![]()
Maybe a simple screenshot and short description (maybe even mine) will suffice. Much depends on his knowledge of Shotcut. Perhaps a simple picture-in-picture would do it by itself. His plan is a little more complex and he just lacked the idea, the experience.
Admit it ![]() . The tutorial is in draft and just waiting for final touches
. The tutorial is in draft and just waiting for final touches ![]()
![]() .
.
It will be useful for others.
![]() My description is too general but maybe sometimes it will be enough for someone.
My description is too general but maybe sometimes it will be enough for someone.
I’ll just add that using a grid (which I often forget) is very helpful for setting position and size.
At first I didn’t know if I understood the thread author’s question and how to do it. Then I saw your demo (maybe you did it a bit differently). Then I had an idea to get an effect similar to yours. When doing my own test to see if I could do it and if I could do it in an hour, I had to modify the initial idea (e.g. I realized I needed to use more tracks, capture more frames, etc.).
I read, watch more than I do (and if anything, it’s mostly very simple things. Sometimes more complicated out of curiosity), so I often lack relevant materials (to use in a tutorial for someone), hands-on experience, and it takes me a lot more time, especially for more advanced projects.
However, I often know where to look for guides.
I don’t speak English (I use different translators, which often get confused), so it’s an additional difficulty for me to search and understand. Sometimes I “get to know” someone from the network (his characteristics), because I observe, but someone does not know me. Therefore, I must be careful when communicating with someone to avoid misunderstandings.
Whatever the level of experience of the original poster, when I make a tutorial I always try (but not always succeed) to put as much info as I can for the beginners.
No, I didn’t start to work on a tutorial yet. If @mujeeb asks for one, chances are I won’t have time today. Maybe tomorrow.
Agreed. A 2x2 grid is almost essential for that kind of editing.
Also, adding the Size, Position & Rotate filters on the track heads (instead of the clips) will save you time.
dear Shotcut friends,
plz make tutorial of my question above for us lame beginners plz.
Regards.
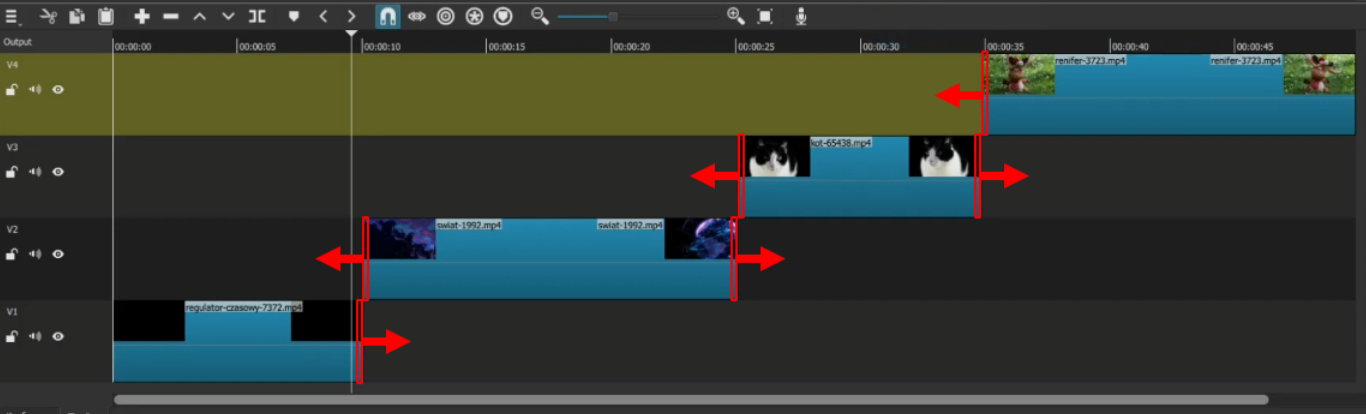
The animation is pretty simple. 4 tracks, 4 video files and two png frames from the beginning and end.
This is on our Shotcut - Tutorial Videos page and possibly in #tutorial here as well.
@mujeeb Mini “tutorial”
My monitor: 22 " - 1680x1050 - 16:10
All clips used have max 25 fps 1920x1080
To maintain compatibility, general image proportions, etc. I will set the project to 1080p 30 fps.
The clips will be quickly shortened to improve comfort and transparency.
The sound practically does not exist here (the clips used have empty soundtracks) so I skip them. For formalities I will show low audio parameters because it makes no sense to generate empty (bytes) zeros.
“Presentation” made on the knee and is only to indicate the general direction. The actions shown can often be performed (optimized) in different ways and in different order.
This “presentation” will become unnecessary (will be removed) when another better person appeared.

Source(s) of clips / Źródło(a) klipów:
pixabay.com - Free license
Authors / Autorzy:
PIRO4D - https://pixabay.com/pl/videos/regulator-czasowy-licznik-liczyć-7372/
bellergy - https://pixabay.com/pl/videos/świat-glob-międzynarodowy-światowy-1992/
Kmeel_Stock - https://pixabay.com/pl/users/kmeel_stock-5075826/?tab=videos
Alexas_Fotos - https://pixabay.com/pl/videos/renifer-boże-narodzenie-łoś-zabawa-3723/
Yep @Roy_Orbison, that is pretty much how I did it.
The only significant difference is that I used 6 exported frames instead of 4.
Many thanks for making the tutorial I myself didn’t have time today.
This topic was automatically closed after 90 days. New replies are no longer allowed.