I’d like that too.
But in case you don’t know, there is a faster way than opening the folder to re-import the frame.
Open the Recent panel.
Position the Playhead on the frame you want to freeze.
Export the frame → It will be added on top of the list in the Recent panel.
Double-click on it (in the panel)
In the Timeline toolbar, click on the Paste button (or use Ctrl+V) to paste the file at the Playhead position.
If you do multiple freezes in your project, the first export will take some time (since you need to choose a folder), but the other ones will only takes a couple of seconds:
CtrlShiftF → Save → Double-click → CtrlV
Not as fast as your suggestion, but maybe you’ll find it less unacceptable.
I do ask for this since years.
All alternative implementations are complicated and prevent me from using such a standard editor function on a regular basis.
You need to be able to control the duration of this freeze frame and adjust it later as needed. Should it appear to you as a separate clip like the Export Frame technique today? Or should it appear on the video clip seamlessly like the Speed filter today where you adjust its duration in Keyframes? It might be possible to simplify the initial setup of either for convenience, but there are trade-offs…
What do you expect to happen when there are filters added to the video clip before you execute the new function? The Export Frame technique today handles this, but it becomes baked into the image because it is derived from the player (WYSIWYG), but this also causes it to use the proxy when that is on.
Similarly, what do you expect to happen when filters are added or modified on the origin video clip after executing the function? If it creates a new clip so you can more easily adjust the duration on the timeline, then changes to filters on the video clip would need to be manually propagated.
That can be done (not today), but A) it does not answer my questions about filters, and B) I doubt that is what others desire. Many people do not understand well the integration between Source and Timeline, and they want this operation to be fully integrated into the timeline, at the current position, and immediate. The next complaint will be: why put the frame into Source? And the suggestion: save me the next obvious step and immediately insert one second of it right here on the track. yswim?
The actual ways to freeze a frame (export frame of time filter) work well for me. I’m not really concerned about the presence or absence of filters. A Copy Frame option would just make the process a bit faster and maybe reduce the chances of being pulled out of the editing flow by silly and distracting images files. Which is, I think, what is requested by the OP.
I can also manage with the existing options.
But I use them much less often than I would need them for badminton explanatory videos because it’s complicated to use.
So how about a “Child Frame” object on the timeline that dynamically references the video clip?
The object would be created by Shotcut via a dialog box which asks for the reference frame (including easily accessible options of first frame, current frame and last frame) and a choice of applying all the filters of the Parent Video to the Child Frame (Y/N)? Since the reference to the Parent Video is dynamic both these parameters would permit updates in the future.
Otherwise, the Child Frame object would behave like a still image, in that it would be stretchable, splitable, etc, and it would also have its own filters, so that, for example, if the Parent Video is zoomed to 150% at the reference frame, we can still add a SizPos filter to the Child Frame and keyframe an additional zoom from 100% to 200% (effectively 150% to 300% of the Parent Video).
If the Parent Video is clipped to remove the reference frame then the Child Frame would display an error. If the Parent Video is removed from the timeline then the Child Frame is deleted.
I think that is too complicated both to code and possibly UX (parent and child does not yet exist in timeline), but it did give me an idea! I can automate this:
get the time of the playhead relative to the beginning of the clip
copy the clip (including filters and all properties overrides)
trim the copied clip in point to the offset time in step 1
trim the out point to make it one second long
add the Speed: Forward Only time filter with only 1 keyframe at the beginning with speed 0
paste
I mocked this up manually. You have to do some extra, messy work today to do steps 3 - 4.
I changed my mind about that. I can now remember a few occasions when I needed to re-add the filters used in the video clip.
I’m assuming it will be pasted as a 1-second video clip, not as a JPG or a PNG.
If so, extending that clip to the desired length will require a few more steps:
Copy the clip
Paste the clip as many times as needed
or
Go to the Properties panel
Add time to the clip Duration
Turn Ripple ON
Extend the clip
I’m thinking of a different automation that would generate an image clip instead of a video clip. It would involve adding a folder in the App Data Directory for captured frames.
I Don’t know if it is feasible or not, but here’s the idea:
After selecting a clip and positioning the Playhead at the desired point, a right-click would have a Freeze Frame (or any other name) item in the options list.
The automation would then do this:
Copy the filter(s) from the selected clip
Export the frame (without prompt) in the App Data folder as a PNG image
Import and Paste the PNG image
Apply the copied filters
Delete keyframes from the filters (if there are any)
Of course, before doing this the user would need to remember to hide the tracks above if their content should not be included in the captured frame.
I also mocked these steps manually, and it worked fine. I’m just not sure if some of the steps can be automated. Might be tricky for example to remove the keyframes on more than one filter.
Wow, I didn’t even know about the Speed: Forward Only filter!
Using this filter I created a Preset called Freeze, which has 4 keyframes:
1.0 at frame 1
1.0 at frame 25
0.0 at frame 26
0.0 at frame 100
It works a treat on any video clip where I haven’t messed with the speed in Properties. If I want to select a different frame at which to freeze I can just slide the 2nd and 3rd keyframe to that different frame.
And if I want to freeze a video clip that I have changed the speed in Properties I can reset the speed back to 1.0, set up a Speed: Forward Only filter, import my Freeze preset, move the 2nd and 3rd keyframes to where they need to be, and then edit the speed in the 1st and 2nd keyframes.
tl:dr - now that I know about the Speed: Forward Only filter I think any development around freeze frames is redundant.
I would disagree, because not all users will want to (or not have the skill to) make a preset, and it is quite fiddly having to adjust the keyframes. Having an automated feature will still be VERY useful. But thanks for this idea.
I think that the process of creating a separate and permanent (and therefore non adjustable) object (jpg, png or whatever) is unnecessarily cumbersome whether it is created manually or partly by automation.
But I think there is scope for making the freeze process easier within the Speed: Forward Only filter.
If I am using a “freeze” Preset I would like to be able to select 2 adjacent keyframes together. This would allow me to drag the freeze frame (keyframes 2 and 3 from my previous post) to a new frame with one action, and it would also allow me to adjust the play speed before the freeze frame (keyframes 1 and 2) with one action.
Another idea is to facilitate Freeze functionality at the current playhead position via a click from within the Speed: Forward Only filter (the automated creation of keyframe speed = 1.0 at playhead and keyframe speed = 0 at playhead + 1) and similarly an Unfreeze function (0 and then 1.0).
I think either or both of these routes provide an automated and dynamically adjustable solution for the vast majority of users. Imo anyone who is making more sophisticated use of the Speed: Forward Only filter, (e.g. varying speeds) will be able to make the necessary adjustments manually within the keyframes panel.
Hi @nitram, all good points. However, I am used to using the “export as a frame” option and to me it is not cumbersome at all. Especially when I use it in conjunction with my second favourite software (:-)) - Auto HotKey.
Would you like to see it in action?
Here’s a short demo I knocked up in a few minutes:
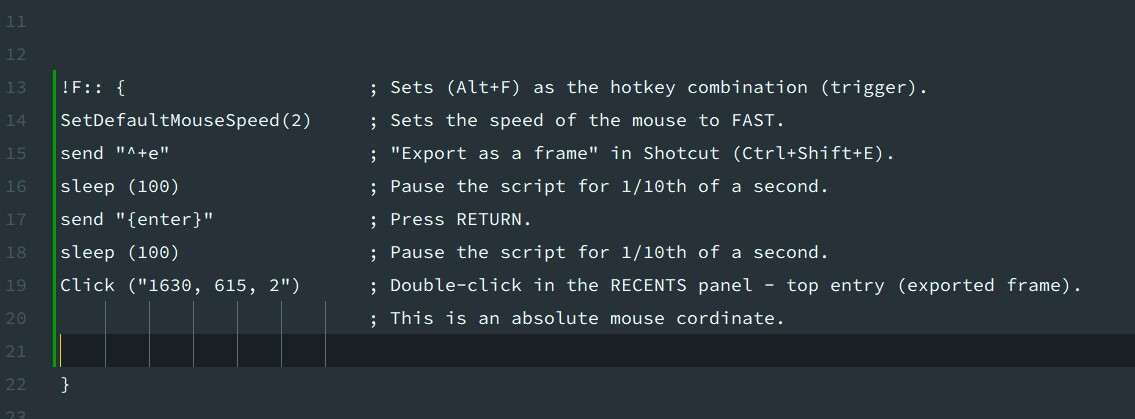
Here’s how the script works (it’s a series of automated keyboard shortcuts):
Here is the script to download for anyone who wants to try it. Shotcut Freeze Frame.zip (671 Bytes)
NB - AHK is Windows only, as I understand it.
This script is for AHK v.2, which is the current latest version.
Beware, it relies on double-clicking an absolute mouse co-ordinate which MUST be the top entry in the Recents panel. This entry will be the newly-exported frame created with the “Export as a Frame” shortcut. This mouse coordinate can be changed in the script.
I actually have devised a cool way of automatically and quickly generating any mouse coordinate ready for pasting into an AHK script - so users can automate clicking anywhere on screen. It’s complicated to explain but I could post it here if there’s any interest, if and when I get some spare time.
This is added for the next version. It is called Freeze Frame in the timeline Edit menu and clip context menu. It operates at the current play head position and creates a one second clip, which can be adjusted afterwards just like any other clip. If a clip is not selected, it works with the most relevant clip at the position: the clip on the current track or the top-most clip if that is blank (same behavior as some other things such as Split).