First Project with Shotcut

My first project with Shotcut version 22.01.17. Switched because the forum is so good, and because Shotcut has excellent audio tools.
If anyone knows the filters well, please look at my settings and let me know if this is the right way to do it. For this example, I am only concerned with audio quality.

Ich will zu viel - 2022.mlt (14.6 KB)

The Title: Ich will zu viel = I want too much

4 Likes

The audio in horrible! I don’t understand a word of what is said!
:upside_down_face:

Seriously, to me, the audio sounds quite good.
I like the lighting of your set.
The face is well lit and the light source projected on the background is very nice.

Maybe the sound needs to be edited better so you can finally understand it.

The lighting is quite simple: from the front an LED lamp with warm light, to which I set the white balance. And a daylight LED lamp for the background, which looks so nice and cool and blue.

With the audio filters you have to follow the given order. Is this important for the editing sequence or also for the arrangement of the filters in Shotcut?

Or maybe I just need to learn to speak German :wink:

The order of the filters almost always affects the final result. So, yes, it is important.

1 Like

I don’t know what you said, but I liked the way it sounded! :smile: And it looks great, too. Cool trick with the white balance.

What I enjoy is the tone that you chose for it. The tone fits the natural sound of a sage philosopher pondering things, as opposed to the punchy sound of a sales pitch.

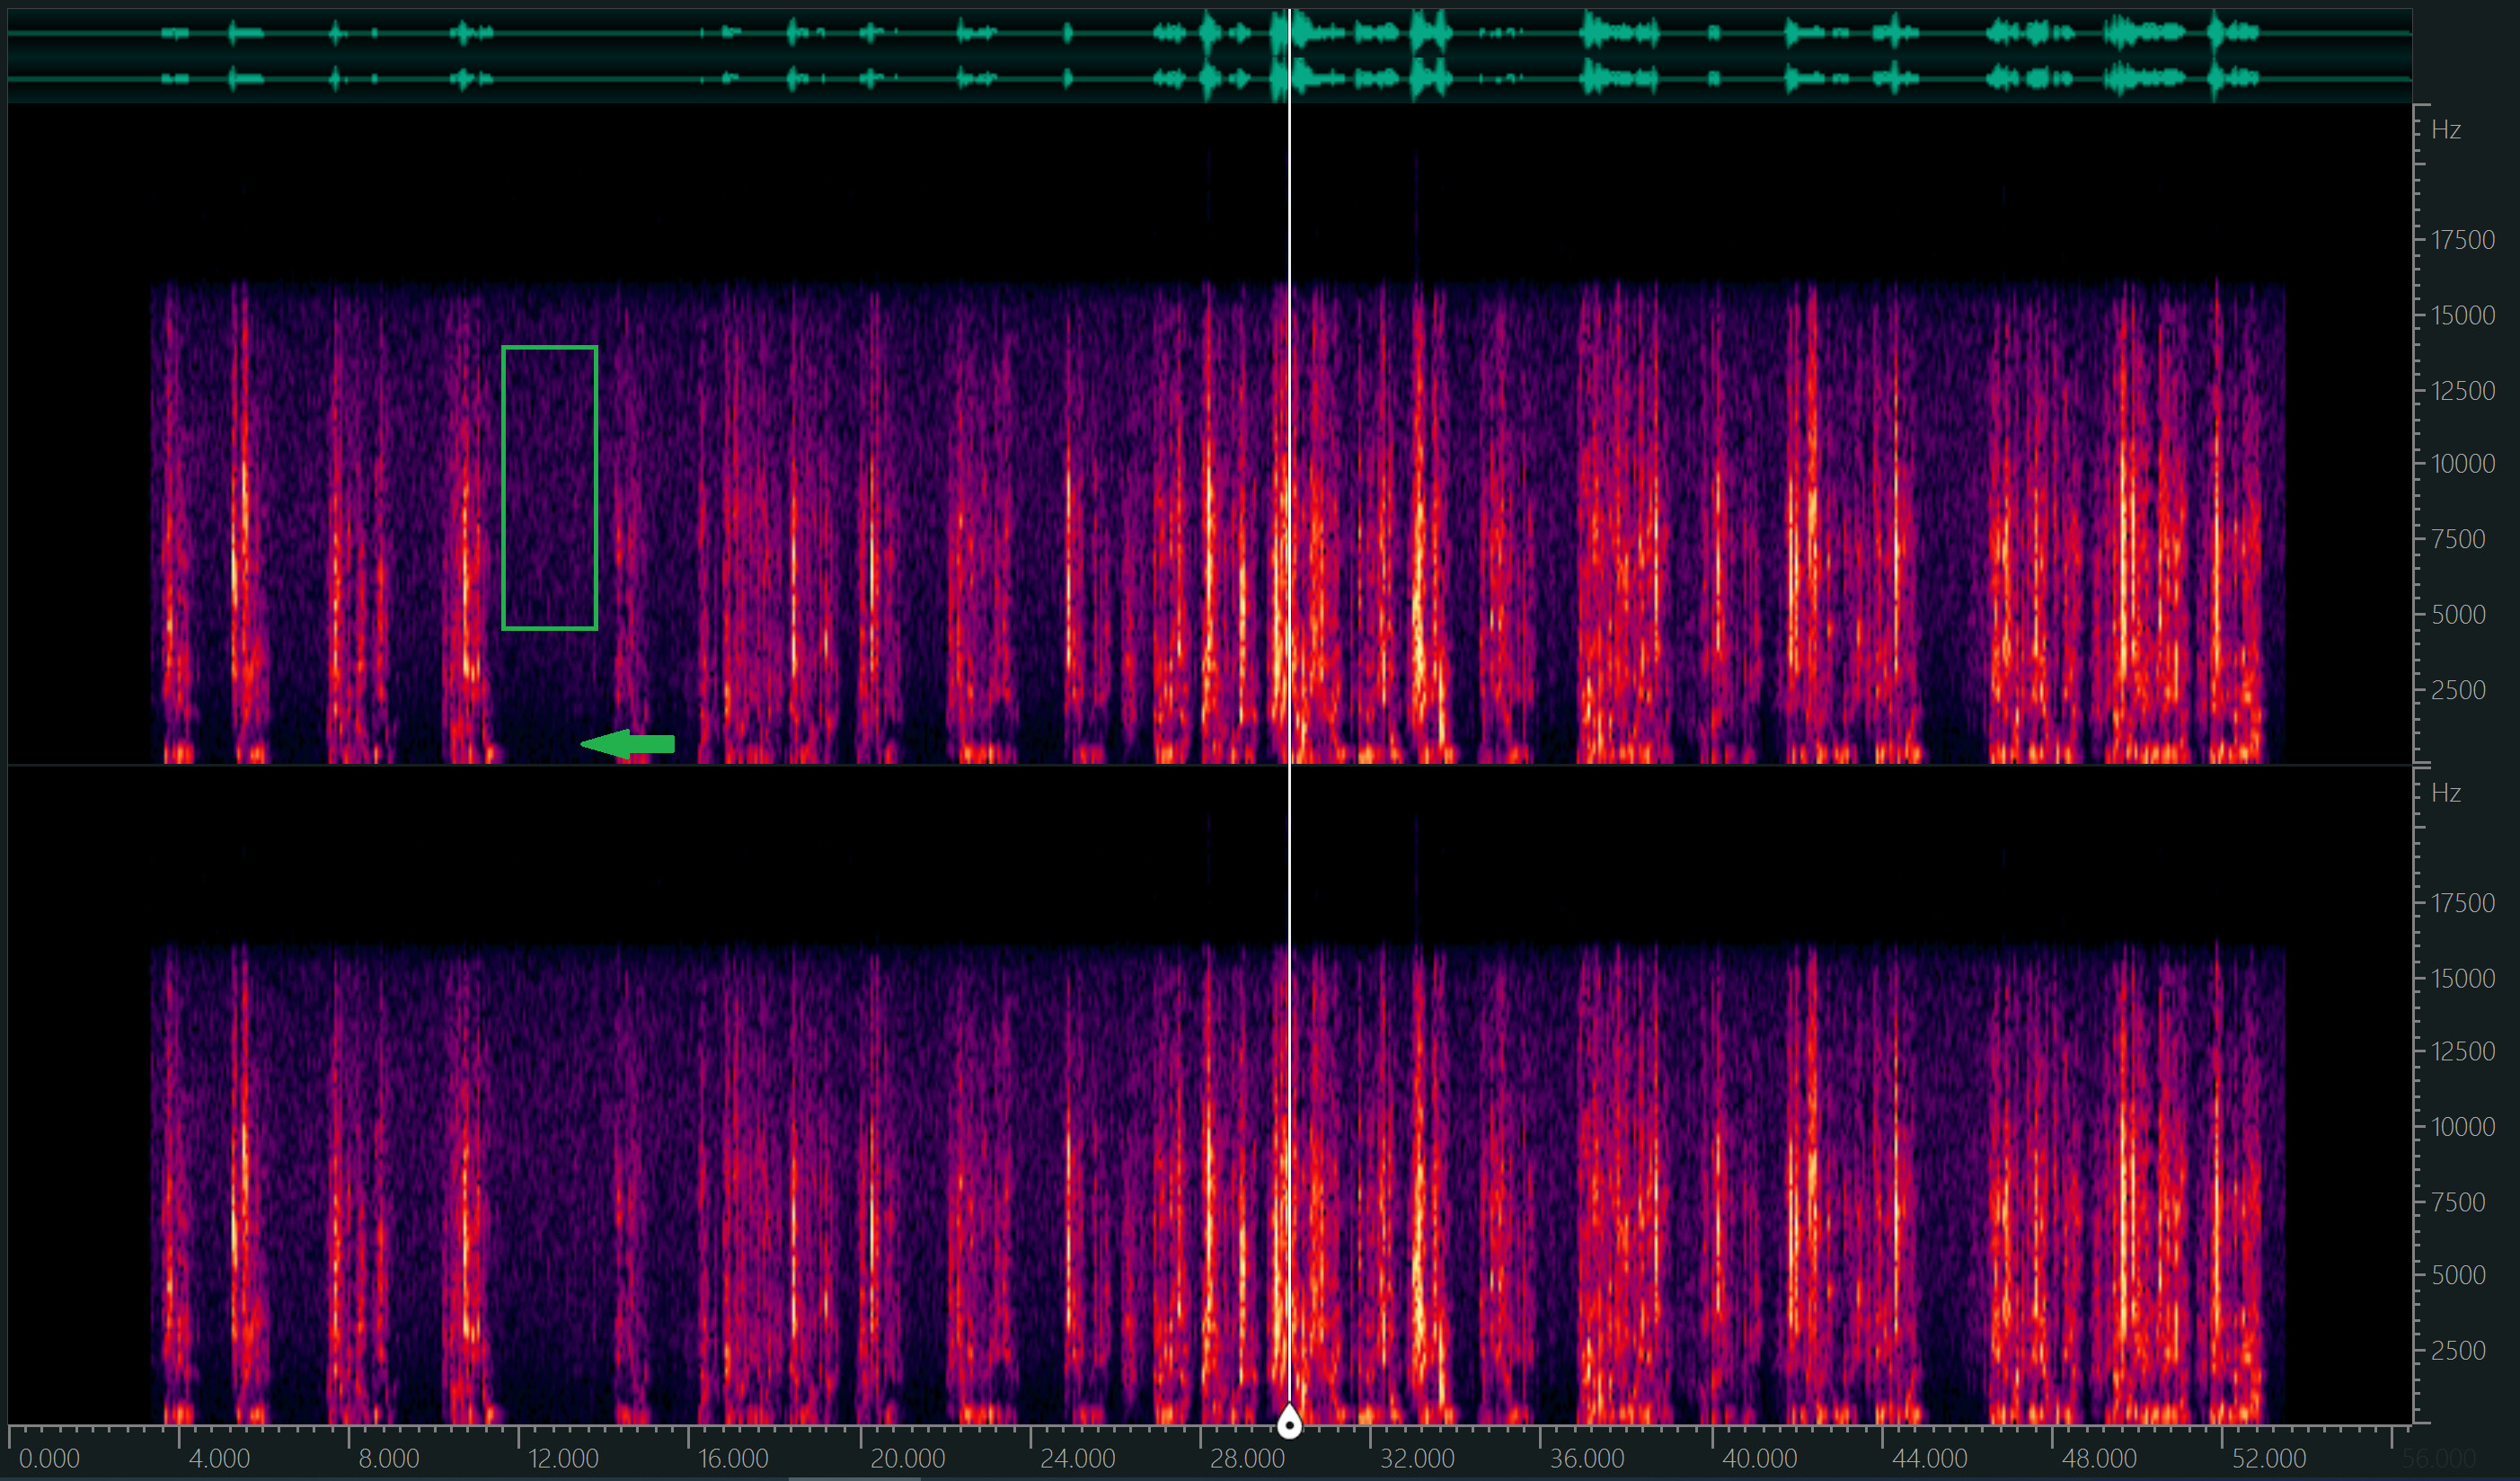
Here’s a visual example of what that means. Here is Micha’s audio graphed by the spectrogram in Ocenaudio:

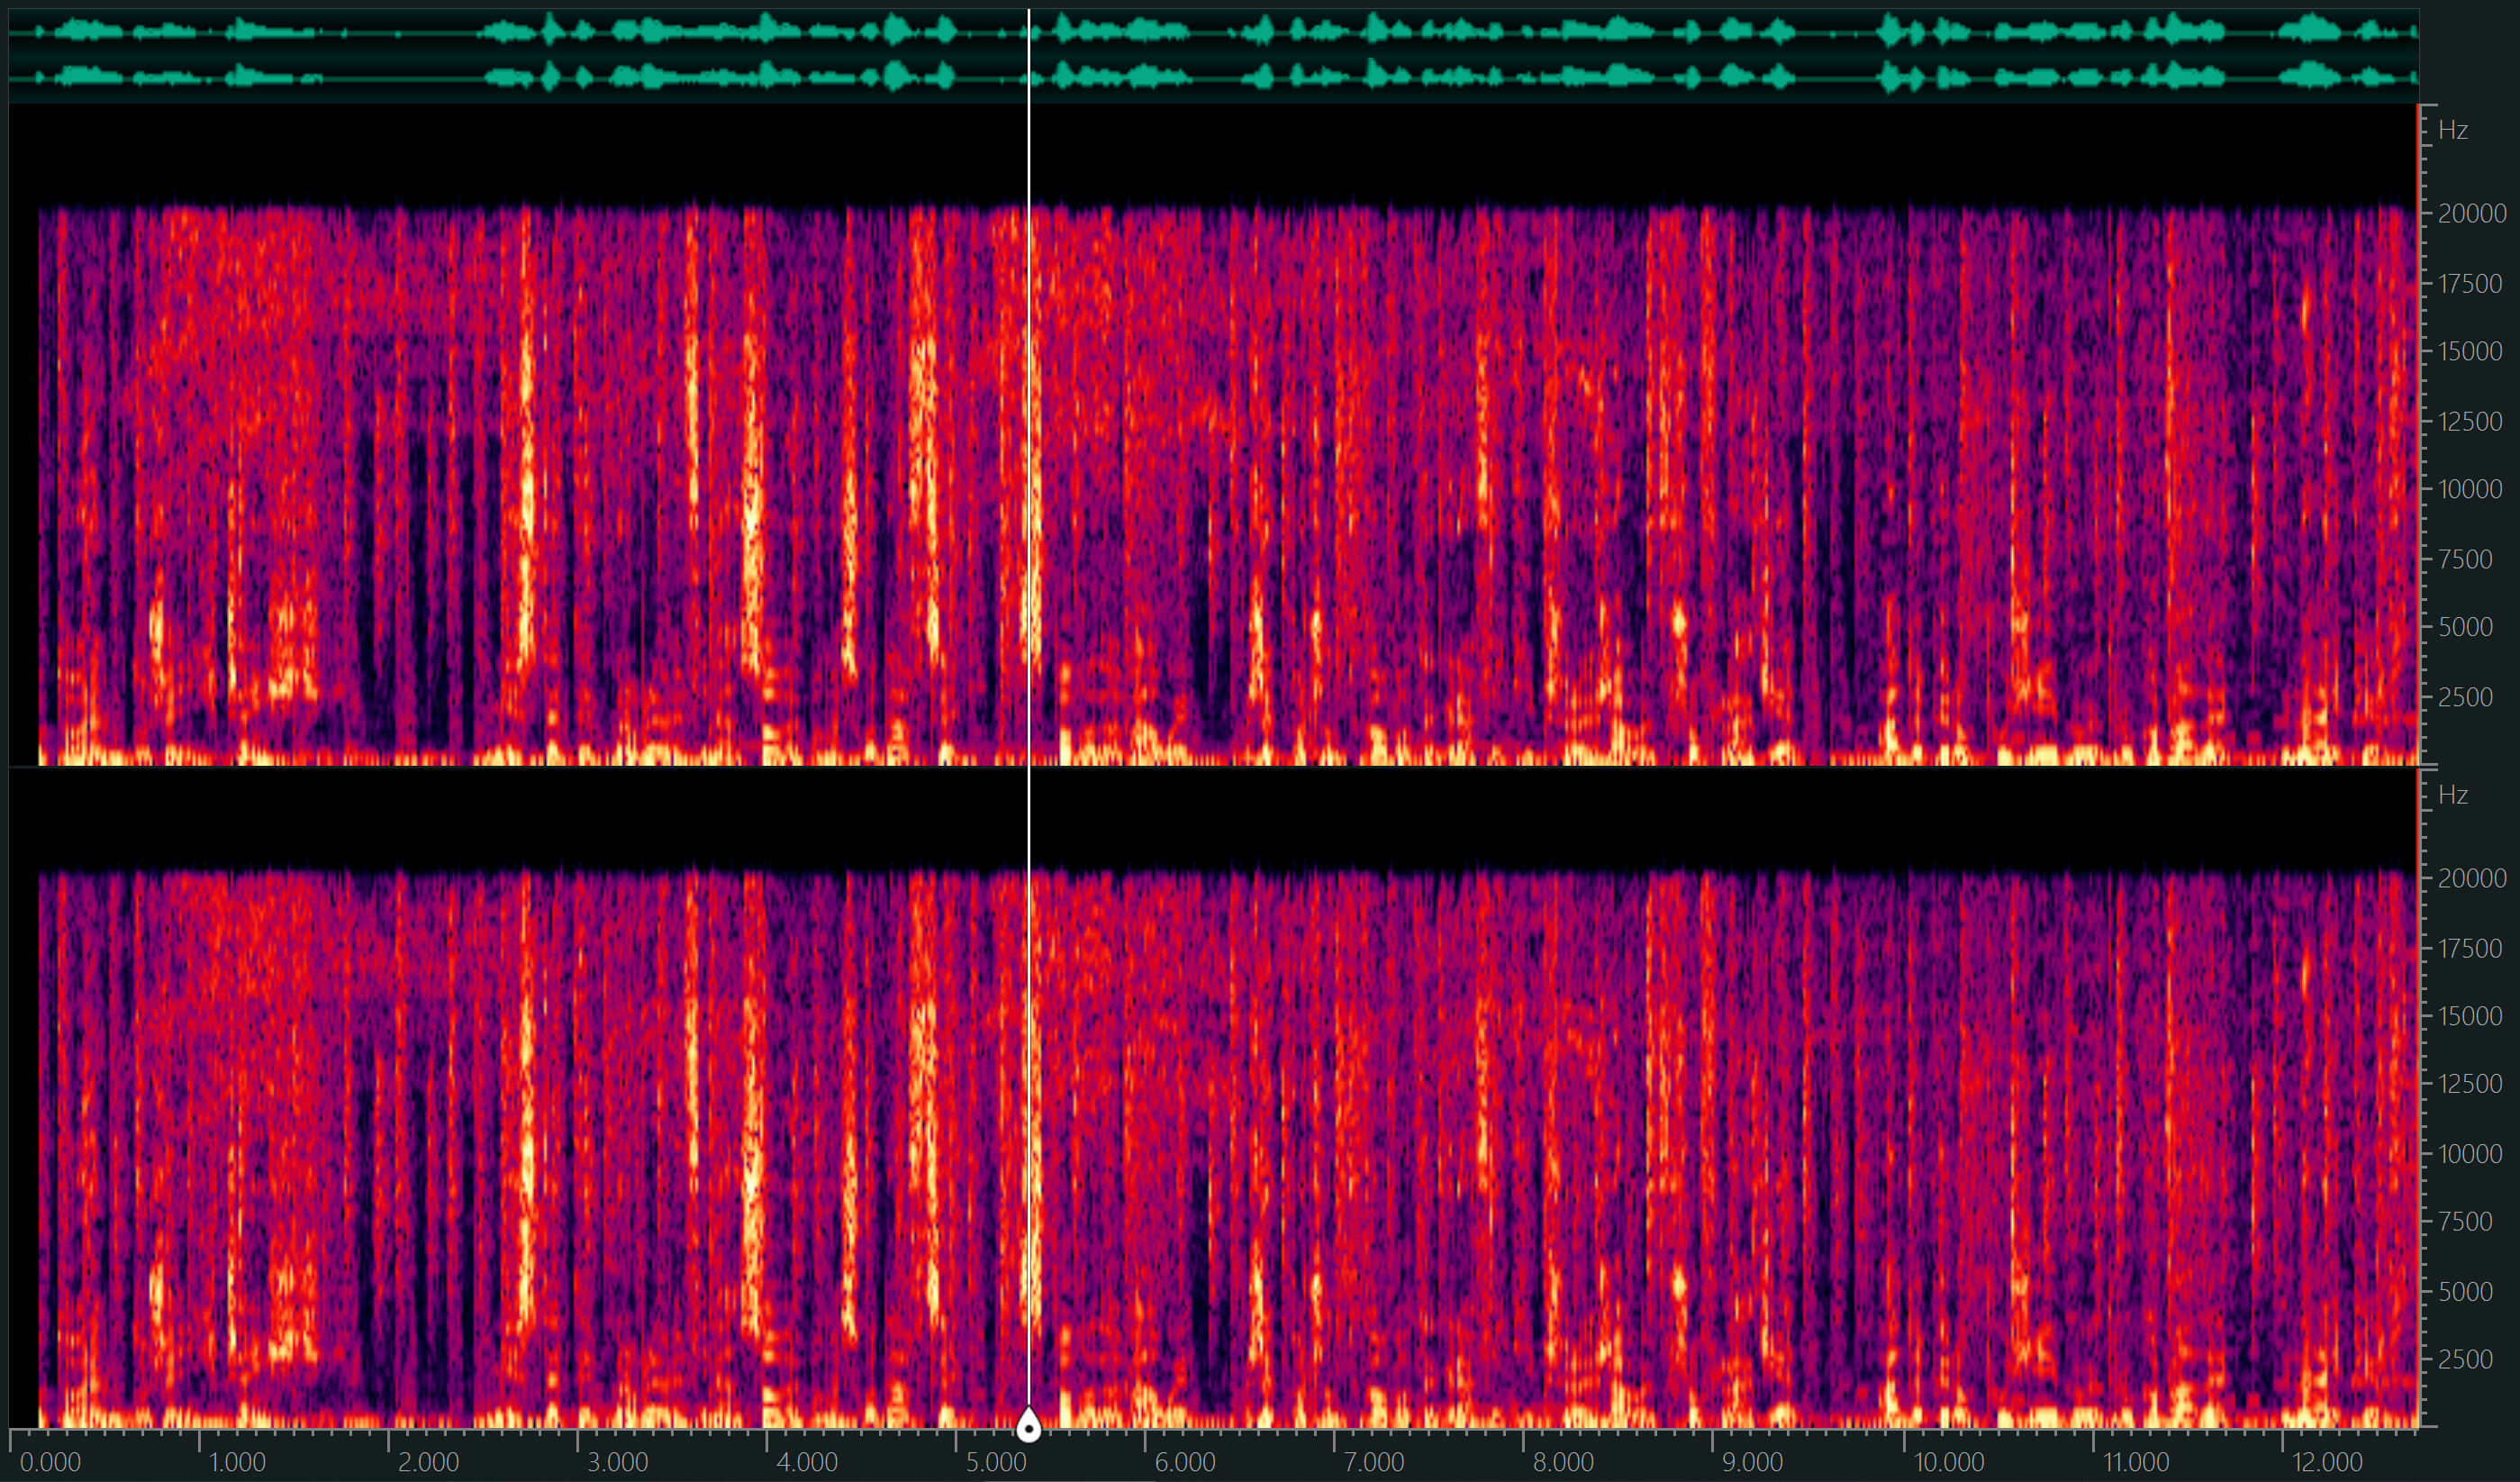
And here is the graph of @ken_wawa’s last video:

Ken had background music and his voice needed to punch through the mix. It was a higher-energy production and it shows in the graph as brighter orange spots. Meanwhile, Micha’s audio makes the bold decision to slow down and be as real and human as possible. I can infer this through the tone without even knowing the language. To me, that’s what makes it an effective tone choice.

In Micha’s graph, I made a green arrow that points to a dark band at the bottom of the graph. The falloff from blue to black represents the low-cut/high-pass filter doing its work below 70 Hz. Also, I made a green box that surrounds what appears to be blue static. That’s a good word for it, because that’s what it sounds like too… static, or background hiss. At first, I was tempted to recommend the noise reduction filter in Audacity to remove it, because Audacity would do well on that kind of hiss. However, on a second listen, I felt that having a little static to keep the audio sounding “alive” during the silent parts is actually a super-analog and sage-like thing to do. So basically, I like it just the way it is.

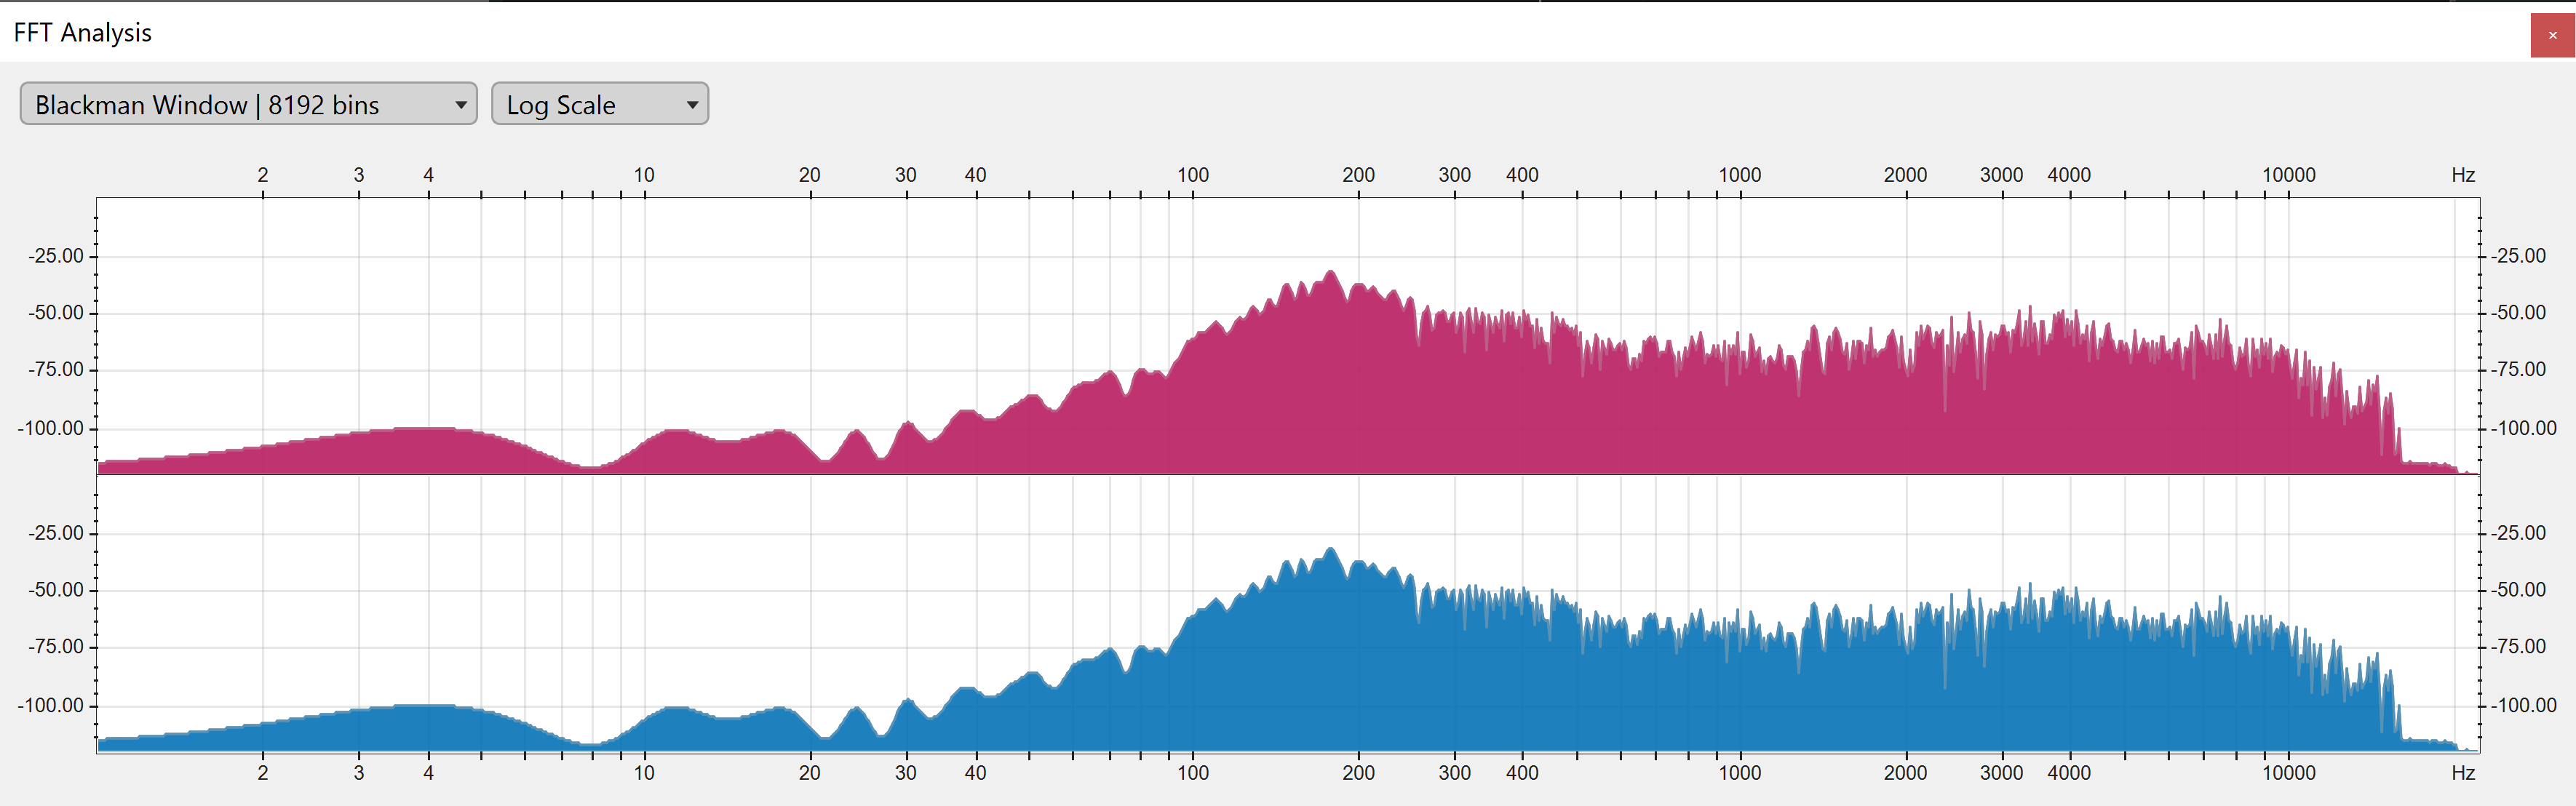
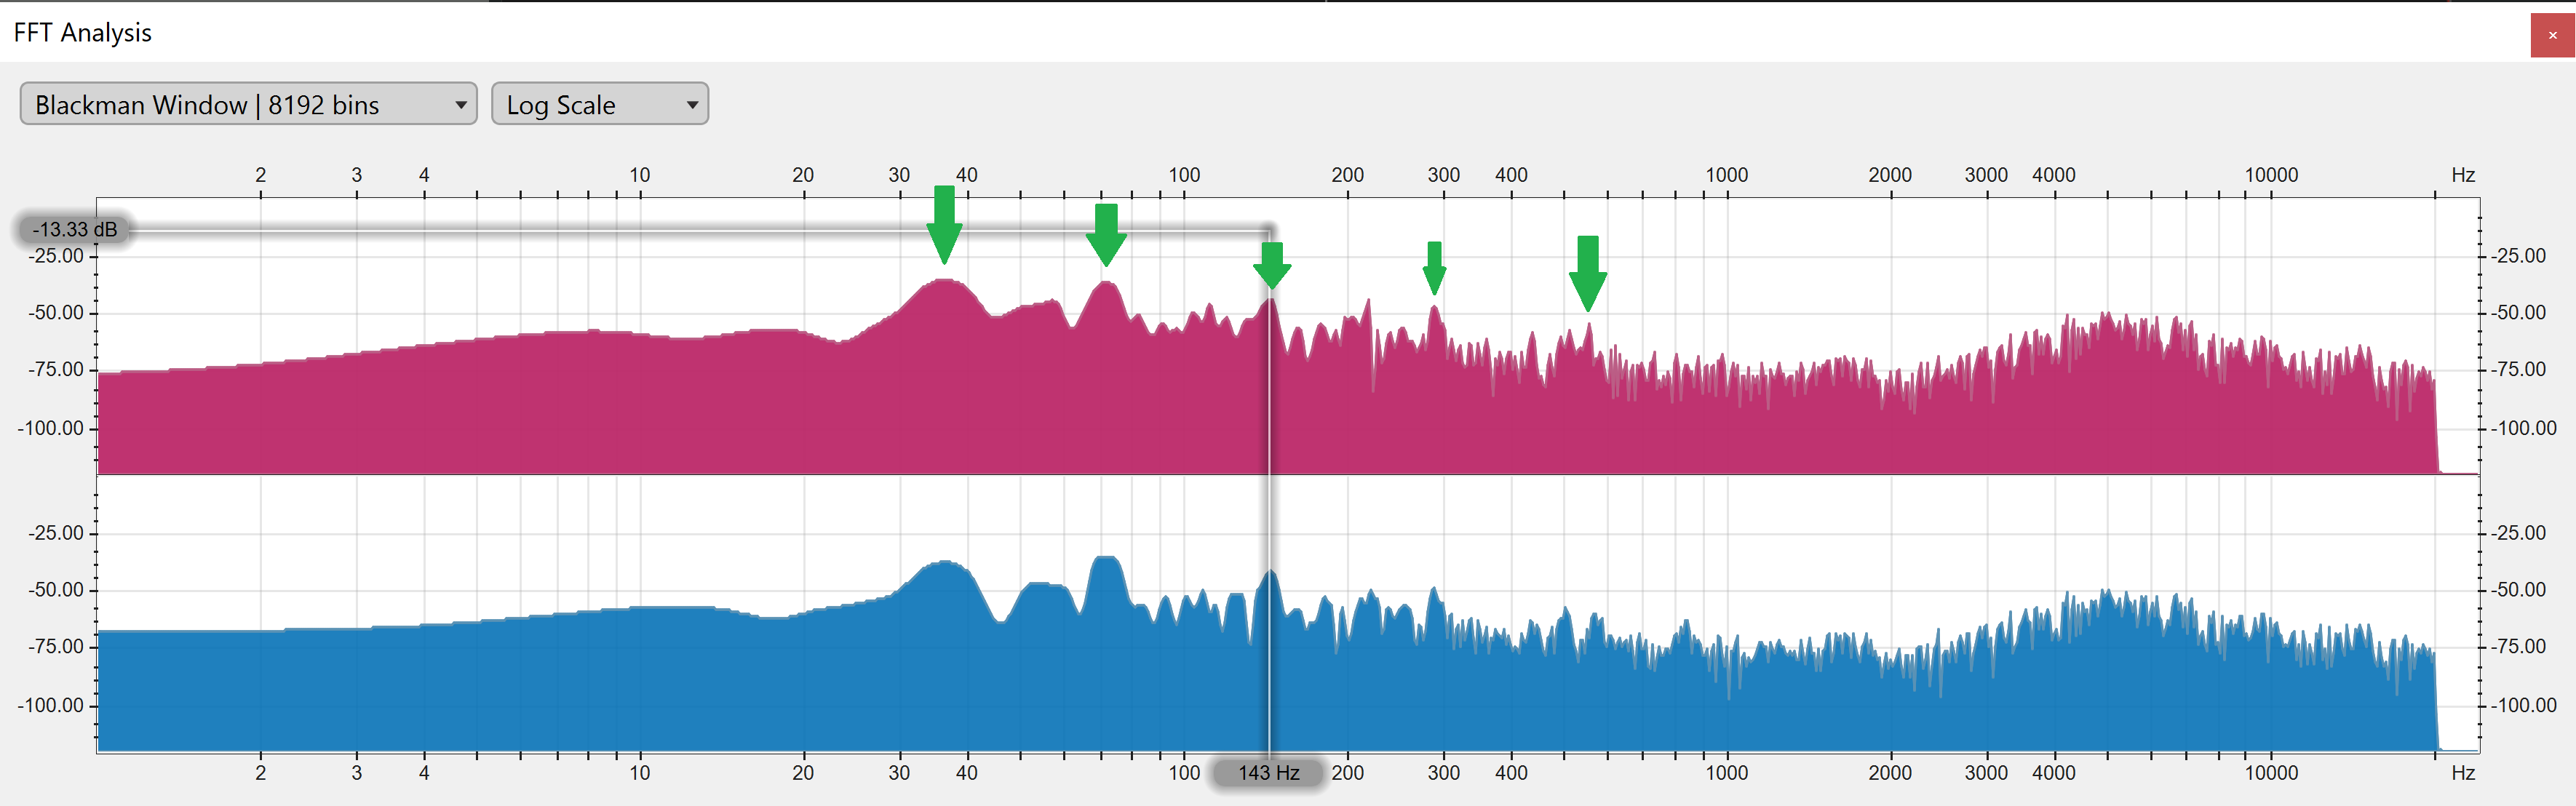
For fun, let’s look at the FFTs as well. Here is Micha’s:

And here is Ken’s:

Notice that Micha has nothing happening at 35 Hz. That’s because there is no background music. Also, Micha’s voice does not have the five swells that Ken’s voice had. This is partly due to the nature of their voices, partly due to compressor settings, and partly due to the presence of background music. It’s interesting to see just how unique two people’s voices are on a graph.

As for the MLT project file that was attached, the filter order and settings on the filters looked completely reasonable. I have nothing more to suggest there, except maybe a limiter on the Output track just for a safety net.

Looks and sounds great! That’s an excellent run for a first Shotcut project!

2 Likes

Very amazing what you are able to hear out of the sound of the voice. Without you giving away the content. It is the maximum I could achieve through sound character. Even though I am not a philosopher at all, I would like the protagonist to appear as if he were very wise, very clever and superior. But since in the presented words and gestures, mostly towards the end a break happens, the viewer should have the feeling: The guy has no idea, because he contradicts himself - and then one or the other starts to think and often discovers the same thought errors in himself. But this process, the stories about it I can’t plan, they happen to me and then I grab my camera and hold it in front of my nose.
To the noise. It’s there, probably due to technical reasons. But if I remove it, then something like “the glue” that holds the scenes together is missing. And that’s important, because I often take breaks from talking. Your discovery to leave the noise also speaks very much for your excellent feeling. It’s great when someone like you both masters the technique and can perceive and classify the emotions. Great luck to all in the forum.

1 Like

Here is my next attempt. This time I took out even more bass. It may sound less impressive, but more natural.
The only thing I would still miss here is a deesser. Sometimes the S sounds seem a bit too sharp to me. Can you do that in Shotcut?

Ich bin gut - 2022.mlt (15.2 KB)
Title: Ich bin gut = I am good
Unfortunately, I don’t really know the English language. But this is about the correct handling of my new favourite video editor.

1 Like

Sounds great! This new sound feels like “natural speech from a normal person”. Your first video was a little more like “natural speech from a person with some level of authority”. The bass setting seems to work like an “authority level” slider for your voice. At this point, it feels like you’re dialed in and it’s time to start cranking out videos!

I’m not aware of a dedicated de-esser in Shotcut. However, if the "sss"s are consistent enough, a sharp reduction spike (Q = 3 or 4) on the parametric EQ could probably knock them down some. The frequency slider may have to be swept around to find exactly what your “sss” frequency is. Probably in the 5-10 kHz range.

Hello Austin,
Are you sure that a high Q value like 3.0 or 4.0 makes the belt narrow? My experience shows exactly the opposite. In EQ Parametirc, Q 0.1 is very narrow, I see that when I look at white noise in Audio Spectrum. However, Q 0.0 makes a resonance, that is a strong disturbance. And Q 4.0 is very wide.

Uh oh… you are correct.

@brian, there appears to be a problem with the parametric EQ filter’s labeling.

The bandwidth is labeled as “Q”. But Q is center frequency divided by bandwidth. With a true “Q”, higher numbers make sharper spikes. But as @Micha pointed out, higher numbers are doing the opposite by making wider spikes.

According to the MLT filter documentation, the bandwidth is measured in octaves rather than Q:

https://mltframework.org/plugins/FilterLadspa-1204/

Since the units aren’t decibels per octave, we can’t call it Slope. And “Bandwidth” is too generic without units. What if the label was simply “Octaves”?

Sorry @Micha, reverse everything I’ve said about “Q” so far. :grin: 
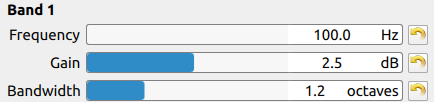
I hadn’t pushed the bandwidth hard enough in any of my tests to notice that it was working backwards from what I expected.

It is easy for me to change “Q” to “Octaves”.

It looks like I can also convert octaves to Q (and back) using this equation:
image

I found it here:

Which do you think would be better?

At first, I saw pros and cons to both… Q is already familiar to sound reinforcement engineers and is used by lots of EQ hardware and software. On the flip side, I can’t think of anywhere that I’ve seen Octave as an EQ unit by itself rather than Q. Using Octave might be a break with tradition, and that has risks.

However, even if experienced engineers aren’t used to Octave labeling, there’s no learning curve because Octave is an audible measurement that everyone can understand and immediately use. Musicians will find it intuitive, and non-musicians will be easier to teach with Octaves than Q. (Thinking ahead to documentation…)

Here’s an example of what finally pushed my preference over the edge:

https://www.sageaudio.com/blog/mixing/how-to-set-the-q-of-an-equalizer-to-an-octave.php

I did some searches to see if any other tools used Octave instead of Q. I didn’t find any. But what I repeatedly found instead was cheat sheets for converting Q into Octave. Even the link you sent me had a Q-to-Octave conversion table in it. As the link I posted above explained well, musicians need to know where octave boundaries are so they can create the most musical modifications and tonal adjustments. Personally, I would love units in Octaves rather than Q because an octave actually means something tangible, and it’s the unit I use to “think” about music and frequencies anyway. It seems many other engineers do too, hence all the conversion cheat sheets I found.

So yeah, I’m decidedly in favor of Octave labeling after looking around. It is non-traditional, so I can totally understand if you want to stay with Q. I’m able to use both and not bothered. But wow, Octave would be so easy to use.

Wouldn’t it be better to write: dB, i.e. dB per octave?

In physics the units i very important, so lets define what we are talking about

dB is very hard to understand for many people, because it is logarithmic relations between two power levels P1 & P2

dB = 10*log10(P1/P2)

It can also be an reference to two voltage levels V1 & V2 (Amplitude of a signal)

dB = 20*log10(V1/V2)

So dB by itself is not telling by itself, you need to know what it relates to, this is why you normally use

dBV ( a voltage related to 1V)
dBW or dBmW ( a power related to 1W or 1mW)

An Octave is double or half of a frequency
An Decade is 10 times or a tenth of frequency.

If it were dB/octave, then it would be called Slope or Edge Steepness. As I wrote to Brian, we can’t call it Slope because the units are not dB/octave. The units are Octaves alone.

dB/octave is a roll-off rate. The bandwidth of the effect has to be calculated based on when the cumulative dB amount goes into the inaudible range. “Inaudible range” would be relative to how loud the listener has their volume turned up.

Octave alone is a roll-off distance. It specifies the bandwidth directly without indicating a rate, meaning the user does not have control over what exactly the EQ curve will look like. The EQ filter takes the center point and the width points, and draws whatever curve (slope) it thinks is best to connect them.

The units are determined by the source code of the EQ filter, which comes from a library outside of Shotcut. This particular filter chose to define parameters as Octaves rather than Q or Slope. The units are not something we can change without rewriting the filter.

EDIT: Oh, sorry, I think I understand what you meant now. If we can write math to convert Q to Octaves, why not convert to dB/octave instead? The reason is that there is a 1:1 relationship between Q and Octave, because they are just two different ways of saying the same thing. But dB/octave measures a totally different property of sound (slope instead of bandwidth), meaning there is no mathematical way to convert to either Q or Octave as required by the filter. With a fixed slope as given by dB/octave, the bandwidth will change to be less or more wide depending on how high the EQ peak is boosted. This is why dB/octave is not used for bell filters (Band 1/2/3), but only for high/low-pass filters and the roll-off portion of shelving filters.

This PDF describes the issue graphically in English:
http://www.sengpielaudio.com/FilterSlope.pdf

Same PDF in German:
http://www.sengpielaudio.com/Flankensteilheit.pdf

Thanks to you, I know what Flankensteilheit means now! :smiley:

Thanks for the feedback. I agree with the logic and it is much easier to change.

I made the label “Bandwidth” and the units “octaves”.

image

3 Likes

Hello @brian,
what is the easiest way to adjust the values?
Moving the slider with the mouse is very rough.
With the mouse wheel it is very precise.
Would it be possible to program it so that small fine changes are made as now with the mouse wheel, and larger steps with Ctrl+mouse wheel?

It often happens to me, when I carelessly “wander” with the mouse over already made settings, that I accidentally adjust the values. To move the view up or down, I use the mouse wheel - and the values are already mixed up. And if I hadn’t remembered the previous value, there’s only one thing left to do: quit the program without saving and restart.
Therefore the following suggestion:
Adjust only with the mouse wheel + Ctrl = strong change, and mouse wheel + Shift = finely graduated change.

I do not want to remove dragging the control to change the value. That is the method I use most. I can appreciate the “wheel + CTRL” suggestion for coarse changes. But the underlying user interface library that we use does not support that without a lot of heavy customization.

1 Like

I understand that. I’ll be fine, you know I’ve been using Kdenlive for 18 months and I’m used to it. But I will get used to the Shotcut method. So I will do the rough with dragging and the fine with the mouse wheel.
Leave it as it is.

Since the few weeks I’ve been working with Shotcut, you’ve already improved so much - it’s hard for me to believe and a cause for great joy.

May I make one more suggestion: In Vegas Pro it works like this: Use the mouse to grab the slider and move it - it’s quick but rough. If you also press Ctrl, the adjustment becomes very fine.
This possibility: Ctrl+Move with the mouse would also be wonderful for adjusting in the color circle of Color Grading.