By the way @bentacular
Why do you have all those sub-folders in the filter-sets folder?
You should only have the filter sets files in there
I added the Sets Archive folder myself by the way. I use it to store the sets I don’t use often.
By the way @bentacular
Why do you have all those sub-folders in the filter-sets folder?
You should only have the filter sets files in there
I added the Sets Archive folder myself by the way. I use it to store the sets I don’t use often.
I did.
I have no idea. Should I just delete them?
I don’t know to be honest. On my computers all those files and folders are located one folder back
Yeah that would be useful. I suppose it being XML, one would really have an element specifically for the purpose.
<TransitionInstructions>
Create a twenty frames transition between two clips. Select the transition. Go to Filters SetsSelect the Whip Pan set
</TransitionInstructions>
Faites la manipulation que @MusicalBox a décrit dans ce post.
https://forum.shotcut.org/t/filters-set-unblur-zoom-blur-animated-title/39433
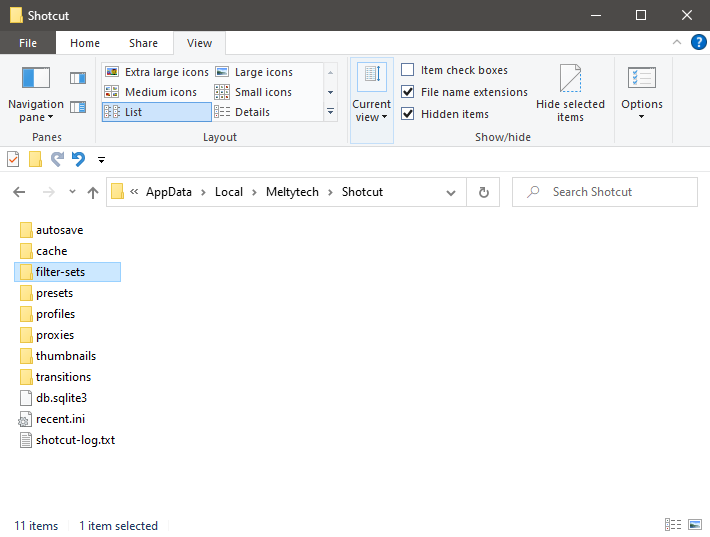
Cela va créer le dossier “filter-set” et c’est dans ce dossier que vous mettrez le fichier.
Perform the operation that @MusicalBox described in this post.
This will create the “filter-set” folder, and that’s where you’ll put the file.
Thank you all! Yeah. It looked like the other folders prevented Shotcut from showing the filter-sets.
Thank again!
Nice and easy and good looking, thank for sharing
Hi @musicalbox, I took the liberty of amending your filter sets (using @SergeC’s suggestion of inverting the Yaw values in the 360:Transform filter (360 and -360)) – to include both a L-R and a R-L movement version.
MB_TRANS__Whip-Pan_20frames_1920x1080_LEFT_and_ RIGHT_30fps.zip (1.6 KB)
Hi @jonray and thank you.
The SP&R filter also needs to be edited.
At the end of my original version (right to left) the SP&R filter de-stretch the image from right to left.
So in the left to right version, the SP&R filter needs to work the other way.
Of course, this happens so fast that the difference is barely noticeable, but… you know
Here’s the new ZIP, with the SP&R filter fixed.
MB_TRANS__Whip-Pan_20frames_LEFT-and-RIGHT_1920x1080_30fps.zip (1.9 KB)
I edited my original post to include the ZIP with the 2 versions.
Great. Thanks. This is a very clever set of filters.
Filter sets could be a game changer in being able to provide users with something like transition plug-ins like other video editors. I attempted to do it using MLTs but it was clunky. This may be the better route.
Agree totally. I wish I had more time to play with these filter sets myself but at the moment it’s hats off to the likes of @musicalbox, @dimadjdocent, @Kamigeek , @david.lyon and others I have failed to mention (sorry)… for pioneering this and being so creative.
The idea to add a filter set to a transition (@dimadjdocent ) was a particularly game-changing idea, I think.
This idea came to me rather banally: I just started to wonder how the transitions are made in other editors and came to the conclusion that it is in the transitions that they covertly sew up their filters. I really hope that this idea will be further developed, and new filters will appear in the shotcut to create new ideas. By the way, I made my transition effects frame-by-frame from YouTube videos where these effects were applied. I compared each frame with a reference and made it myself, because of this I have so many keyframes and filters to get as close as possible to the result.
Bravo, sir! A Shotcut pioneer…
I don’t know if by Notepad++ auto-templates you meant turning THIS:
Into THAT:
But after a bit of search I found that to do it, I needed to install the NotePad++ XML Tools plugin.
Go to Plugins > Plugins Admin…
That’s brilliant. I was going to write in and ask if there was a way of doing that…
I knew you would. Knowing how busy you are, I thought I’d save you the trouble
@jonray if you prefer Visual Studio Code, it can also format the code lines.
It also needs an extension.
Go to the Extension tab
Type format XML in the search field.
You’ll get many suggestions. I chose the first one I saw:
After the extension is installed:
Use the shortcut Alt+Shift+F to format the code of the opened document
OR
Right-click anywhere in the editor and select Format document.
The first time you may be prompted to indicate what extension to use.