Filter Set | Whip Pan transition

Yes, @bentacular has done the first, with an image created in Photoshop. I had done the Gimp version. Let’s all cry together😢

2 Likes

@Jonray From left-to-right, simply invert the Yaw values in the 360:Transform filter (360 and -360).

1 Like

You dont really need to add the .xml extension.
You can leave the file as it is (with no extension) and simply add your comments right under
the <?xml version="1.0" encoding="utf-8"?> line.
Works for me.

2 Likes

Yes, I played around a bit more and realised the xml extension isn’t required though Notepad++ auto-templates the xml making it a bit more readable.

2 Likes

Thank you @SergeC , I will do that!

I don’t know if that could be possible, but it would be a nice feature if Shotcut could detect
the <!-- COMMENT --> part of the file.
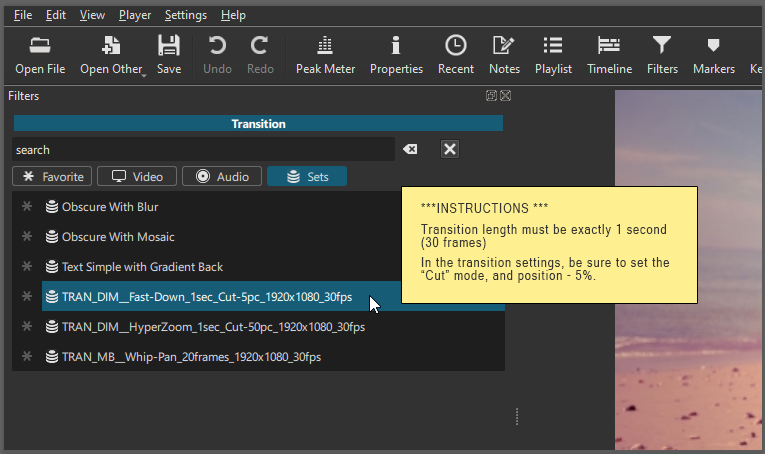
When hovering the mouse on a filter set, the instructions could be displayed in an info bubble.

:roll_eyes: :innocent:

2 Likes

I think I’m missing a step. I’ve been dragging the file in the folder, but I’m not seeing the whip-pan filter set

image

image

Did you re-launch SHotcut?

1 Like

By the way @bentacular

Why do you have all those sub-folders in the filter-sets folder?
You should only have the filter sets files in there

I added the Sets Archive folder myself by the way. I use it to store the sets I don’t use often.

I did.

I have no idea. Should I just delete them?

I don’t know to be honest. On my computers all those files and folders are located one folder back

Yeah that would be useful. I suppose it being XML, one would really have an element specifically for the purpose.

<TransitionInstructions> 
     Create a twenty frames transition between two clips. Select the transition. Go to Filters SetsSelect the Whip Pan set
</TransitionInstructions>
1 Like

Faites la manipulation que @MusicalBox a décrit dans ce post.
https://forum.shotcut.org/t/filters-set-unblur-zoom-blur-animated-title/39433
Cela va créer le dossier “filter-set” et c’est dans ce dossier que vous mettrez le fichier.

  • NOTE IMPORTANTE: Quelqu’un a commenté sur YouTube qu’il ne voit pas le dossier filter-sets dans son Shotcut App Data Directory . Je pense que ce dossier n’est probablement ajouté au répertoire que lorsque vous créez votre premier ensemble de filtres personnalisés . Donc, si vous ne voyez pas le dossier filter-sets , procédez comme suit pour le créer :
    • Ajouter n’importe quel clip à la chronologie
    • Appliquez un ou plusieurs filtres.
    • Cliquez sur le bouton Copier les filtres cochés .
    • Entrez un nom dans la boîte de dialogue et cliquez sur OK pour enregistrer le jeu de filtres.
  • Quitter Shotcut
  • Dans App Data Directory , ouvrez le dossier filter-sets .

Perform the operation that @MusicalBox described in this post.
This will create the “filter-set” folder, and that’s where you’ll put the file.

1 Like

@bentacular Hi. follow these instructions

3 Likes

Thank you all! Yeah. It looked like the other folders prevented Shotcut from showing the filter-sets.

Thank again!

1 Like

Nice and easy and good looking, thank for sharing

1 Like

Hi @musicalbox, I took the liberty of amending your filter sets (using @SergeC’s suggestion of inverting the Yaw values in the 360:Transform filter (360 and -360)) – to include both a L-R and a R-L movement version.
MB_TRANS__Whip-Pan_20frames_1920x1080_LEFT_and_ RIGHT_30fps.zip (1.6 KB)

whip pan filter sets MB screenshot

2 Likes

Hi @jonray and thank you.

The SP&R filter also needs to be edited.

At the end of my original version (right to left) the SP&R filter de-stretch the image from right to left.
So in the left to right version, the SP&R filter needs to work the other way.

Of course, this happens so fast that the difference is barely noticeable, but… you know :wink:

Here’s the new ZIP, with the SP&R filter fixed.
MB_TRANS__Whip-Pan_20frames_LEFT-and-RIGHT_1920x1080_30fps.zip (1.9 KB)

I edited my original post to include the ZIP with the 2 versions.

3 Likes

Great. Thanks. This is a very clever set of filters.

1 Like