Experiments with the Time Remap filter

Surprisingly smooth during the slow-down! You may have convinced me to do more recording at 60fps.

1 Like

Yes, there is a noticeable difference. I did my first tests with a 30 fps and the slow-downs where definitely more choppy.
https://streamable.com/8aae7o

I’m wondering though… Slowing a 60 fps video in a 60 fps project looks smooth. What if we use use a 60 fps clip in a 30 fps project ? I’ll have to test that.

It will be smoother because the additional frames will be used. This is especially noticeable when slowing down but also improves speeding up due to higher precision.

1 Like

New Version 21.05.01: Time Remap

Hello, (english is not my native language)
I would like to use the new time remap filter, but have problems understand how to work with it … I have already searched tutorials and videos for the new shotcut version and found nothing (except for a created video with this filter) that shows this :frowning:

I can work with keyframes, no problem, but in each filter I can adjust how, where, what, … In Time Remap I do not get along because I only keyframes can here up and slide down and this is very inaccurate. I do not understand this time setting and speed setting in the filter. How is that action? If I e.g. A time and speed for a keyframe in place changes the (e.g., Speed) also in the other frames behind it …

So, it would be really great to see a small Step for Step instructions. I think the filter is really great and very useful if you understand how to use it correctly :slight_smile: Thanks for the work!

So if someone could explain / show someone in a short tutorial, that would be really great and certainly helps others.

Hi @paulshots
I feel that the Time Remap filter is one of those things that are harder to explain than to understand.

A bit like trying to teach someone how to see the 3D object hidden in one of those pictures:
3d.
(By the way the object is a butterfly)

My advice is to read the page about the filter (link in my first post above), then experiment and practice with the filters. Start with a couple of keyframes, move them and see what it does. At some point you will simply get it.

I can give you these two tips though:

1- Use the Ctrl or the Alt shortcuts when moving a keyframes horizontally or vertically.

Press & hold Ctrl and Grab & Move a keyframe. It will only move UP or DOWN.
2021-05-06_04.05.04

Press & hold Alt and Grab & Move a keyframe. It will only move LEFT or RIGHT.
2021-05-06_04.06.07.

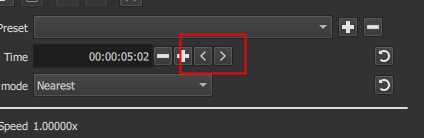
2- Experiment and practice with those two buttons. Use and abuse them until you understand how they work and when to use them.
image

In conclusion, I’m sorry if I can’t provide you with more help on how to use the filter. I learned how to use it myself by doing exactly what I describe above. I understand the filter well enough to use it efficiently, but honestly I wouldn’t know where to start to create a clear and comprehensive tutorial about it (English isn’t my native language either).

4 Likes

Hy,

Thank you many times for your effort and the tips. This definitely makes it very easier to move the keyframes. But somehow I have a think mist with this filter. I have now tried about 2 hours with it and come to no understanding to work with it. Only one thing is “reliable” succeeded. play between two keyframes backwards (have typed the start and end time for the frames). Everything that has to do with time and speed is somewhat arbitrary and not 100% understand it(up, down, slowmo/speed,…) Maybe it’s because the “timeline” of the filter works vertically and not horizontally as normal? Or do I lie wrong again?

And also weird - when I convert as a subclip (e.g.) I still get the original clip until the end / beginning when I play as reverse …?

With this filter it really is like with your picture. I get eyes cramps and do not see this butterfly :frowning:

I will these and all subsequent versions shotcut therefore no longer install (etc. because older projects) in the near future. If I do not understand it by a (maybe still) upcoming guidance (video tutorial, …) for dummies :slight_smile:

Even if I find it a lot of a pity :frowning: Would not already have the warning for older projects (repair, …) Then I would have installed firmly until now. At this time I had tried it with the portable version first.

I can only say that I think this filter basically really great, but he is simply too incomprehensible and inaccurate for me. Maybe I’m just too stupid for that … :frowning:

1 Like

Hopefully, someone will come up with an easy to follow tutorial soon.

5 Likes

The Time Remap feature was/will be the mechanism by which the award-winning film “Slaughterhouse Five” will be/was made using Shotcut 21.05.01 in 1972.

Don’t look at me, LOL

@bentacular as was not looking at you at all…

2 Likes

This is where I stand…

1 Like

He mentions you can add keyframes and make adjustments, but did not verbalize whatsoever what the adjustments mean. What direction? What does up or down mean? What does left or right mean? When you go back to the main timeline, does it shorten the clip to match the new time? He basically says, you can make adjustments. That’s about it.

1 Like

You’re correct, he didn’t fully explain but I still took something away from it.

I don’t use it as he does. My way is to put a key frame at the desired point then click the left arrow to set the speed ‘previous’ to the key frame. For me that’s what sorta works to complete what I need, so far anyhow.

1 Like

@shotcut or @brian,

In the thread announcing the release of V21.04 ALPHA/UNSTABLE - Time Remap, you mention (at the end of the Usage paragraph) :

When the speed is faster than 1.0, multiple clip frames can map to the same output time. The Image Mode allows the user to choose between selecting the nearest frame, or blending frames frames.

Can you explain in layman’s terms what “multiple clip frames can map to the same output time” means? And possibly show an example please?

1 Like

Yeah. Until the kinks are worked out, I’m going to accomplish what I need to do the old way

2 Likes

I don’t know if my question was unnoticed or simply ignored, but I’d really appreciate an answer please.
Sorry for insisting.

1 Like

If 30fps footage is sped up to 2x, it effectively becomes 60fps footage but with half the duration of the original.

In this example, the sped-up clip is twice the frame rate of the timeline. This means two frames of source fit into the duration of one timeline frame. The export engine has to choose what to do:

  1. Choose a single source frame that is closest to the timestamp of the timeline (nearest mode).
  2. Blend multiple source frames into one mash-up frame with averaging (blend mode).

I don’t think anyone was ignoring you. It’s just difficult to explain without an illustration, and it takes time to make one, even a hacky one like mine.

3 Likes

Thanks a lot @Austin :+1:

1 Like