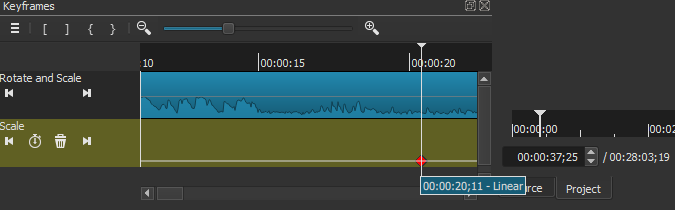
The keyframe timeline runs under its own independent time. It does not match the time running in the Project tab. This makes it very difficult when trying to move keyframes around because the dialog bubble that comes up in the keyframe timeline that tells you at what position the keyframe is at and where it’s being moved has no relation to the main timeline making it useless.
Here is an image showing this problem:
Can this be changed so that the blue dialog box in the keyframe menu shows the same time that’s in the main timeline? This change would go a long way in making work in keyframes much, much easier and faster.
Keyframe positions are relative to the beginning of what they are attached, usually a clip. If you are interested in making certain effects or animations with certain timing relative to the beginning - do X at Y seconds, you want to see the relative time instead of project time.
The problem is that since there is no snapping keyframes to the playhead and the bug from this report still exists:
In Advanced Keyframes, when the keyframe timeline is zoomed in the seeking is inaccurate after the keyframes are moved. Also, they stutter as they are being moved around. This happens with both types of Advanced Keyframes.Demo
then there is no real way to know exactly where the keyframe is being moved to without doing more work. If those numbers showing up in that blue dialog box were of the project time instead then even with the keyframes jerking and stuttering around like is seen in the above demo then the placement of the keyframe will still be accurate without doing extra work.
If you don’t want to change the relative time in keyframe timeline to the project time then how about adding a timer to the keyframe timeline that shows the relative time position of the playhead in the keyframe timeline?