Batch Convert to Edit-Friendly?

Hello,
Long time Shotcut user, first post on the forum. Up until now, I have been able to look up all of my questions and find the answers I needed but I’m not able to find a specific answer for batch converting multiple files to edit-friendly.

All of my clips are variable frame rate and must be converted to “edit-friendly” before I start each project. Currently, I pull each clip in to Shotcut, one at a time, which prompts me to convert. This can be very time consuming as some projects contain almost 100 clips.

If I drag multiple clips into the Playlist, the convert dialog pops up but it only converts the first clip. If I put all the clips in to the playlist, highlight them all, select Properties, and then click “Convert to Edit-Friendly”, it only converts the active clip.

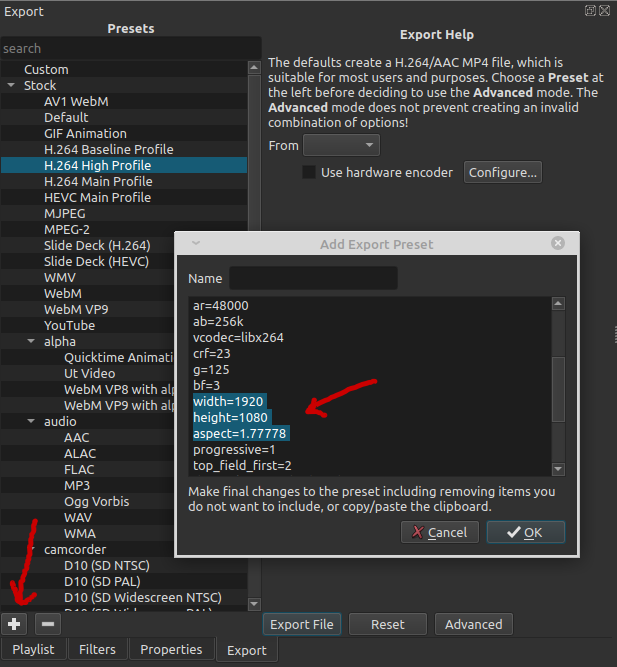
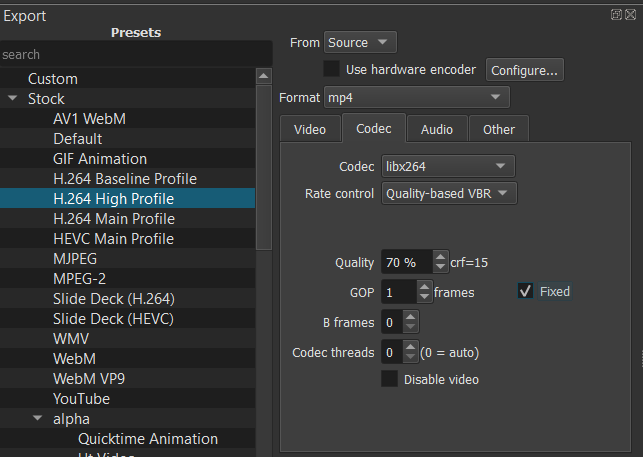
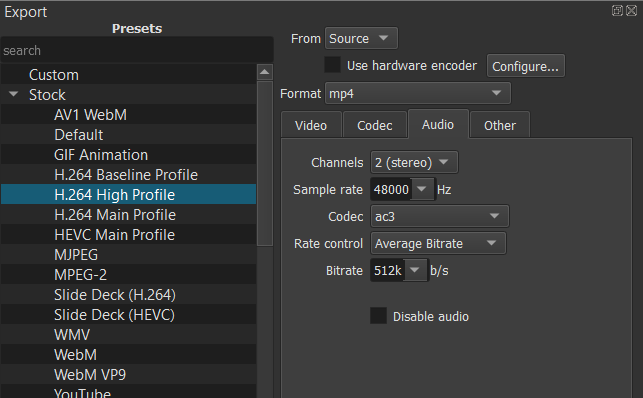
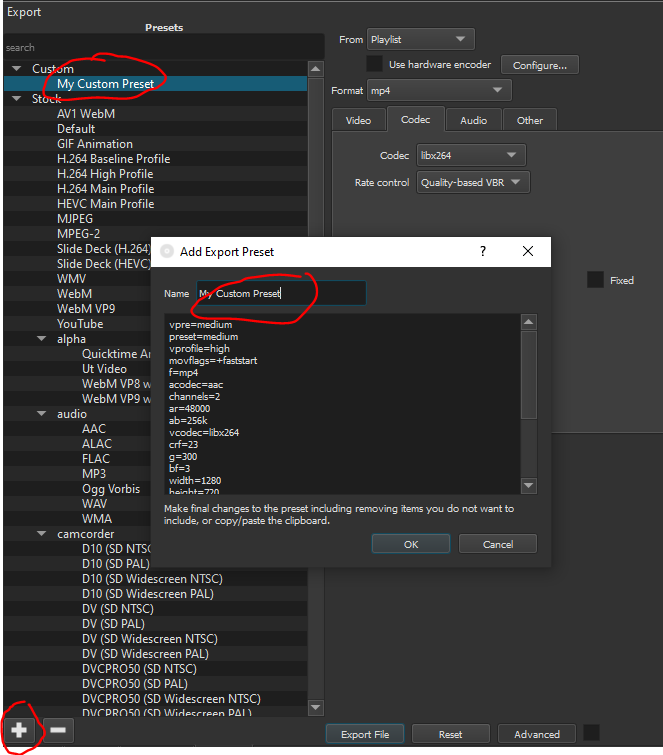
I do understand that there’s an option to Export > From > Each Playlist Item but I don’t know all of the options I’d need to change to get the same exact converted clip that I get when I select “good” on the “Convert to Edit-Friendly” dialog.

So, my question is: Is there a way to only interact with the “Convert to Edit-Friendly” dialog once, to select the quality and save location, and have it automatically convert all of the clips without any further interaction from me?

I’m currently using Shotcut v20.07.11. I realized there are newer versions but this version has been very stable for my needs. However, I have no problem upgrading if a newer version resolves my conversion issue. Thanks!

-Mike

No

This should get you the same results:

image

image

1 Like

Hi brian,
Thanks for the settings screenshots, I really appreciate it! When I change these settings to convert my clips, will Shotcut save the changes? If so, that means I would need to change them back to export the final edited video. Any chance a batch convert feature might be added in the future or would that be considered a duplicate feature since the Export > Each Playlist Item already exists? Thanks again for your time.

-Mike

You could make a custom export preset for these settings, so it would be quick and easy to switch between Convert and Final Export settings.

2 Likes

After you configure the Advanced export settings the way you like them, click on the “plus” and give your custom preset a name.

1 Like

No immediate plans for that. There are some features in the “Convert” dialog that are not available in the export panel. E.g. HDR color mapping and motion interpolated frame rate conversion. I think those need to be considered on a clip-by-clip basis and are not good candidates for batch processing.

1 Like

Austin,
Thanks for the idea, that sounds like my best option.

-Mike

brian,
Thanks for taking the time to create the screenshot, makes perfect sense and will be a good solution to my issue.

Also, thanks for explaining why batch processing via the “Convert” dialog might not be a good idea. However, does that mean if I use the Export > Each Playlist Item method to convert my clips, I will be missing out on the features you mentioned that are only supported in the “Convert” dialog and could end up with lesser clips since they missed out on “HDR color mapping and motion interpolated frame rate conversion”?

-Mike

When making the export preset, remember to remove the following lines before saving it:

  • width
  • height
  • aspect
  • frame_rate_num
  • frame_rate_den
  • channels

Otherwise, the export preset will force all clips to the same dimensions and frame rate, which would not be representative of the original clips.

As for HDR conversion, that is only needed if the source is HDR, such as a screen recording of a video game in BT.2020. If the footage looks fine in Shotcut, HDR conversion is not necessary. BT.2020 footage will look washed out and milky in Shotcut until it’s converted.

Motion interpolation is when you want to create artificial frames to make 30fps source footage look like 60fps slow-motion footage (as an example). This is a special effect feature, not a requirement for making edit-friendly substitute videos.

The deinterlace option could come into play if you’re editing interlaced footage. If that’s the case, then use Convert to Edit-Friendly with the Deinterlace option for the interlaced footage, and use the export preset for everything else for highest quality.

1 Like

Austin,
Thanks for pointing that out, I would have been chasing my tail trying to figure out what went wrong. :slight_smile: Depending on my filming angle, some clips accidentally end up recorded in portrait instead of landscape and I have to use Shotcut to rotate them.

As for HDR, the camera I use is currently set to Auto HDR so, based on the lighting (I think), it chooses whether or not to use HDR when I hit the record button. So, in some cases, my source would be HDR.

I’m starting to think that the potential to run into various issues using the Export > Each Playlist Item conversion method might end up costing me more time, in the long run, than just using the “Convert” dialog for each clip, one at a time. Am I wrong and just over-thinking it? Thanks again for your help.

-Mike

HDR in your camera’s Auto HDR context likely refers to choosing and manipulating exposure. As in, you are allowing the camera to alter what it sees in order to cram HDR-like range into an SDR file. But Auto HDR mode shouldn’t change the fundamental format of the output file, which is still BT.709 SDR. Colorspace is usually deliberately chosen by the user, and I can’t imagine a camera randomly flipping between colorspaces as it sees fit. It would be chaos to color grade later in post-production if the files weren’t consistent.

A quick way to test this is to turn on the Auto HDR mode and record two scenes, one where it doesn’t do HDR and another where it does. Trick it with a flashlight if necessary. Then, bring both clips into Shotcut and look at the Properties panel for those clips. If the colorspace says ITU-R BT.709 for both, then HDR processing will not be necessary. It would only be a concern if you saw BT.2020 or BT.2100 as the colorspace. A true HDR clip would also have milky washed-out contrast. You would notice right away if you were dealing with a true HDR clip.

Generally speaking, the Export > Each Playlist conversion should be good enough. If there was a problem, it would be obvious during editing and you could manually convert that one clip the traditional way. The only exception I see is handling interlaced SD video, if you have any.

1 Like

Austin,
Thanks for the thorough explanation, makes sense. Also, I don’t have any interlaced SD video so I think I should be good to go with the Export > Each Playlist Item batch conversion method. I really appreciate the time you’ve spent helping me understand the best solution to my problem.

-Mike

1 Like

Austin,
Last quick question (hopefully): When saving my custom preset, none of the items you suggested to remove (width, height, aspect, frame_rate_num, frame_rate_den, or channels) were in the list below where you name your custom preset. I assume that means I’m good to go or am I looking in the wrong place to remove those lines? Thanks.

-Mike

A lot has changed since Shotcut 20.07.11. If you don’t see those lines, you’re good to go.

1 Like

Good to know, thanks!

-Mike

The custom preset conversion worked but a clip processed by the “Convert to Edit-Friendly” dialog is much larger at 520 MB. The same exact clip processed by my custom Export preset, using brian’s suggested settings, was only 331 MB.

In Windows, when looking at the Details tab, under the file Properties, the only difference is the Data Rate and the Total Bitrate. Here are the differences for the same clip:

“Convert” method: Data Rate = 61803 kbps, Total Bitrate = 62316 kbps
“Export” method: Data Rate = 39241 kbps, Total Bitrate = 39754 kbps

I was able to get the converted clip much closer to the data rate and total bitrate of the “Convert” method by increasing the Quality, on the Codec tab, from 71 to 79 (crf=11), on my custom Export preset and the file size came up to 519 MB.

-Mike

For anyone else planning to use this Export method to batch convert your clips, I have a couple tips:

1.) After selecting your custom preset under the Export tab, be sure to select “Each Playlist Item” on the “From” drop-down menu at the top. You’ll need to do this every time you want to batch convert more than 1 file.

2.) After clicking the “Export File” button, you’ll be prompted to provide a file name. You must include the file extension but Shotcut will automatically number the converted clips. For example, if you have 3 clips to convert and you enter “test.mp4” as the file name, your converted clips will be named test-1.mp4, test-2.mp4, and test-3.mp4.

-Mike

I just tried using Shotcut 21.06.15, comparing Brian’s settings to the Convert output. The difference in file size was less than 1%.

If you’re still using 20.07.11, the Convert feature has gone through a lot of change since then. Brian’s screenshots match what Convert does today, not what it did a year ago.

CRF 11 at HD resolutions and above is a bit excessive if you want to save disk space.

One caveat I found about playlist exporting… If the source videos are in full range, Convert will preserve full range in the output. Doing a mass playlist export will not… it will convert full range to limited range.

1 Like

Austin,
Good point. On version 20.07.11, Quality at 79 (crf=11) gets my converted files the closest to using the “Convert” dialog but maybe I should just upgrade and go from there.

Thanks for bringing up the full range vs limited range caveat. I’m currently shooting most of my video on a Samsung Galaxy S7 so I assume it uses limited range but I’m not sure. Any way to tell on the video file itself?

Personally, with all of these points you’ve brought up, I think the addition of a “Batch Convert to Edit-Friendly” feature would be a nice and easy solution for the end user.

-Mike

Bring the phone footage into Shotcut and check out the Properties panel:


Also, I checked the source code history, and Shotcut 20.07.11 did indeed use CRF 11 in the Convert dialog:

1 Like