I am trying to brighten a video taken on a Sony camera.
The format is AVCHD (.MTS)
1920 x 1080
25fps
Total 16429kbps
and the audio
256kbps
2 channel
48kHz
File size 262 MB
How do I save my edit in the same format & quality please?
I am trying to brighten a video taken on a Sony camera.
The format is AVCHD (.MTS)
1920 x 1080
25fps
Total 16429kbps
and the audio
256kbps
2 channel
48kHz
File size 262 MB
How do I save my edit in the same format & quality please?
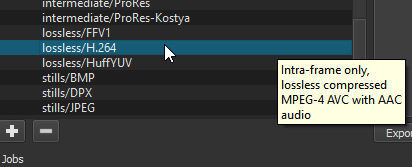
AVCHD uses the MPEG-4 AVC/H.264 standard, so use the lossless/H.264
Thank you Steve.
The exported video views correctly, but the file size has leapt from 262MB to 2.89GB
As a second issue, the audio in the export is breaking up.
Just changing brightness and leaving everything else undisturbed appears to be surprisingly complex.
Lossless essentially means un[re]compressed. Your .MTS is decompressed when opened in Shotcut then exported uncompressed, hence the size difference. MPEG-4/H.264 is a lossy format, no matter what you do re compression will be lossy. It’s the nature of the beast.
Thanks Steve. I should rephrase my question. How do I save to .mts, retaining approximately the file size and quality of the original?
I understood your original; question.
MTS [AVCHD] is a propriety container owned by Sony and Panasonic. .MTS is only a capture format used by cameras.
As already mentioned. .MTS is a container for MPEG-4/H-264 video codec and AC-3 or PCM audio codecs.
Knowing this it is possible to select a suitable export/output from Shotcut that closely matches however there will always be some lossiness.
Thanks Steve. I am taking you reply to mean that Shotcut does not write to AVCHD file structures?
That would not be an entirely accurate conclusion to draw from my writings…
As already stated, AVCHD uses MPEG-4 AVC /H.264 video codec and Dolby Digital AC-3 audio codec.
Both of which are available as Video and Audio encoders in Shotcut.
Technically, no, Shotcut cannot write AVCHD, but it can write an HD AVC (aka H.264) file. The Export defaults give you just that if you are using an HD Video mode from Settings (or HD file as first file added to a project if Settings > Video mode = Automatic). If you want to more closely approximate AVCHD, then in Export you can change Format to “mpegts”, Audio > Codec to “ac3”, and export it with a “.mts” extension - and it will not create a very large file like lossless does. With enough research on x264 and AVCHD, one could probably coax Shotcut into writing (nearly?) compliant AVCHD.
AVHCD is only a container. My Sony cameras use it too. But the only reason to keep it would be using the camcorder for playback, which, to my mind, is not a very good practice. Why not use .mkv or .mp4, with AVC video and AC3 sound, and play through the TV or BD player USB reader ?
Thanks Dan,
Following your guide, the file created had no extension, but accepted a rename with .mts added.
However, the original 260MB file became just 11MB. Still some way off taking a .mts file, changing brightness, and saving as .mts with comparable quality.
Thanks Francois,
You are correct that the AVCHD container is a red herring.
It is the actual video file, the .mts, that is my interest.
I’m just a simple guy who starts with a .mts file, wants to brighten it, and save as .mts, in quality comparable to the original.
When I say “comparable” I mean allowing for the slight loss resulting from recompression.
For example, I might expect the save button to offer “retain original format”, or include .mts in the options, and list a quality/file size scale as happens with a jpg save.
Actually .MTS is the container with AVCHD being the format used which, as I’ve attempted to explain a number of times uses MPEG-4 AVC /H.264 video codec and Dolby Digital AC-3 audio codec. Both of which are available in Shotcut for you to use.
I’m confused why you’re stuck with this to be honest.
I import, edit and export .MTS from my Panasonic HDCamcorder all the time and never have issues retaining visual IQ after editing and exporting. File size does not always equate to quality because it mostly equates to Codec compression ratios.
While not a totally accurate comparison, you could think of MTS (MPEG Transport Stream) as similar to DSLR still image RAW formats such as DNG (Digital Negative) which when edited and saved out to (commonly) JPEG are much smaller yet the image quality is either the same or due to good editing, is better. Yes RAW have more DR to work with while we edit, but what we save as JPEG is what we need. As too, MTS to MP4.
As an alternative suggestion, if you just want to adjust brightness then save out to a format ready for future editing rather than playback ( and retains a wealth of image information) then you could choose ProRes.
I’m replying to a topic which is 2 years old now.
The video files from my 2009 HF S100 Canon camcorder are stored as .mts files on the computer. I can play back these video files through my computer to a computer monitor or TV - no problem here for my needs. There is no need/desire for me to change the file format, video format or file size of the current .mts video files.
However, I would like to do simple video cuts and join the clips together into one video clip. Very high on my priority list is to keep the computer processing duration and the increase in the exported file size to the absolute minimum. The current .mts video file size is fine for my purposes. For this I would imagine the following should help (I’m reasonably new to this):
I’ve been reading a lot and have played around with the export settings in Shotcut in an attempt to achieve the above objectives. The results have unfortunately been disappointing for me:
I then turned to the video editing software (ImageMixer 3SE) that came with the camcorder. I did a few video export trial runs, also without doing any editing to the video clips:
I would still prefer to achieve similar results in Shotcut though because Shotcut has by far more to offer in terms of editing options/capabilities. I’ve tried to match the ImageMixer 3SE export settings in Shotcut, but to no avail.
I have some suggestions to get you going, but first we need to establish how much you really want to keep the MTS format. There is no speed, quality, or file size advantage that comes with exporting to the same format as your input files. Recompression is recompression from scratch, every time. Nothing can be salvaged from the input file to reduce processing time or preserve quality, and even if it could, it would be made obsolete after applying any filters such as brightness. In fact, you could gain quality and file size improvements by using a newer, smarter compression format.
Assuming you’re willing to use H.264 without AVCHD/MTS restrictions, here are some options. First, on the Export tab, choose the “H.264 High Profile” preset under the Stock header. Then click the Advanced button and consider the following changes:
If you want the exported file size to be guaranteed identical to the original, go to the Codec tab and change “Rate control” to “Average Bitrate” or “Constant Bitrate” (preferably Average for better quality). If you know the codec bitrate of your camcorder, enter it directly and you’re done. If you don’t know it and can’t find it in an owner’s manual online, you’re down to some math to reverse-engineer the bitrate… (File size of an input MTS video in bytes) * 8 bits per byte / (Length of video in seconds) - 128,000 bits per second for audio = bits per second for video. Divide by 1,000,000 to get megabits. It is often possible to produce higher-quality video by turning on the “Dual pass” check box, but that requires processing time you may not wish to spend.
If you can flex a little on the output file size (we are still on the Export > Video tab here), you can often get noticeably better quality video by using “Quality-based VBR” rate control. The default quality setting of 60% is quite high and makes a great-looking albeit large file. It correlates to H.264 CRF 20. Finished videos in AVCHD are more like CRF 23 to 28, which in Shotcut is between 46 and 54 percent on the Quality slider. Try a few test exports in that range until you find a file size and quality trade-off that you like.
Now to address processing speed. This applies regardless of which option you chose above. Go to the Export > Other tab and change medium to veryfast on the vpre and preset lines. Considering the nature of your input files, the quality difference should be unnoticeable, but encoding time could be faster than real-time depending on your CPU.
The result of all this will be a .MP4 file rather than .MTS. Could you let us know the results of those settings and we can investigate from there?
Thank you very much Austin.
I’ve only just seen your reply, will try out your suggestions and then post my findings. I didn’t realize re-compression is re-compression from scratch every time. I was (erroneously) reasoning that the closer the export format was to the input format, the less processing would be required.
I’m not at all bent on keeping to the .mts file format, it’s just that ImageMixer 3SE seems to produce fantastic export results with the default .mts file format in terms of processing time and export file size whilst seemingly also maintaining the original quality. The export file in ImageMixer is 99.9% identical to the input file in terms of file size and Bitrate. This led me to think that very little processing was taking place in the export process and that the key to this was their default set-up with the .mts file extension.
I’ve discovered in the meantime that the ‘HDV (HD 1080p 29.97 fps’ Preset in Shotcut for example also exports with the .m2t file extension. In a test run the processing time in Shotcut with this particular Preset was 1.26 times the clip duration and the export file size was 2.2 times larger than the input file. In ImageMixer the corresponding values were 0.384 and 0.9996 respectively in a test run doing the exact same thing.
There is an enormous difference there. Can it be that the ImageMixer software is set up to specifically work optimally with video files created by my particular camcorder model (Canon HF S100)? The ImageMixer 3SE software comes bundled with the camcorder and if you go to the software developer’s (Pixela Corporation) website for an update, the software is arranged by camcorder model group.
I still prefer to work in Shotcut over ImageMixer for a few reasons, but I’ve got something like 800 hours worth of home movie video that I’d like to preserve for our family history. I already have enough storage space for the original files, so that’s not a problem, but the processing time becomes a really big factor. Also, future technology will probably better deal with the .mts/.m2ts/.m2t files, but in the meantime I want to consolidate the raw material, preserve as much quality as possible, yet have enough leeway in terms of editing features.
I am not familiar with the ImageMixer editor, but I think you have a very reasonable assumption about it being tailored to your camera. Its defaults are probably set to the same settings as the codec in your camera. Meanwhile, Shotcut’s defaults are designed for very high quality output, which means slow and large files.
As for the HDV preset, it uses a 25 Mbps data rate and a 15-frame GOP. If the output file is twice as large as your input file, then your camera may be using a 14-17 Mbps data rate and a GOP that’s up to 150 frames. I have an old Sony camcorder that outputs MTS HDV and its high quality setting is 17 Mbps. You can plug the 17 Mbps number into the H.264 High preset as well and see if the output quality is comparable.
I would be hesitant to continue using the HDV format. If I remember correctly, the actual resolution is 1440x1080, and it gets blown up to 1920x1080 by using non-square pixels. If you ever wanted to send this footage to YouTube or any other sharing service, be aware that they can get grumpy about non-square pixels and you may have to transcode yet again.
In other news, maybe we can relieve some of your concerns about long export times by looking at the queue feature. Let’s say you sit down and edit three projects in a row. You like what you see in the preview window and are ready to export all three. You can open the first project and export it. The export becomes a background process. You can now open the second project and export it as well. Since Shotcut is still busy exporting the first project, the second project goes into a queue. Now you can open the third project and export it. You can queue projects up as deep as you want and let Shotcut export everything overnight. For me, final export time is a non-issue because I use the queue to run exports overnight all the time.
I’ve done 8 more export test runs in Shotcut using the “H.264 High Profile” preset and the “Quality-based VBR” rate control at different quality settings (59%, 60%, 63%, 3 times at 64%, 70%, and 90%). In my test runs the file size and data rate values of the exported file would approximate the input file values at the 63% or 64% mark for the VBR quality setting. The exported file size increases very steeply at a setting of 70% or higher.
I yet need to play back the exported video clips on a television to further evaluate the video quality, but so far the results look very good on the computer monitor at the 64% VBR quality setting. The export time (1.92 times the clip duration) is still longer than I thought is possible, but I can live with it, especially now that I’ve been made aware of the queue feature.
This set-up in Shotcut for video export is pretty much what I was looking for but couldn’t recognize. Thank you very much Austin!
Also, thank you for the good advice regarding the HDV format. I won’t be using it now.
Side note: it is incredible to me that this Shotcut software is for free and the tutorial videos are fantastic for the uninitiated.
In all I have 23 (20 x Shotcut and 3 x ImageMixer) output files, all with different export settings in Shotcut and all of the same input file. I played them back on a large TV to compare the export quality with the input quality.
That is a surprising result, but it might make sense now that I think about it. Two things come to mind…
The source video is probably 1440x1080 with non-square pixels. The H.264 output video is 1920x1080 with square pixels. This means the H.264 version is storing 25% more pixels than the source version, so it would take 25% more data rate or file size or something like that to achieve the same quality level. Right now, H.264 is smashing many extra pixels into the same file size as the source, and quality is suffering.
Perhaps the motion artefacts could be lessened if the H.264 GOP was lower, say 12 to 15.