Hi everyone- About a year ago I started dabbling in visual work for live shows. Mainly rock and roll…I would basically make random videos to play behind bands on a projector screen in little dive bars. One thing led to another and the right person saw my work. I now have this opportunity to do stuff on a Imax screen. I’ve been using 4k source footage. The resolution I was told to use was 2048x1080. Aspect ratio 19:10. With a screen this big you’ll obviously be able to see every detail. I’ll also be using some vintage archival footage that will have some grit so I’m not worried about every clip I use being crystal clear. I’m reaching out here in the hopes of getting some advice on the best settings to render the final product. Which settings, codec…etc will give me the highest quality for this scenario? Also any tips to reduce color banding? Any help is appreciated. Thanks!
It sounds like you’re working with one of the earlier imax screens that’s 2k DCI, most of what you’re looking for should be defined with the standard.
Your best bet is to contact the venue that has the projector your film will be shown on. “IMAX” is not enough information if you are delivering digitally. Do they want a 2K DCI? If so, the output format will be a JPEG2000 image sequence in XYZ color space. Shotcut doesn’t export in XYZ (that I’m aware of), so you would need to export an (ideally) lossless intermediate file and then use ffmpeg to convert that into an XYZ image sequence in an MXF container. Same for audio… 48 kHz using pcm_s24daud exported as an MXF file. Then you’ll need some DCP tools to write the files and metadata onto an external hard drive formatted with ext2 (unless you’re dealing with a newer venue that can do the flash drive option).
That all assumes they’re using DCI. I’m going to guess they are because 2048x1080 is native DCI resolution. If they’re using something else, there’s no telling what they need. Some theaters allow exhibitions and have the ability for computers to plug in directly via HDMI. If you’re going that route, you could export in pretty much anything and be fine. It really comes down to asking the projector operator exactly what they want and targeting it specifically.
I have a couple more ideas for you, but first… how comfortable, able, and willing are you to make command-line ffmpeg a part of your workflow? If you are, there are a number of options that open up for you to make a better production.
Also, what are your input files and from what kind of camera (or archive or stock agency)? Is your workflow 8-bit or 10-bit? Log gamma or standard? 4:2:2 or 4:2:0? Shotcut operates in 8-bit only, not 10-bit. (It will take 10-bit inputs, but they will be downsampled to 8-bit and processed as 8-bit.) The best way to reduce banding when limited to 8-bit is to make the shot look as good as possible in the camera eyepiece (or external recorder) and shoot in 4:2:2 standard gamma. This means doing whatever it takes to make the lighting look good in the recording room “as is” and then choosing an exposure that matches the final look you’re hoping to achieve. As in, don’t shoot with “proper afternoon exposure” and think you’ll pull it down to simulate nighttime in post. Shooting like this, or shooting with log in general, would require heavy color grades to make the shot look “correct”, and those grades would be processed in 8-bit rather than 10-bit and show banding from the hard pulls. The more you can make the input files look like what they’re supposed to be from the start (using standard gamma and lighting such that only minor grades are required), and the more color data you can capture (4:2:2 instead of 4:2:0), then the less tinkering you have to do in post-production, and the less chance there will be of banding or revealing any macroblocking in the shadows for that matter. Yes, it’s completely backwards from a 10-bit log workflow. But it works quite well.
Austin, thank you for the plethora of information. I’ve been in contact with the venue and luckily they have a HDMI input. I sent them a few tests videos last week and they said they looked fine (as far as fitting on the screen) I’m not using any footage I’ve shot myself. I’m using all archive footage and random free stock footage, and random stuff I’ve found on the internet…YouTube…etc…input files…mp4s?
Command line ff-mpeg? I have no clue what that is, ha. This sounds like something I should educate myself on. As you can read I’m very much a newbie to this. Luckily for me I’m going to the venue next Monday to hook up my stuff and do some test runs.
In that case, you should have no issues with banding unless you have some filter distorting the colors by an extreme amount. If that happens… be less extreme, or overcrank it like you meant it haha.
HDMI will be easy then. Below are two high-quality options for export settings, given that your video will be displayed on a huge screen. The first one is essentially guaranteed to work, but it will be a large file. The second one will most likely work and be significantly smaller in file size, but double-check during your Monday test run to make sure it looks and sounds as good as the first one.
Export Option 1: ProRes 422 HQ
Select the “Intermediate > ProRes” export preset, hit the Advanced button, and make these changes:
Video tab
Resolution: 2048x1080
Aspect ratio: 256:135
Frames/sec: 24
Interpolation: Bicubic
Audio tab
Codec: pcm_s24le
Other tab
vprofile=3
vendor=apl0 ← As in, APL0 not AP10
movflags=+faststart+write_colr
write_tmcd=0
Export Option 2: H.264 CRF 10 (Quality 80%)
Select the “Stock > H.264 High Profile” export preset, hit the Advanced button, and make these changes:
Video tab
Resolution: 2048x1080
Aspect ratio: 256:135
Frame rate: 24
Interpolation: Bicubic
Codec tab
Quality: 80%
Audio tab
Bitrate: 640k
Notes:
-
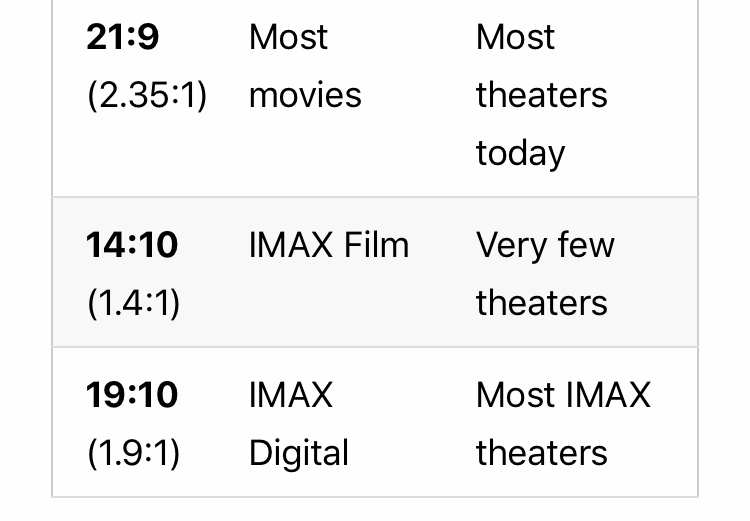
I’m wary of their 19:10 aspect ratio recommendation. That will be way off from 2048x1080, which if anything, is closer to 17:9. Over HDMI, it may not make any difference, but it sure could somewhere else.
-
You will have to create a custom video mode to get the IMAX resolution. From the Shotcut menu, choose Settings > Video Mode > Custom > Add. Just like the settings above, use 2048x1080 (256:135) at 24fps and keep the BT.709 color space. Give this video mode a custom name like “I’m a Rock Star on IMAX” and then create a new project using it. You will probably have to zoom or crop all your 4:3 and 16:9 media to fit this format. However, that’s way better than making a 16:9 video with burned-in black bars and who-knows-what will happen when played back on different computer systems with different resolutions going through the HDMI. Matching the exact projector output is the only way to guarantee you get the best fitting picture.
-
Also, I enhanced the audio settings because concert and theater audio is not the place to go cheap on disk space. The DCI spec is 48kHz/24-bit and you’ll want similar clarity when the sound system is pounding your ears at 83 SPL. However, you’re at a rock concert, so it may be closer to 115 SPL.

-
A note on the frame rate… Theater projectors do not use 23.976 drop frame. The DCI specification requires exactly 24 frames per second. Since you’re providing video over HDMI, you can technically do whatever you want and the electronics will dupe or drop frames to make stuff work. However, using 24.0 fps will provide the smoothest motion by eliminating an unpredictable dupe or drop. It also makes any frame rate math easier to calculate, so why not take advantage of it?
I’m very interested to know how things turn out! I’d also be curious to know if the ProRes file (option 1) looked any different than the H.264 file (option 2) on a huge screen.
Austin- Thank you again for the info. So extremely helpful! The color banding is def coming from me desaturating everything. The person I’m doing work for wants everything to be black and white. I’ll try to let up on it a little to see if that helps and add a little noise. I was told the aspect ratio was 1.9:1…I tried typing that exact thing into shotcut and it wouldn’t work. After doing a little googling I found a chart which I attached a picture of. That’s where I got the 19:10. I assumed it was the same thing (?) Was I correct in doing so?
Like I said- very very new to this and I always dealt with 16:9…
I’ll do both options for one video and see if there’s a difference in quality and keep you updated!
@sauron @elusien Any tips on converting a video clip to black and white without banding? I wouldn’t think a grayscale conversion would cause banding, so I’m surprised here.
As for 19:10, so sorry about that. I saw the 19:10 but my brain kept thinking of 16:10 and freaked out. Yeah, 19:10 is fine for IMAX. However, it is rounded ever so slightly. 256:135 gives 1.896blahblah which is really close to 1.90:1 so they call it the same, but that’s for convenience. The technically correct ratio is 256:135 and that is easily entered into Shotcut.
Could the banding be a combination of resolution change(how small is the source footage) with the desaturation? I imagine it would be quite extreme if coming from a 320x240 source up to 2k
Colour-banding happens when values within a gradient get pushed so much that there is no color/value in the file to actually represent the mathematical change you’ve applied with your filter. It sound like your desaturation of the frames has done that. One suggestion is to add a bit of noise (or grain), see here for a suggestion made by Dan:
Check out the later answes in this post too.
Try this filter. All it does is make an image/video black and white. It has no parameters to adjust.
bw.zip (1.2 KB)
Thank you! I’ll try it out.
Thanks! I’ll try the second one and see how it fits. I’ll take your word for it! The banding is more noticeable on flat surfaces if that makes sense…for example I’m using a shot of ocean waves. When I desaturate the image the sky shows bands.
I cant for the life of me figure out how to get this filter into shotcut…I unpacked into-what thought was the right file path and its still not showing on my list. Any advice? I’m a windows user.

My bad. Sorry.
Go to \Shotcut\share\shotcut\qml\filters . Copy the entire folder in the attached zip file into the filters folder.
bw.zip (1.2 KB)
Ok, trying it now. Thanks!
Good call, this would be my suspicion as well. The source footage was archive and YouTube and other places? Is all of it 4K, or is it a mixture? Upscaling would totally account for banding.
Turning a color image to grayscale is as straight-forward as dropping the UV components of the YUV signal. There isn’t a color grade push involved to get the underlying grayscale. So possible problems could be 1) a filter is broken, 2) the source video is tiny and being scaled up, 3) the source video has undergone so much prior compression that it’s missing enough detail to be banded in the luma (grayscale) plane, or 4) something else might be going on with the source.
The current video I’m working on has all 4K source footage. The banding isn’t that extreme…I just notice every little detail when I’m working on stuff (perfectionist)! I’m going to experiment some more. Doing the test run on Monday will tell me everything I need to know and what needs to be fixed. I’ll have another week after the test run to fix things so as of now I’m feeling optimistic!
Asking everyone else here because I haven’t played with this scenario and can’t test at the moment… could a small amount of blur or smoothing or contrast reduction be used to minimize the bands?
Tried the first option for exporting and its getting stuck at 10%…Its a only 20 second clip as I wanted to do a test run of it first. Any idea what might be causing this? Looking at the properties of this source footage and the Format is yuv420p…could this be the culprit? If so should i consider converting all source footage to mp4 before hand?