Hi,
I have just started with Shotcut and I’m excited to try it out. I have come from using Windows Movie Maker for creating 6+ videos, but support for that has been discontinued. I still have it, and I believe it can still be downloaded from MS. I have not yet tried the Video Editor app they just put out, but if anything I’d have to guess it probably has less functionality than Movie Maker.
I figured I’d make a switch now since Shotcut is also free, is available on Windows and Mac (I have a Mac laptop, Windows desktop), and because it can export to more video formats including 4K. I don’t have a 4K TV myself but I have some family members that do and I thought it would be interesting to try. My regular camera takes photos of pixel dimensions that are higher than 4K so there is a chance to take advantage of that at least a little bit. I imagine Shotcut will be gaining more users as a result of these things.
I read a few articles and watched the official Getting Started video, and then I got started trying it. It seems like impressive software, but of course I’m not yet really familiar with it. I’ve been to a few forum posts since then for questions that came up. I got to a point where I thought I needed to learn more, so that’s why I’m posting here.
Could you tell me more about the general workflow of the software?
I’ll give my situation. I have about 400 photos and videos (mostly photos) in a directory for this video project. Some of these have been edited in an image editing program already, some panorama photos stitched together, and things like that. I was able to load them into the playlist, mostly in the order I wanted. By the way, I really don’t like how MacOS does not have the ability to sort photos in a directory by EXIF date taken. Boo, MacOS.
From there, I was able to Add All To Timeline, and after a few seconds everything was in my timeline at the bottom. In the time since that, I have cut and pasted many items in the timeline to get them into the correct order. I have also used Split to cut up a bunch of the video clips into the portions that I want to show and removed the remainders from the Timeline.
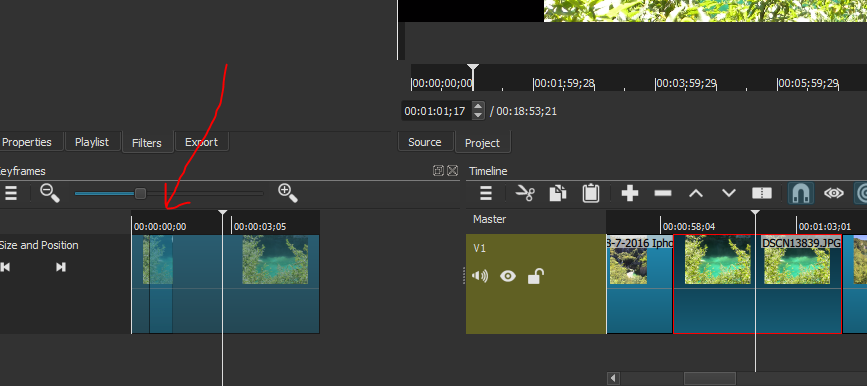
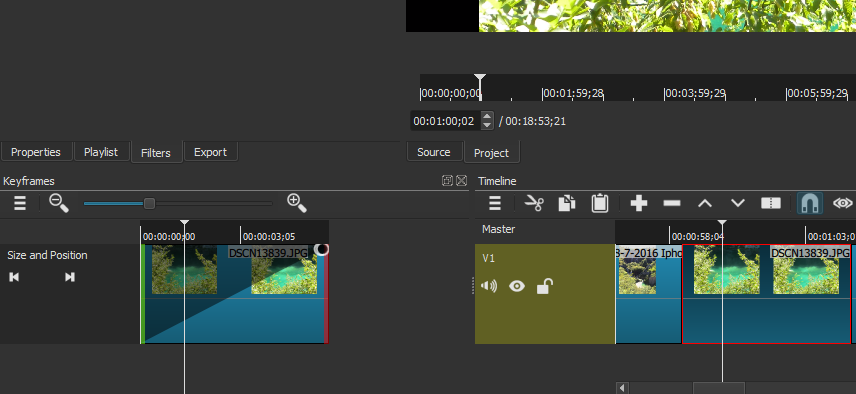
At this point I realize I want to lengthen the duration on at least some of the still photos. I can see that the default duration is 4 seconds from looking at things in the Timeline.
I came across the forum post ( Changing the duration of a still ) about this and realize this needs to be done in the Playlist. Strangely, in the Playlist, I see the duration of all my still photos is set to 3:29 for some reason. I don’t know why it’s different there from the 4 seconds I saw in the Timeline. I was able to change the duration for one photo somewhat awkwardly. I went back to the Playlist and found the item there, double clicked it, then went to the Properties tab, and I could adjust the duration. Then I clicked the Playlist tab again and clicked the checkmark to actually make the change.
Now, that change isn’t reflected in the Timeline. So I guess I could add this to the Timeline, put it in the right place, and then remove the previous 4-second version from the Timeline. I used an option for Add All To Timeline originally to add my Playlist times to the Timeline, but I don’t see an option for just adding the one selected item to the Timeline. But I tried dragging it… yeah that seems to do something, but not exactly what I had in mind. When I dragged it over the spot in the Timeline, there was an overlay message that says “Overwrite”. Ok cool. I dropped it on the one I want to overwrite. But it seemed to have sort of overwritten from the exact spot in the Timeline where I dropped it, meaning it has overwritten most of the next photo as well. Thank goodness for the Undo button. After a couple tries, now I notice one of my photos after that is only about 2 seconds long 
What I figured out that I could do to add it is to just use the + button under Timeline, which adds it to the end, then go to the end of the Timeline, cut it, and then paste it into the right spot. Then I removed the other version. Now I have what I want for that one photo. Is there any way to insert it in between two things… where the playhead is located? What am I missing?
I noticed it seems like these two Timeline functions are the same, though with quite different names:
-
- (minus) button “Ripple Delete - Remove current clip shifting following clips to the left”
- right-click, Remove
Now what do I do to fix the one that got shortened to just under 2 seconds? I’ll do the same thing I guess.
So, I have a bunch of questions at this point. I’ll start with going back to the workflow idea. When making a photo/video slideshow such as I am, what is the best way to do things?
It seems that editing duration can only done in the Playlist, and can’t be done in the Timeline. From the tutorial video, I remember seeing that speed can be changed in the Timeline though. How about ordering everything? Is ordering best done in the Timeline or the Playlist? There was no playlist in Windows Movie Maker so it sort of seems like an extra thing for me right now. But I guess it allows you to make some changes to the component items while you can still add or remove them from the Timeline without losing those changes.
Why do my photo stills show having 3:29 duration in the Playlist, but 4:00 duration in the Timeline? This is for all of them that I did not edit. For the ones I did edit the duration, they appear to have the same duration once added to the Timeline.
I don’t want to add transitions, but I would like to add pan/zoom to my stills. I found information about that in a 3rd party article. At first I didn’t see exactly what the article mentions (Size and Position). But then I saw it from the Getting Started video after the starred favorite filters were mentioned. I found Size and Position in the non-starred filters. Great, these sound exactly like the possibilities that were available in Windows Movie Maker. And I like that it looks like it fills the “screen”. I did read that multiple select isn’t possible so I imagine I’ll have to apply this to all of them one at a time. Ok, I’ll just get as fast as I can at that and try to crank through it, and sort of randomize on my own
Here’s a different question - how do I adjust the preview video to show different proportions? Most of my photos are 4:3, but I plan to export for viewing on TV, so 16:9. I also have a bunch of panoramas and various others that I’ve adjusted to 3840 width and/or 2160 height and such. It would be helpful to see the resulting “black bars” for the different situations and that would also help dictate what I choose for any still photo motion effect.
And finally, I did take a quick glance at the Export situation by clicking the Export button. I don’t see any presets so I guess I just have to type in the resolution there? Any suggestions? Or are the “Stock” things on the left presets? I see Youtube there. But selecting those doesn’t change the resolution or anything else on the right so I’m not sure what’s going on. Ah, now I see they do change if I select something under the “device” or “intermediate” headers further down. Any thoughts on how to pick the right thing here?
Big thanks in advance to any help, suggestions, etc.! I look forward to using Shotcut more.
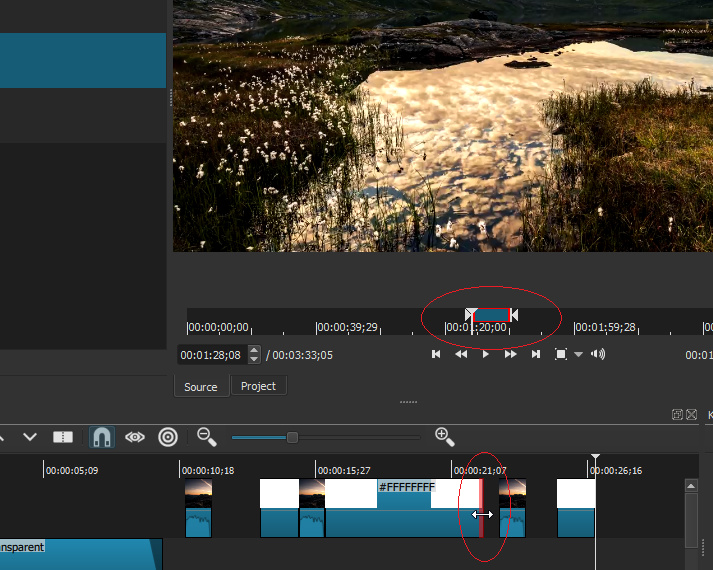
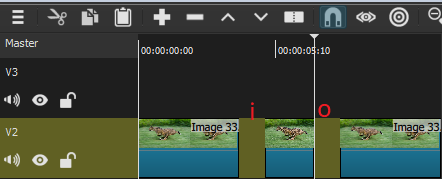
 From experimentation, I think the i and o actually set start and end points, trimming off the beginning or end and leaving empty space. This is a photo slideshow so that’s not the way to go. Also I actually want to increase the length of the one I’m looking at as I type this.