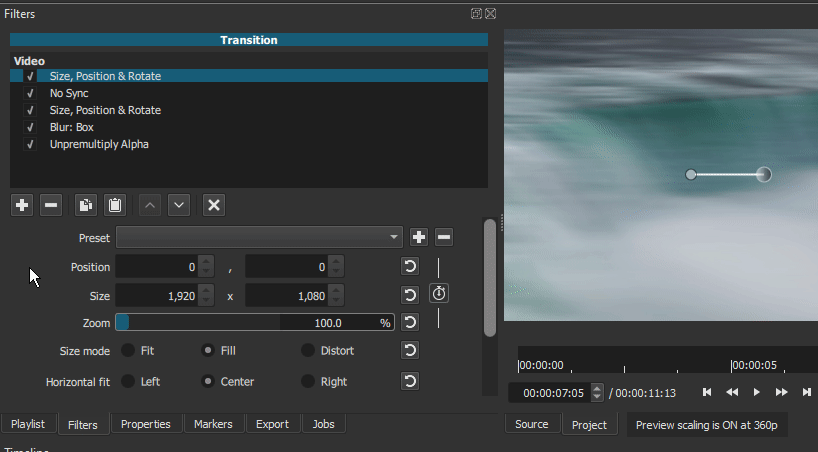
Merci pour ce nouveau tutoriel. Cependant, après avoir essayé de le reproduire, après avoir appliqué les 2 filtres SPR, mon image est grossie et le passage de la dernière image du clip 1 à la première image de la transition est très visible. C’est vrai que cela peut dépendre des images choisies … Ou alors j’ai raté quelque-chose dans le réglage des 2 filtres SPR.
Thanks for the new tutorial.
However, after trying to reproduce it, after applying the 2 SPR filters, my image is magnified and the transition from the last frame of clip 1 to the first frame of the transition is very visible.
It’s true that it can depend on the chosen images …
Or maybe I missed something in the setting of the 2 SPR filters.
J’ai mis les mêmes paramètres en 24 ips. Ce que je remarque c’est le brusque changement au début de la transition. Peut-être que cela est amplifié par l’ours blanc qui se détache bien sur le fond bleu, mais on voit bien qu’il s’allonge fortement.
I put the same settings in 24 fps.
What I notice is the abrupt change at the beginning of the transition. Maybe this is amplified by the white bear standing out against the blue background, but you can see that it is getting longer.
Oui, c’est le désavantage de cette méthode. On doit étirer l’image pour qu’elle remplisse l’écran. Mais une fois exporté, comme ça se passe très vite, ça ne se remarque pas tellement je trouve. En tout cas, pas dans tests que j’ai fais jusqu’à maintenant.
Yes, this is the downside of this method. You have to stretch the image so that it fills the screen.
But once exported, as it happens very quickly, it’s not that noticeable I think. At least, not in the tests I’ve done so far.
Dans l’exemple ci-dessous, j’ai fais la transition entres des vidéos très différentes en luminosité et contenu. Au visionnement, je ne remarque pas l’étirement des images, ou le brusque passage de pas flou à flou
In the example below, I made the transition between videos that are very different in brightness and content. When viewing, I don’t notice the stretching of the images, or the sudden change from not blurry to blurry
I never use the No-sync filter. This transition method is one way to put it to work.
The real struggle was to find a way to make it work horizontally instead of vertically
C’est brillant ! Mais si je me souviens bien, dans les tutos publiés par @jonray et @bentacular, ils utilisent Photoshop (ou Gimp) pour justement étirer les images afin d’accentuer l’impression de vitesse du déplacement des dites images. Je présume que la méthode à utiliser dépendra des goûts de chacun. Merci pour cette alternative @Namna. Très intéressant. Par contre, à cause de vous je vais sans doutes devoir publier un annexe à mon tutoriel.
It’s brilliant!
But if I remember correctly, in the tutorials published by @jonray and @bentacular, they use Photoshop (or Gimp) to precisely stretch the images in order to accentuate the impression of speed of the movement of said images.
I guess the method to use will depend on each person’s taste. Thanks for this alternative @Namna. Very interesting. However, because of you I will probably have to publish an appendix to my tutorial.
Oh my goodness, @musicalbox - that is a brilliant tutorial. No-sync filter! Surrounded by two SPR filters!! Who would think of that? (Seriously, how did you think of it? It’s genius).
Now I have to re-make my whip-pan tutorial and change it to - "Watch @musicalbox’s tutorial instead… " LOL!
Excellent work.
BTW I found something spooky. Play your tutorial at 1.75 speed on YouTube. You get a rather fast @bentacular …
@jonray, thank you! Funny thing is, to make the voice sound more mature, I slow down the voiceover files by 5% in Audacity before I import them in Shotcut.
I’m not sure. I guess I had an Isaac Newton moment.
Kind of a tangential question - the beginning of your tutorial - when you make the cut. I never understood this – later on if I want to change my mind about cutting something on the timeline, how do I undo it? (later on in the editing process where the undo command is not available anymore). Is there a “glue” command to combine two adjacent pieces back into one? Or a “remove cut” command? Such a rudimentary question, I know.
Je viens de l’essayer et avec les modifications apportées par @Namna aux filtres SPR (merci également), il semble être presque parfait.
Il fonctionne même comme un fichier txt, de sorte qu’ils peuvent être copiés dans le panneau des filtres une fois la transition a été créé sur un nouveau projet très facilement.
 transition")