The Elements panel provides a very slim (22MB) stock asset library: emoji stickers, sounds, overlay transitions, animated text, and graphics.
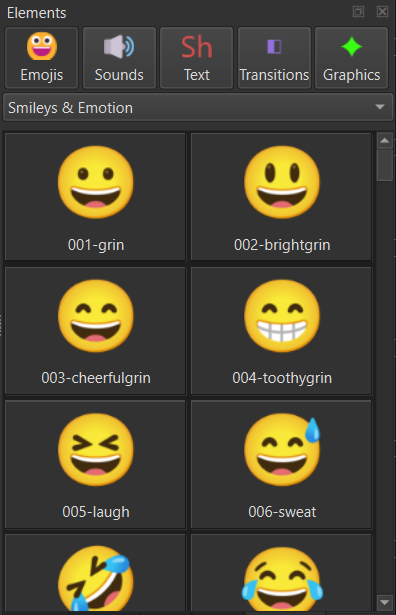
Getting Started
You can open this not only from the View menu but also from File > New menu, or the Generate buttons in the main and timeline toolbars.
To use one of these, you can double-click to open in the Source player or drag-and-drop to the Playlist or Timeline (recommended). Remember, it is not necessary to always add things to the Playlist and then drag it to the Timeline. From anywhere, you can add directly to the timeline.
Editing and Adjusting
Some elements are expected to be edited, while others are not. For example, typically you need to directly edit a text or graphics element, but an emoji or sound does not (adding filters is not considered an “edit”). Therefore, opening or dragging from the Emojis or Sounds category makes a copy of the installed asset only if it does not yet exist in your project directory. Whereas an asset opened from another category always creates a unique copy. That way, if you use, for example, a text element more than once in a project, they can say different things. The assets are copied into corresponding sub-folders of the project folder. If you have not yet saved a project (“Untitled”), it uses sub-folders in your system Documents folder.
To edit a Text, Transition, or Graphics element, you need the Glaxnimate application. Click to select the element on the timeline, go to Properties, and click Edit. However, you do not necessarily always need to edit. Adding an emoji, text, or graphic always automatically adds a filter to adjust the Size, Position & Rotate. You might find it more convenient to use a Shotcut filter for some changes instead of editing it directly. Some examples:
- Use Hue/Lightness/Saturation to change the color
- Use Opacity to adjust the blending
- Use Fade In and Fade Out to make it smoothly appear and disappear
- Use Mask: From File to use a wipe transition for when the element appears and disappears
- Add a Drop Shadow
- Use Text: Simple to add text instead of editing
Sounds
Adding a sound effect automatically adds a Gain/Volume filter since you almost always need to change the sound level.
Transitions
The Transitions are graphical overlay transitions. They are not transition clips like you might be familiar with creating in Shotcut. They usually work best with a simple cut. If the name of the element begins with “Centered” it is designed to overlay both the first and second clips, usually half-and-half, because the short moment of time at which everything in the animation is opaque and obscuring the video is in the middle time-wise. If the name begins with “Intro” it is recommended to place the animation over the beginning of the second clip.
Other Notes
- This feature was added in Shotcut version 26.8.
- Since these are assets intended to be overlayed (video) or mixed (audio), you may find it convenient to use Settings > Timeline > Automatically Add Tracks so you always have an empty track ready to receive things.
- The content licenses are royalty-free, including commercial use, and do not require attribution:
- Emojis: Open Font License 1.1
- Sounds: The Sonniss #GameAudioGDC Bundle Licensing Agreement
- Text, Transitions, Graphics: Lottie Simple License
- You cannot add your own things to Elements because these are installed, and usually the operating system blocks modifying the install directory or modifying the app bundle/package. Also, the animations are pre-generated and not something made in real-time from a new file. Instead, use the Files panel and bookmark folders where you have personal collections.