Files with B-frames are inherently difficult to seek in because seeking requires finding the start of a GOP and then decoding all frames leading up to the frame of interest. Going forward is OK because the frame of interest is always the next frame. But going backwards is difficult because it involves re-decoding the same frames over and over from the beginning of the GOP. We can imagine algorithms to cache decoded frames to re-use them. But the underlying FFMpeg library that we use does not provide that. This inefficiency in seeking b-frames results in a very laggy experience that preview scaling can not help with.
The underlying FFMpeg library is not always frame accurate when seeking in files with B-frames. The accuracy is good when going forwards for the reasons I described in #1. But seeking backwards can result in unexpected results or un-smooth motion.
Here’s what’s throwing me off on the keyframe timeline. Even before any keyframes are added we start with a diagonal line (assuming it represents progression of time). I don’t think it needs to be diagonal since the cursor is also moving, so the movement represents the progression.
I would rather it start with a horizontal line (representing 1x speed). No keyframes added means it stays horizontal. You can even shade the area above the horizon as a different color to create a clear delineation between what’s faster and slower than 1x speed. Any keyframe added above the original horizon would represent 1< speed and below would be <1 speed. So a diagonal line going from low to high visually would also represent the speed going faster. It would also be somewhat on par with how Premiere and DaVinci visualizes their speed timeline. The line representing speed would be easier to understand than the line representing forward or backward.
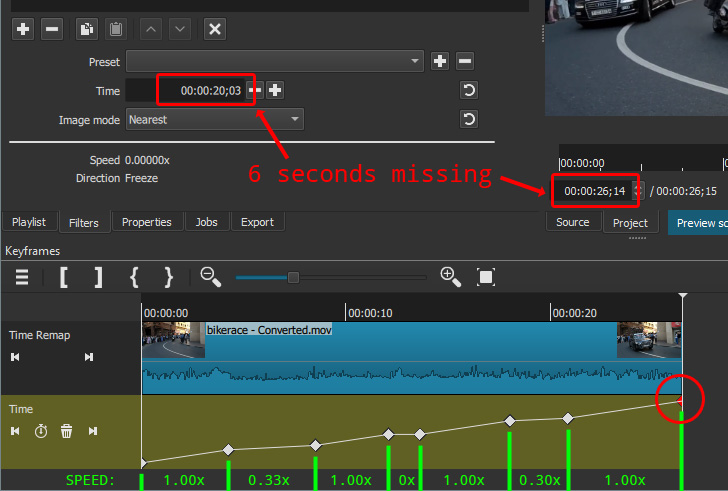
In the example above, I slowed this 26;14 secs long clip two times and froze it one time.
The last keyframe was originally set at 26;14 by Shotcut, but to make the last section run at speed 1.00000x, I had to change this setting to 20;03. This results in losing about 6 seconds of the clip.
I suspect this is intentional, because keeping these 6 second would mean to make the clip longer in the timeline and would result in messing with other clips on the track.
But what if those 6 seconds of video are important ?
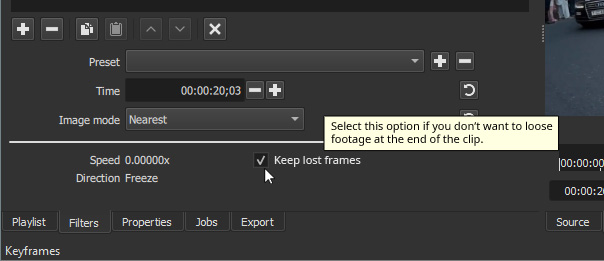
I know there would be ways to manually retrieve the missing frames from the original file and add them at the end, but that would be time consuming.
Is it possible for you to make the filter not erase those frames from the clip ?
If so, I suggest to add an option (a select box maybe) giving the user the choice of keeping or not the missing frames.
Something like this maybe:
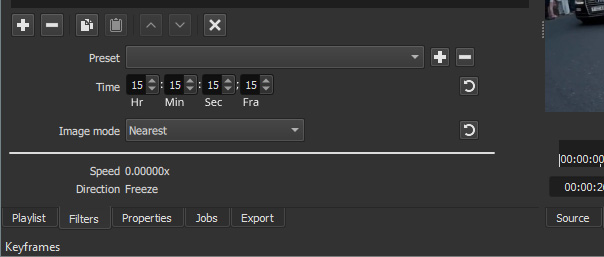
Another suggestion would be to make the Time selection faster by giving separate controls for hours, minutes, seconds and frames. Hours isn’t critical I suppose, but to keep the layout homogenous… you know.
I also agree with @bentacular that a diagonal line is a bit confusing. I would prefer an horizontal line too, although I don’t see how a frozen part of the clip would be represented. Maybe a vertical line ?
Another suggestion
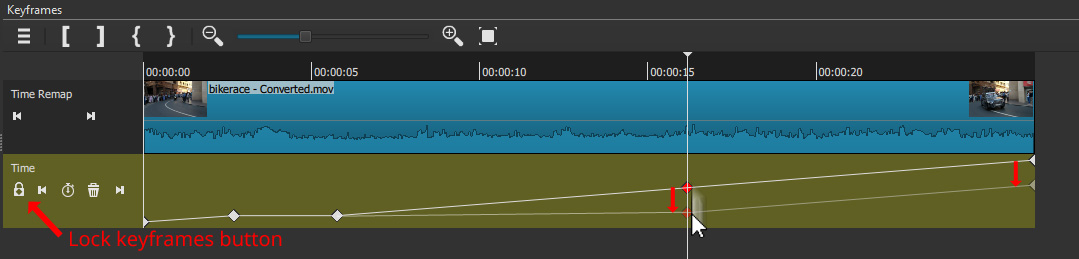
Would it be possible to give the user the choice of locking together the two last frames on the vertical axis?
Or some other way to insure that the last portion of the clip always stays at 1.00000x speed.
Frozen could be the ultimate slowdown speed. Let’s take the gain filter. It starts with a horizontal line. Mute is basically represented by a drop, all the way down to the base, which is volume = 0
The issue is @bentacular, your idea would be for a speed ramp feature. What @brian is doing is creating a filter that would also allow the ability to reverse the footage. That’s why he has the diagonal line representing normal forward time. And if you reverse the two starting keyframes by putting the first keyframe up and the last keyframe down, you reverse the footage.
Make the + and - buttons move a selected keyframe even if the playhead if not ON that keyframe. This would make it easy to see how the speed changes as we move the keyframe up or down:
As it is now, the + and - will add a new keyframe at the position of the playhead.
A reverse can be easily represented by another keyframe pulled backwards, like an S shape. In any case, I think it may be too confusing to have both forward/backward and speed on the same keyframe. They could be split into 2 different filters, plus I think the existing reverse functionality under properties is perfectly sufficient.
I predict that we will get many comments from people who wish the filter worked in speed instead of time. I hear those valid requests and maybe someday I will be able to make a filter that operates on speed. But this time remap filter operates on time. The “Y” axis is input time from the clip. the “X” axis is the project output time. The line represents the mapping of the input time to the output time. For now we will have to work together to help people understand this and to make it as intuitive as it can be.
Those frames are not lost. You can open the clip properties and make the clip longer. As a simple example, assume you have a 1 minute clip that you want to play back at 50% speed. You would go to the clip properties, change the duration to 2 minutes and then adjust the last keyframe to the last frame of the source.
This is a good observation that changing the time can be cumbersome. But I do not like the usability of 4 separate text boxes. My expectation is that people will do most of their interaction with the filter in the keyframes window and only mess with the time box to make final adjustments of a few frames. But maybe there are workflows where it is more convenient to make all the adjustments from the time box?
We will need some people to make some tutorials to demonstrate the best workflows for time remapping since it will require coordinated controls from the Properties, Filter and Keyframe panels.
I need a little more explanation on this. The keyframes do not move on their own. They only move if the user changes them. So what does “locking” do? If you like where they are at, then don’t change them. I have made a change with a button to adjust a keyframe to achieve a desired speed (see my screenshot above). Maybe this will help with your suggestion?
Or maybe there could be a generic feature to be able to move a group of keyframes using multi-select. I will probably not add multi-select keyframes in the short term. But maybe it would be a roadmap item if it is compelling for many filters.
This would not be consistent with all the other filters where changing a parameter in the Filter panel creates a new keyframe or modifies the keyframe at the playhead. Maybe we could make a generic feature for all filters to operate on a keyframe instead of the playhead.
To accomplish what you request, I interact with the keyframe in the keyframe panel while the playhead is on a frame of interest so that I can see how the speed changes. Maybe that would work for you - and then make final adjustments in the time box in the Filter panel.
Great comments and brainstorming, everyone. Keep the comments coming. I am excited for you to get your hands on the improvements I have made.
I tried a couple of times but couldn’t recreate those “lost seconds” with another clip. I should have kept that project. Anyways don’t waste time trying to explain that part further, I’ll probably figure it out eventually
But you mention the Source in your answer. Do you use the filter with the video in the timeline or in the source ? I’ve been using in only in the timeline so far.
Well, after more experimenting, I’m not so sure anymore about that suggestion. I’ll get back to it (maybe) after more toughts and testing.
I do that too. Suppose I need the speed between two keyframes to be 1.00000x. I’ll position the playhead between the keyframes, use Ctrl + moving the keyframe UP/DOWN with the mouse to get roughly to 1.00000x then use the + & - buttons to finetune.
But that often needs many tries to get to the target. And that means (for me):
Put playhead on keyframe
Press the button
Move the playhead between keyframes to check if speed is OK
Repeat until success.
It would save if we could move a selected keyframe with the buttons no matter where the playhead is.
But yes, I understand why this would be a inconsistent with how the keyframe panel interacts with the filter panel.
Thanks for the replies. Can’t wait to see those new improvements you made
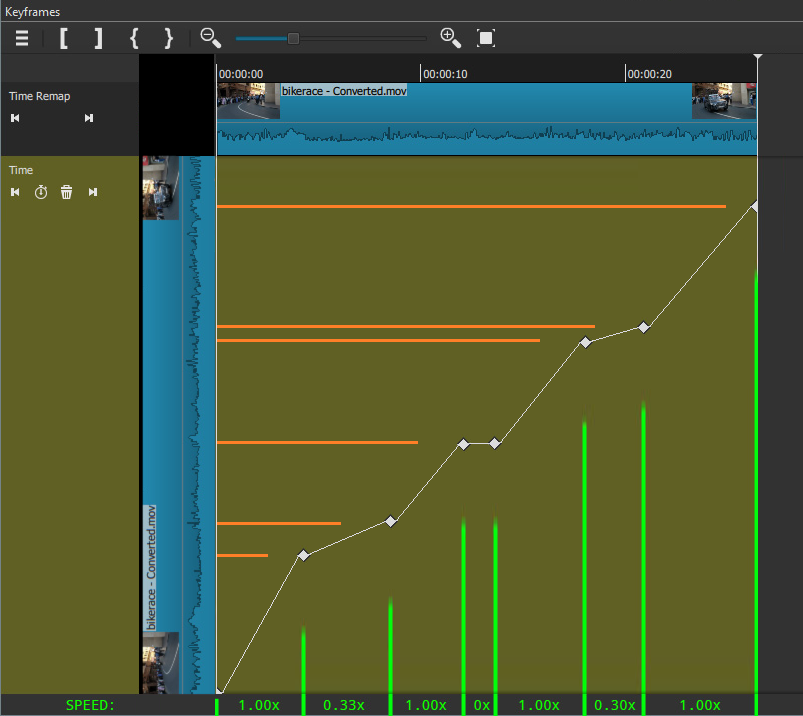
This is a great explanation that needs more visibility. It seems like a disconnect is frequently happening that maybe visualizations similar to this could fix (an extension to @MusicalBox’s screenshot above):
As playback time moves forward (from green spike to green spike), the frames we actually see move from orange spike to orange spike, which can be at a different rate (including reverse).
Therefore, a speed ramp can be simulated with time remapping, but time remapping can do much more than a speed ramp.
Now with the left/right arrow buttons you added to set time according to desired speed, this filter is extremely powerful just the way it is. The gap seems to be clear and visual documentation of how it works.
If the diagonal line is going to be the standard, it would be much easier to explain if there was a standard path line that is placed statically in the background that represents a normal passage of time. The keyframed line then placed on top of it will be given context on what you are about to do with respect to the normal passage of time.
The ideal path could be a watermark in the background because once you start adding keyframes to the only existing line, you forget where normal is anymore with respect to the standard
That could be interesting. A watermark in the background would show absolute normal time. But what about a hockey clip where there is slow-mo for a goal and then the video returns to normal time? The normal time section would have the same slope as the watermark, but be permanently offset due to the slow-mo section. What about also watermarking each individual keyframe, so we can tell what normal is in relation to the current point in time? I’m not sure whether the watermark per keyframe would be more useful being constantly visible, or only appearing on a specific keyframe while it was being manipulated. But I like where you’re going.
EDIT: Ooooooh, if a normal-time watermark appeared between the previous keyframe and a keyframe being actively edited, then there could be a snap-to-watermark feature that easily got you back to 1x time. Or any other speed. The watermark wouldn’t have to always be 1x.
It’s just that if we’re messing with a clip’s time, we would assume that they only want to mess with a fraction of that clip, and the whole clip. Otherwise, just adjust speed under properties. So eventually we would need to bring time/speed back to “normal.” What is “normal” based on the current changes could to be indicated by an “ideal path line.”
Exactly! That’s why absent of a watermark, a horizontal line would’ve been easier, because you always knew how to get back to “normal.”… a horizontal line in the middle
That’s the issue… Once a speed-up or slow-down occurs, normal is no longer in the middle. Hence, the need to shift the watermark based on the current keyframe.
EDIT: Ignore this. I misread your post, sorry. I see now that “middle” referred to the horizontal line concept, not the diagonal line concept.
There is green text at the bottom added by @MusicalBox. The 1.00x sections are non-edited/normal. It doesn’t look like an exact 45-degree angle because I stretched the original screenshot to create this. In reality, the 1.00x segments would be 45-degree angles. A 45-degree means real-time (assuming the clip has not been lengthened or shortened). So we note how each 1.00x section drifts away from the middle due to slow-downs.
I’m stuck in my car in the middle of a parking lot, waiting for my 82 yo mother to finish buying her grocery and I’m reading these new post with big interest. I feel this will help a lot in the evolution of the filter.