Hey all,
Lately I have been transcoding my source footage to an intermediate file format (using the DNX_HR_HQ preset) or even more often than that, to a lossless file format (using the HuffYUV preset). Using these transcoded files in place of my source files in Shotcut has saved a lot of time and headache as these edit-friendly files have greatly reduced the laggy/choppy playback of my high bit-rate H265 files.
If you are facing this issue, I highly recommend transcoding your files to an intermediate or lossless file format using either of the presets mentioned above. I wish I had known about transcoding files earlier, and even when I had heard about it, I avoided the topic because I assumed it was this overly complicated time-intensive process. However, it is a simple but effective process and the sooner you learn it, the better off you will be.
Please see the video tutorial below, or the step-by-step explanation written out below that, whichever format is better for you. Someone commented some very useful information that was not in the video, so please add any feedback/corrections/ or additional information that you may find helpful to the Shotcut community.
Thanks and happy editing!
Video Tutorial
DNXHR_HQ Intermediate File Format Tutorial
Summary:
DNXHR is a visually lossless (but still technically lossy) format that offers significantly faster playback in Shotcut due to the decreased decoding time that occurs when your videos are being played back. This decreased decoding time occurs due to a far less aggressive compression of your video files when compared exported footage with codecs such as: H264, H265, VP9, etc. This is especially helpful when you begin adding transitions and filters to the video clips in your project’s timeline. Consequently, this relatively less aggressive compression codec will result in a much larger file size than your compressed source files. An intermediate file format such as DNXHR is arguably a fair balance between fast decoding time and file size to be stored. However, I prefer to use HuffYUV as faster playback is more important to me than file size, and I often times delete my source footage of projects.
Transcoding Steps (DNXHR_HQ):
- Import your source file(s) into Shotcut using the “Playlist” tab in Shotcut’s toolbar (at the top of the screen).
- Make sure your video mode is set to the same frame rate and resolution of your source footage (Settings > Video Mode > Select).
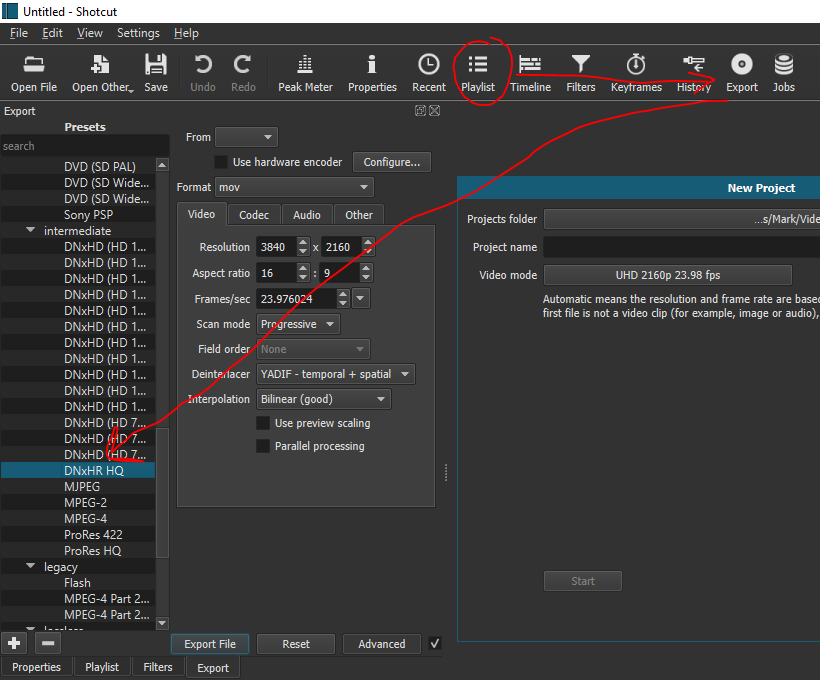
- Select the “Export” tab in Shotcut’s toolbar.
- In the export window that appeared, you will see “Presets” on the left side of your screen. Scroll down to the “Intermediate” portion of the list and select "DNxHR_HQ.
- Click “From” in the “Export” window and select “Each Playlist Item” (See picture below).
- Under the “Video” export sub-tab, select the resolution, aspect ratio, and frame rate that matches your source files.
- Under the “Codec” export sub-tab, set your “Rate Control” as “Quality Based VBR”. The quality percentage does not matter as this is a visually lossless format, it will come out the same size regardless. Same goes for the bit depth under the audio tab, nothing needs to be changed because the preset was set to be lossless.
- Click “Export” and name your file(s). For example, if you set the name as “Video”, your files will export sequentially as “Video-1, Video-2,etc”.
HuffYUV Lossless File Format Tutorial
Summary:
HuffYUV is a truly lossless format and offers even faster playback in Shotcut than DNXHR at the cost of an even larger file (due to less aggressive compression).
Transcoding Steps (HuffYUV):
- Import your source file(s) into Shotcut using the “Playlist” tab in Shotcut’s toolbar (at the top of the screen).
- Make sure your video mode is set to the same frame rate and resolution of your source footage (Settings > Video Mode > Select).
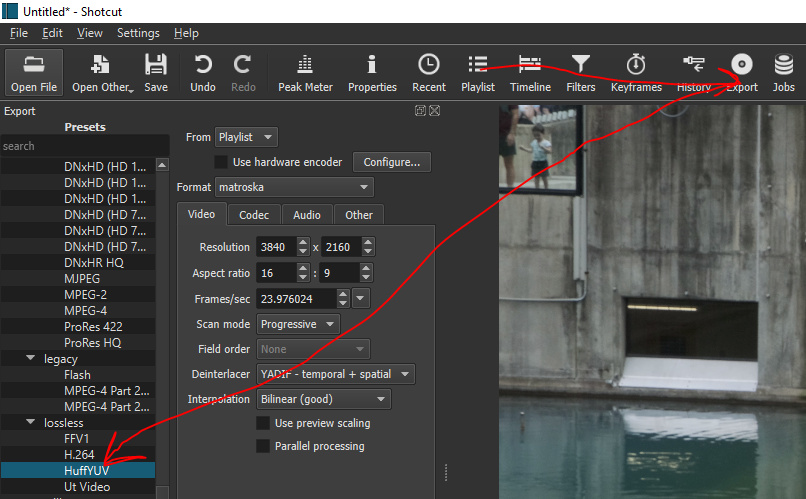
- Select the “Export” tab in Shotcut’s toolbar.
- In the export window that appeared, you will see “Presets” on the left side of your screen. Scroll down to the “Lossless” portion of the list and select "DNxHR_HQ.
- Click “From” in the “Export” window and select “Each Playlist Item” (See picture below).
- Under the “Video” export sub-tab, select the resolution, aspect ratio, and frame rate that matches your source files.
- Under the “Codec” export sub-tab, set your “Rate Control” as “Quality Based VBR”. The quality percentage does not matter as this is a truly lossless format, it will come out the same size regardless. Same goes for the bit depth under the audio tab, nothing needs to be changed because the preset was set to be lossless.
- Click “Export” and name your file(s). For example, if you set the name as “Video”, your files will export sequentially as “Video-1, Video-2,etc”.