Je ne sais pas comment @MusicalBox a réalisé cette flèche. Il existe des polices de caractères où chaque caractère est remplacé par un symbole. Téléchargez la police, passez le curseur au dessus du symbole et une bulle d’aide vous dit qu’elle est l’équivalent caractère clavier. Ensuite dans SC vous sélectionnez cette police et tapez le caractère correspondant dans le filtre texte.
I don’t know how @MusicalBox made this arrow.
There exist fonts where each character is replaced by a symbol.
Download the font, hover over the symbol and a tooltip tells you it is the keyboard character equivalent.
Then in SC you select this font and type the corresponding character in the text filter
I guess maybe the numbers are already down there.
A mask from file (arrow or any other shape) and then move with SPR.
Either way it’s a very imaginative use of Shotcut’s resources.
Maybe this will inspire @musicalbox to post a tutorial about the arrow and numbers.
First, thanks @jonray for these very nice comments.
I use ShareX to record the screen.
The arrow and numbers are done in Photoshop on a transparent 1920x1080 background
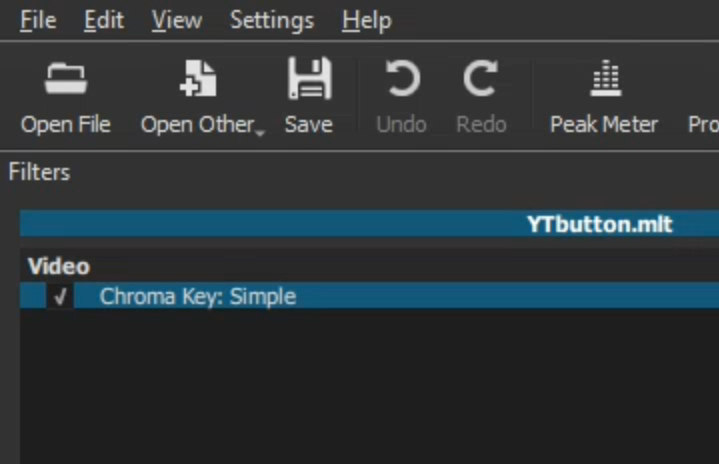
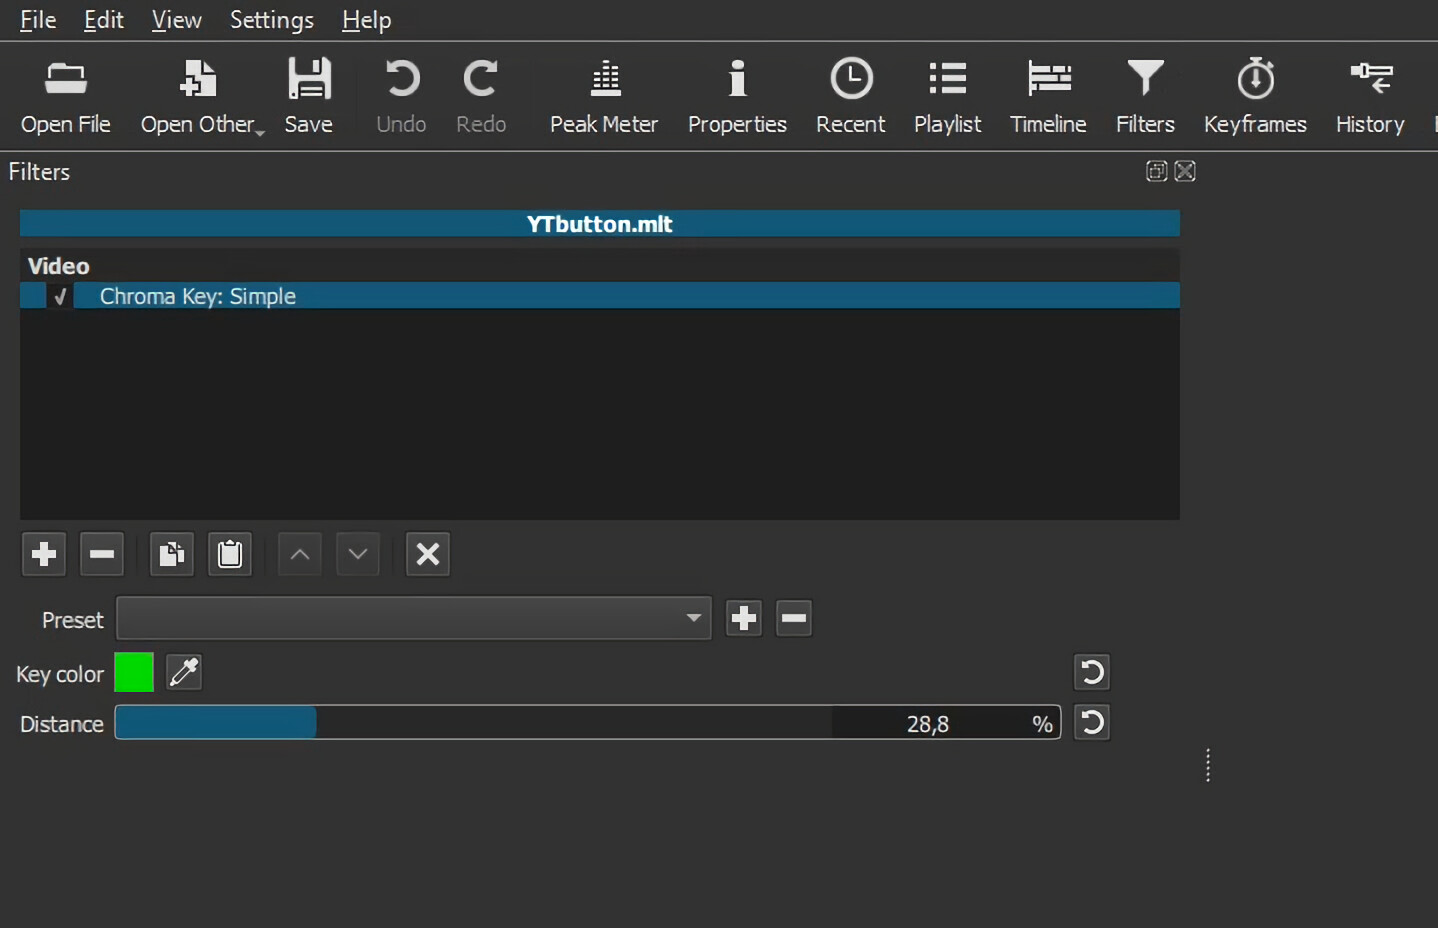
The numbers are on a track above the arrow and are the same color as the Shotcut background. That way, you can only see the numbers who are right above the arrow. The arrow clip and the numbers clip are animated at different speeds to give that effect. (I don’t know if that makes sense).
Here’s what it looks like without the Shotcut background. https://streamable.com/caoc1m https://streamable.com/caoc1m
I can’t afford to hire @bentacular
Instead I sent a team of my minions to record him while he sleeps. He talks a lot in his sleep.
Some hypnotic techniques are used to make him say the text I need.
As simple as that
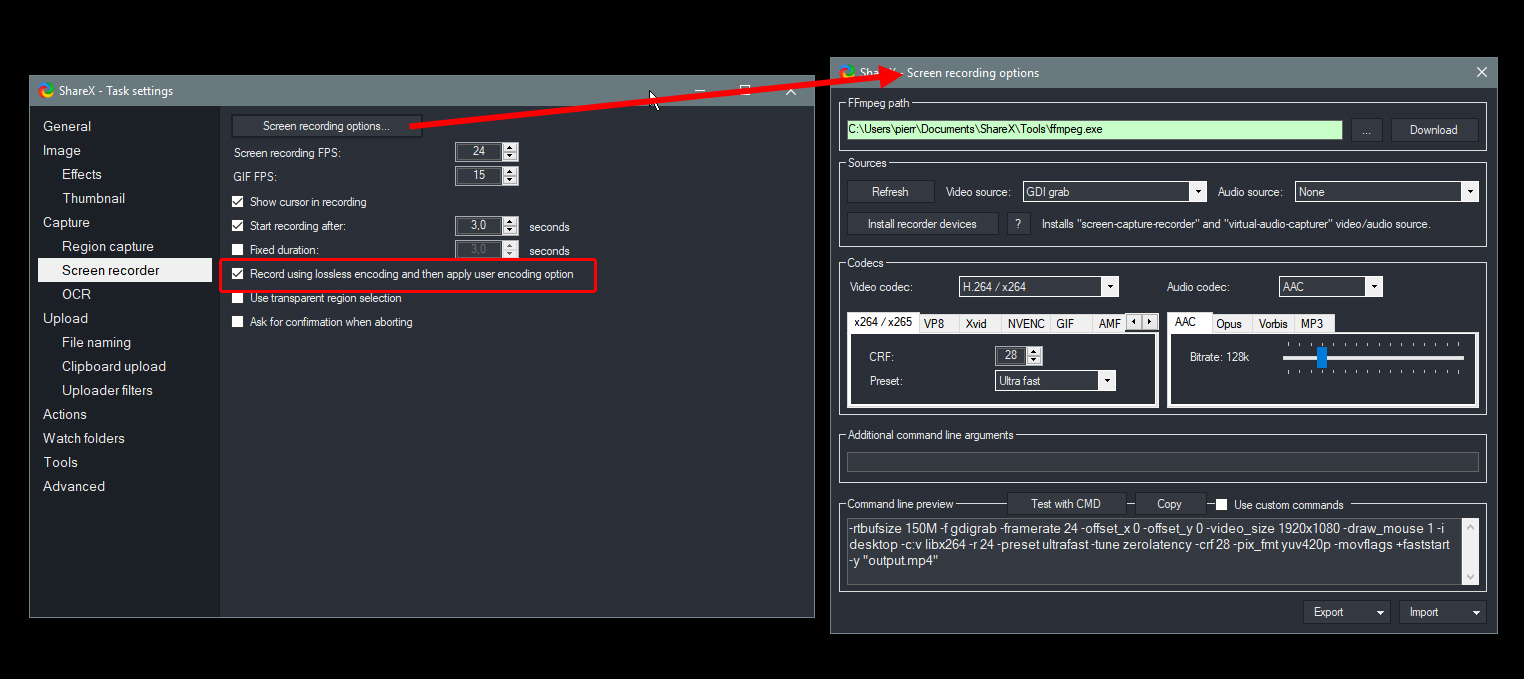
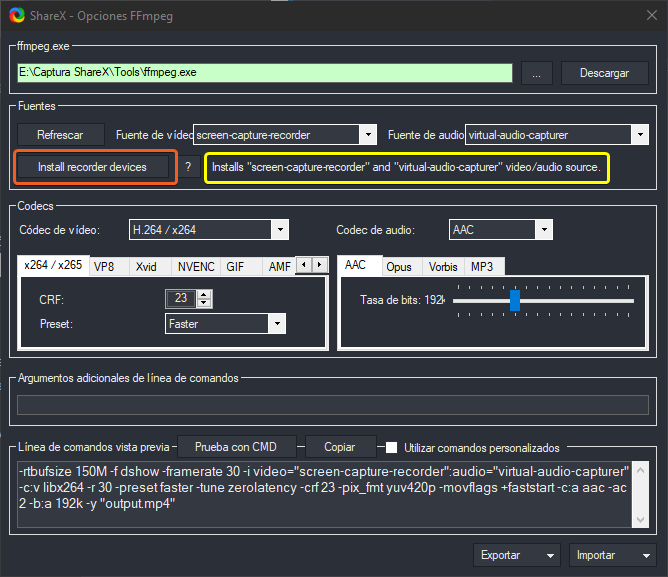
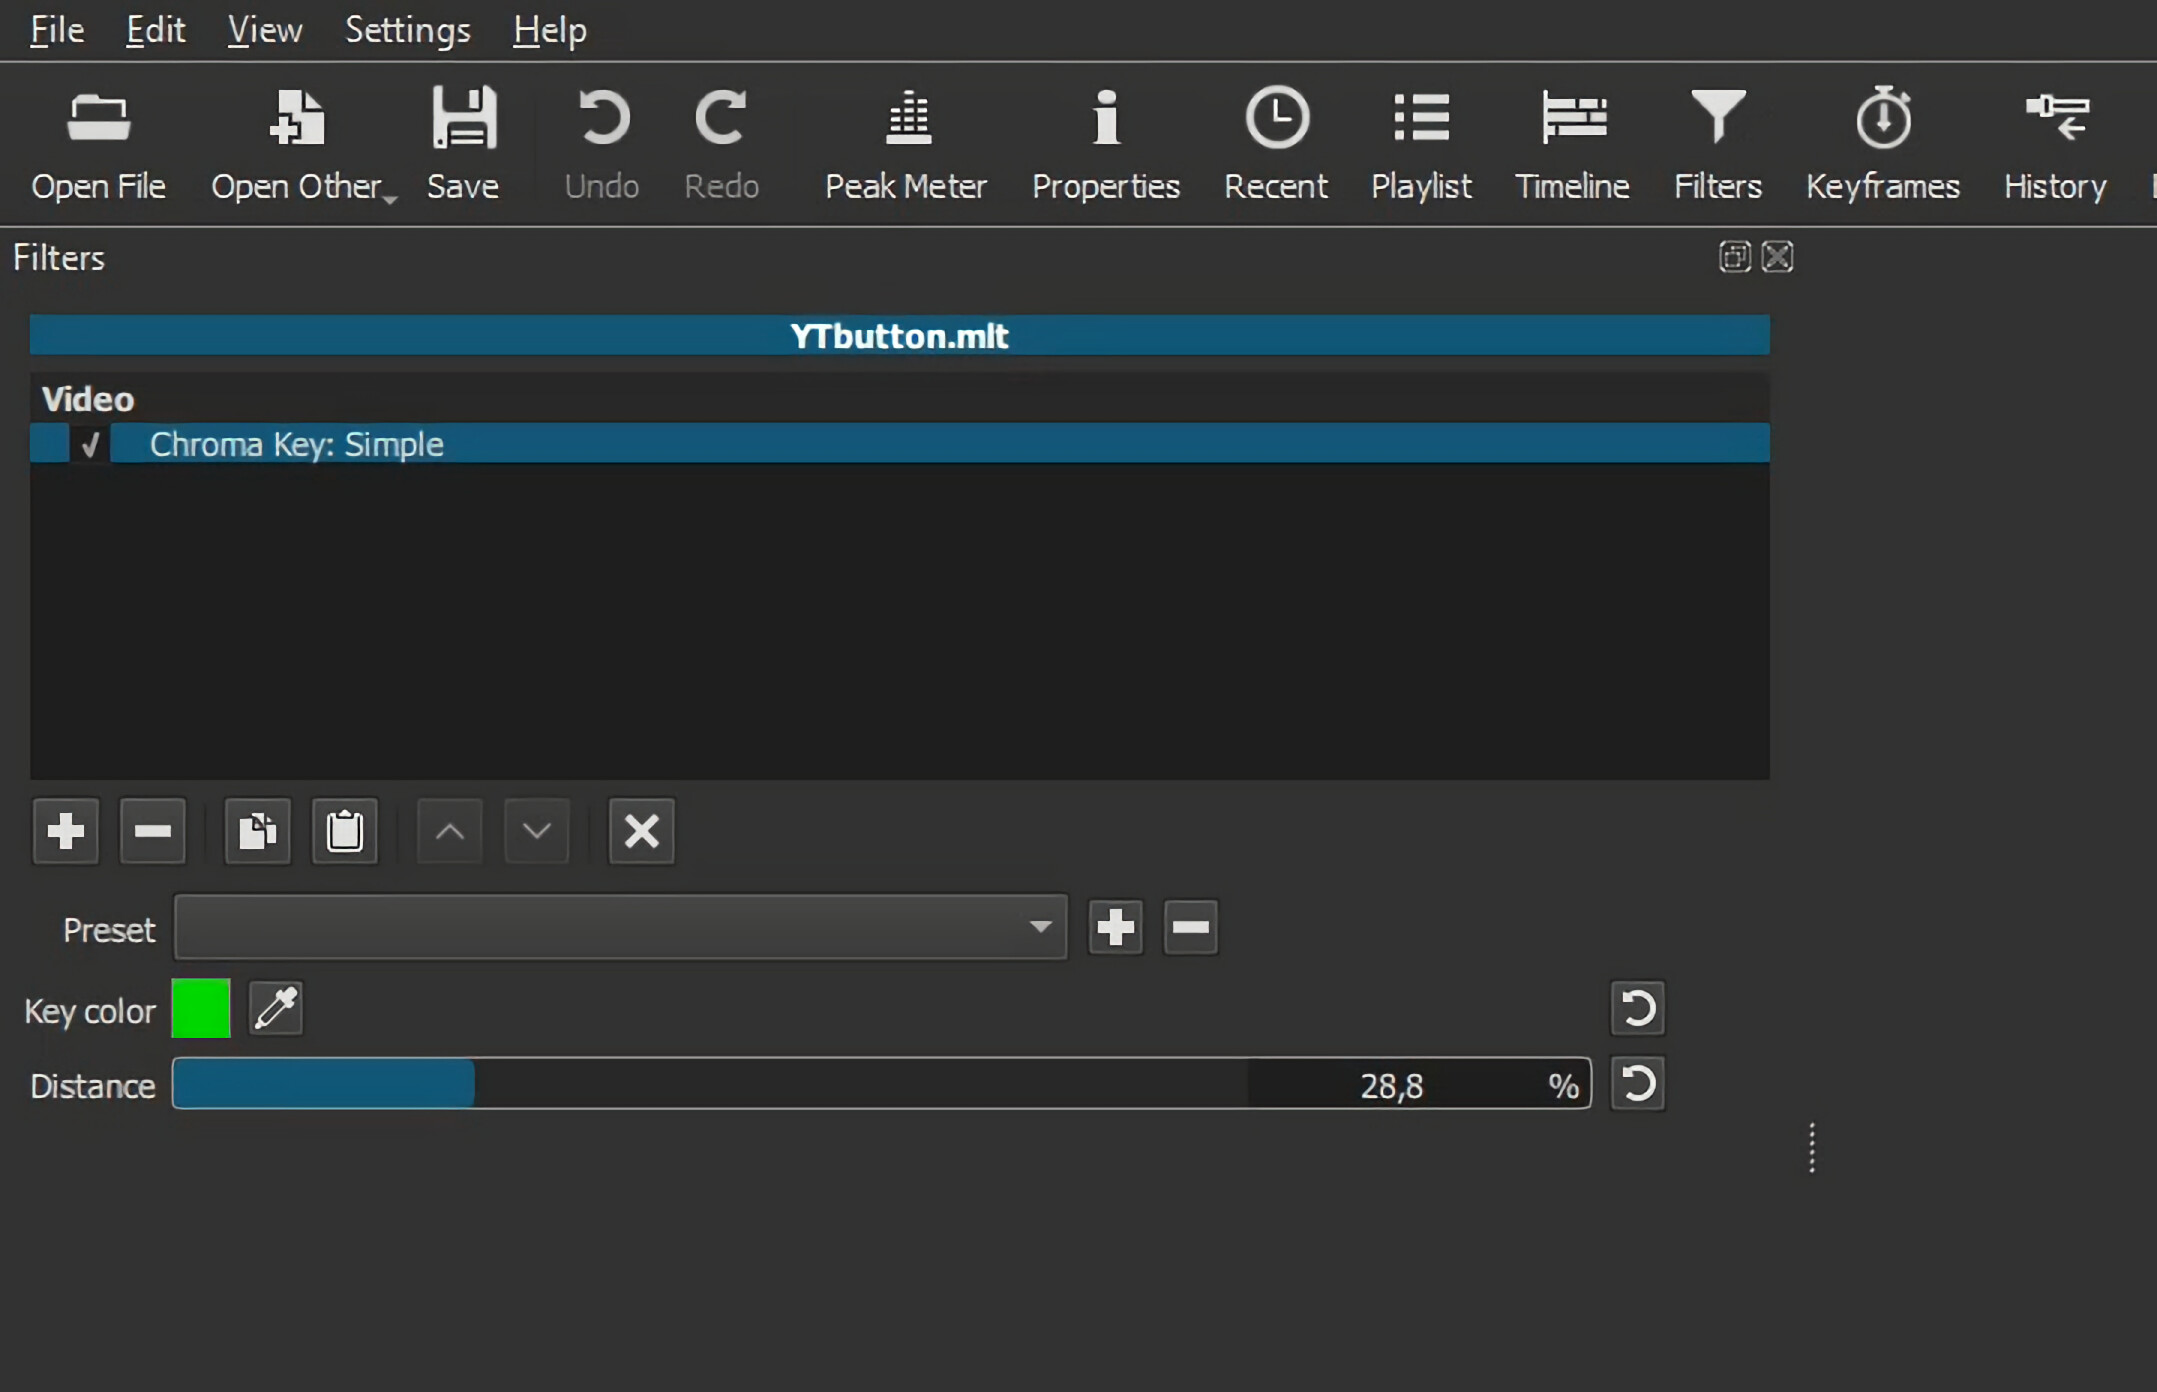
These are my Screen recording settings. I have Record using lossless encoding checked because I figure that maybe if ShareX doesn’t have to compress while it’s recording, the end result will be smoother. Maybe it does something to the quality of the video too… who knows
GDI grab - Records the screen with built-in FFmpeg methods.
screen-capture-recorder - Records the screen using the open source DirectShow filter.
Lossless capture I suppose will avoid latency (I don’t know) but subsequent conversion will introduce a loss of quality (visual or not) depending on the CRF quality setting.
I guess @jonray’s question is also related to the sharpness of your video in the enlargements of a part of the Shotcut interface.
I am still experimenting with some things about this.
In my short videos about audio filters, I replicated the filter interface in Inkscape in my first video.
In the second video, I used an image scaler (Waifu 2x).
If the capture quality allows such a scaling, I would not need intermediate steps to show the interface of each filter clearly.
This implies that I did some things in W10 (ShareX and Waifu2X) and Shotcut editing in Ubuntu Studio.
I will review the settings of my screen recorders in Ubuntu Studio (VokoScreen and OBS Studio) to improve the detail for the enlargements.
What is the advantage of installing the screen-capture-recorder in ShareX?
I’ve read the forum thread you linked, but honestly, I didn’t get much from it.
Your examples look very nice when seen as previews. But at full scale as we would see them when used in a video project, we can see the heavy work done by the scaler. Particularly on the text.
Your 3x example seen at it’s full size of 2157x1392
It’s not unpleasant. But how complicated is it to use an external scaler ? Do you import a video in it, and export it again after it rescaled the video, then import the result in Shotcut? If so, it may be faster (but maybe not as efficient) to just add a Sharpen filter in Shotcut.
Here’s the video with SP&R at 300% and before & after using the Sharpen filter:
I know this option because I needed audio recording as well. So I installed both options. I didn’t test the advantages or disadvantages of each of these options so I can’t say which one is better for me.
I used to record with OBS, but in some circumstances recording with ShareX worked better and in other cases OBS was better.
With the scaling issue I didn’t use the highest quality or processing for this sample graphic, but I will concede that SP&R + Sharpen does a very decent job.
The advantage? It just depends on your needs, nothing more.
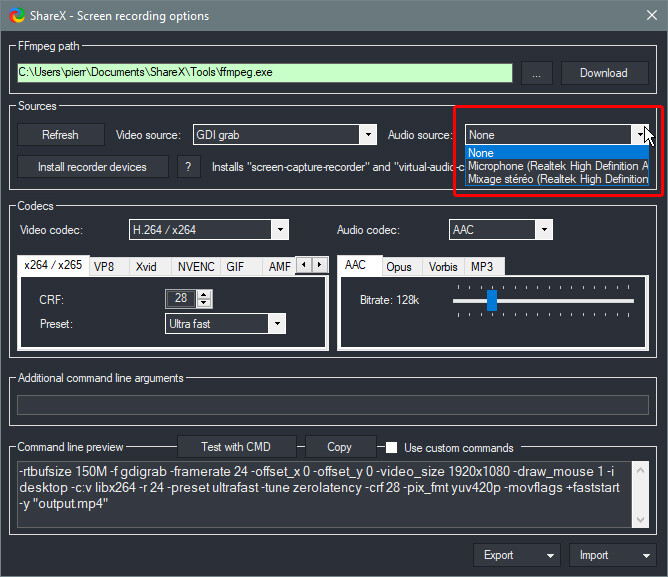
I always have the Audio Source set to none, because I rarely need to capture audio. But I know I can record Audio with ShareX without installing virtual-audio-capturer.
I just choose one of the choices ShareX gives me: