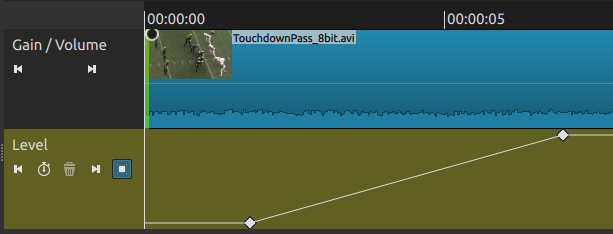
Nothing about the keyframe mapping changed between the two versions that you show. What did change is the “scale” of the y-axis of the keyframe display. If you look at the first image you provided (from 21.03.13), what would you do if you want to set the speed to 2x? You can not drag the right keyframe up because it is already at the top. For this latest version, I scale the y-axis to the entire clip so that you have the option to drag it up or down for the entire duration of the original clip.
Your attention to detail amazes me.
If you want to make the 30 second clip play at 1.1x speed, then the display will be inconvenient. If you want it to play at 100x speed, then it will be very convenient. So there is a tradeoff right now. Maybe someday in the future we will add some vertical zoom feature to the keyframe display.
I agree that results in less vertical space. But it does not conform to our UI guidelines to always put the label on the left and the value on the right.
I also considered combining them somehow. For example: Map: 16.6416s -> 16.6416s
But I was not sure if that would be intuitive
Right so it’s absolute now and not relative. I don’t think this is a good idea because like I said if the source footage is very long then how can the keyframes be done on a small section that’s just mere seconds? The relative scaling was better. Here’s another use case that is now very hard to do in this new version: Reversing footage. Previously if you wanted to reverse the footage all you had to do was take the first default keyframe and raise it to the highest point and take last default keyframe and bring it all the way down. Now how can the user measure those points easily?
On the previous beta version while holding Alt down, you would bring the last default keyframe closer to the first keyframe until the Speed counter tells you it’s at 2.00000x speed.
I’ll call back my suggestion from the beta thread here:
I think in the Alpha thread I asked something about what would happen if a clip is made longer or shorter after Time Remap is added. I think I suggested something about the lowest and highest points sort of updating dynamically to reflect the length being changed. I don’t know what your thought is in regards to that but in case I did bring that up before I want to say that after me giving it some more thought maybe it’s easier and more logical to just have it that when Time Remap is added to a clip the lowest point (i.e. the start frame) and the highest point (i.e. the last frame) are locked from that point on regardless if the clip is made longer or shorter. There could be perhaps a use case of someone using Time Remap just to make a clip run slower or faster as an alternative to the Speed parameter in Properties.
My thinking here is to keep the keyframes relative to the clip/sub-clip that Time Remap is added on. If someone wanted to use a frame that is from later on in the source clip then they would have to add Time Remap to split clip that has that frame. Then if they wanted to speed it up they would bring that keyframe in closer to the start of the clip. Then they could split the end off at where the keyframe has been reset and there is the desired effect.
That makes more sense and is much more usable than the absolute method that is being done now.
I want to also take back what I suggested in that above quote. Time Remap cannot really be used as a true alternative to the Speed Parameter. There are use cases that the Speed Parameter is much better suited for.
On another note, @shotcut one suggestion I want to make that really should be added for the upcoming release is to communicate to the user that Ctrl and Alt lock down the keyframe movement vertically and horizontally. This is sort of hidden because the only way to know this other than by finding out accidentally is to look at the keyboard shortcuts and many don’t do that. For the Size, Position & Rotate filter you added that note the comes up:
You should do something similar to all of the filters that have keyframes with curves including Time Remap. When the advanced keyframe button is pressed a note should come up saying something like “Holding Ctrl locks keyframe vertically, Holding Atl locks keyframe horizontally”. The way Time Remap is done here makes the use of Ctrl and Alt a must and the user needs to be made aware. But I wonder if the placement for this note should be somewhere different than the one for Size, Position & Rotate because the users eyes may be away from the player when turning on advanced keyframes.
Also, I think the color for these kinds of notes should be something else other than blue. Blue is the color that is used to note use of Proxy and Preview Scaling so when that new note for the filter comes up users miss it because it blends in with the note for Proxy and Preview Scaling. Notes should be a different color like maybe green.
For the next build I have added a toggle button to allow the user to scale the keyframes to fit within the vertical space. Essentially, this button toggles between the current behavior and the previous behavior.
This button is available for all filters that have numerical keyframes.
I think a future improvement will need to be adding values to the vertical axis for min, middle and max values. I will have to think about where this would fit.
I would recommend using the buttons for setting speed (they accept negative values for reverse). That would be much more precise than dragging keyframes. But now you can hit the toggle button to scale the values if you prefer.
@shotcut, would you consider extended the end date for this version by a few days? I didn’t really get a chance to test this as much as I wanted to as I’ve been busy.
Here are issues I found with version 21.04.26.
6) Keyframes don’t work after the Zoom In Keyframe button is pressed with any filter (e.g. Brightness, Gain/Volume, Opacity, Size, Position & Rotate, etc…) outside of Time Remap. Once the button is pressed no values are being changed despite the keyframes being moved around. Also, when the Zoom In Keyframe button is pressed and you move a keyframe while holding down the Ctrl button, the keyframe is separated from the curve line. Demo.
7) The help dialog for keyframes with curves about Ctrl and Alt doesn’t appear for Time Remap.
8) When you press the Zoom In Keyframe button then click away to another filter, another clip or another layout and come back to it, the button is turned off.
9) While the newly added suggested file name for Exporting Frames does come up, after pressing Enter or Save no file is exported.
10) With the modification of the suggested file name to make the export of frames quicker, why not simplify the shortcut for Exporting Frame? Ctrl+Shift+E is a little hard to grab. How about either just E or Shift+E which are easier to grab and would help make the process even quicker?
11) The “Do not show this message anymore” should be removed for the Convert dialog. If users click that then they won’t be able to use Time Remap.
12) Setting the input time button to 1.00000 doesn’t work even if clip is stretched out past last default keyframe. Demo.
This hasn’t been addressed and in the latest version the sub-clip option is still hidden.
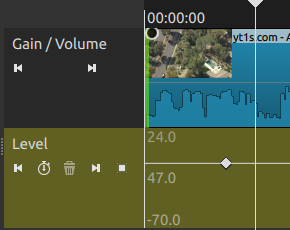
This is because you only have one keyframe. So the zoom range maximum and minimum are the same. The graph behaves badly in this case. The timeremap filter would also do this if you delete all but one keyframe.
I have made the following changes to improve this:
Do not allow dragging when zoomed to one keyframe
Show min, mid and max keyfame values in the graph
When zoomed to one keyframe, only show the mid value
When zoomed to one keyframe, always place the keyframe in the middle
of the y axis
The zoom button zooms the graph to fit the largest and smallest keyframe values. Some people will request a variable zoom. I am not going to implement that for this release.
This is on purpose so that when people leave and return to the filter they aren’t confused because they have forgotten that they left the zoom on. Many people will complain about this. But those complaints will be less noise than all the people who would otherwise request support because they accidentally left the zoom engaged and forgot.
This just occurred to me. With the Reverse option, if you select the whole clip then use Reverse it reverses the whole clip. If you use Reverse on a sub-clip it reverses just the sub-clip without the need of an option to check.
Can Convert be programmed just like this? That way it skips the whole need for a sub-clip check box at all and just converts what was selected be it the whole clip or a sub-clip whether the user manually selects Convert from properties or its called on by Time Remap. It would simplify everything and make the most sense.
No, as I explained, the sub-clip option also affects the scope of the following replace action. In the case of Reverse, you very rarely want to replace every clip from the same source. However, in Convert you frequently do. With sub-clip only the selected clip is replaced; without sub-clip each clip from the same source is replaced with the conversion result.
