Techniques to Crop/ Mask a keyframe parameter with a perfectly "fixed" ratio?

I searched pretty thoroughly for any other threads on Google, Youtube, and these forums for a similar question and couldn’t find anything. Partially because it was hard figuring out a way to properly phrase the question, but more likely it’s not a common issue.

In short, I’m trying to introduce an image over a video, over time, starting from the outside moving inwards. So, the image needs to start as transparent and slowly ‘appear’ from the outer borders inwards towards the center.

The image has transparency and is intended to act as a border on top of the video for a portion. The video underneath must always be visible under the transparent portions of the image as it comes in.

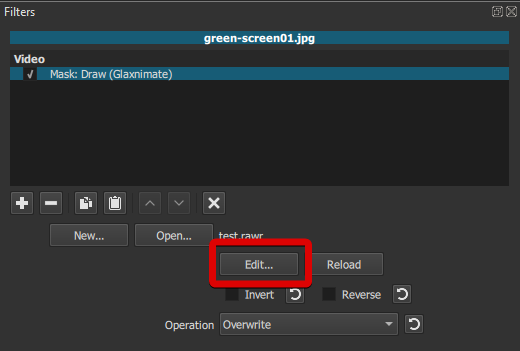
I initially had no clue on how to achieve this but eventually was able to figure this out by using the: Mask: Simple Shape filter → Operation: Subtract → Shape: Rectangle → and using the Keyframes on the Width and Height to make the image appear over the video starting from the outer 4 boundaries.

However, here is where the issue of obtaining a perfectly “fixed” ratio problem comes in.

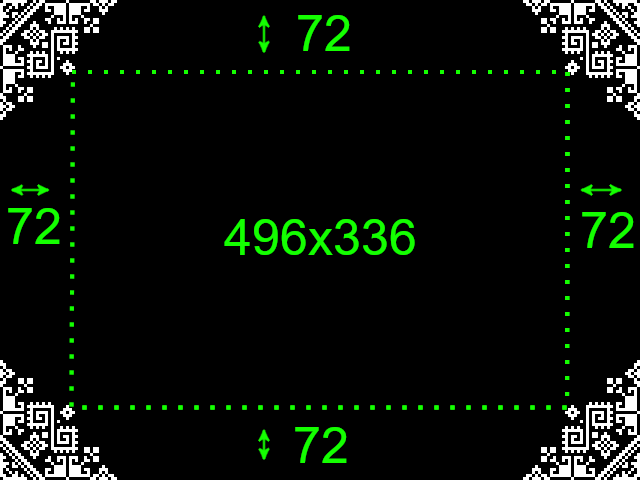
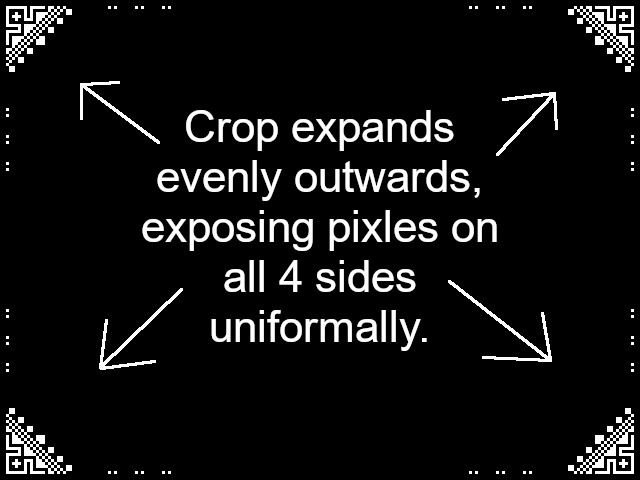
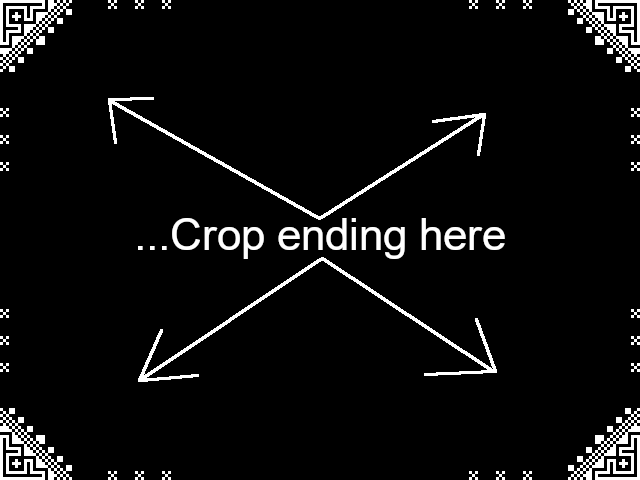
To illustrate what I mean by “perfectly fixed”, I’ve included a picture and I’ll describe how this is actually obtainable through Crop: Rectangle, BUT limited to only cropping from the middle -->outwards.

I was able to make the image appear from the center–>outwards with perfect pixels on all 4 sides using:

  • Crop: Rectangle
  • Transparency engaged
  • Project is 640x480, 25 fps
  • Calculate the distance to achieve an expansion per frame, ending at full resolution
  • Start the Crop at size 0, and position middle (320x240)
  • End the Crop at size 640x480, and at positions 0.

Example2
Example3

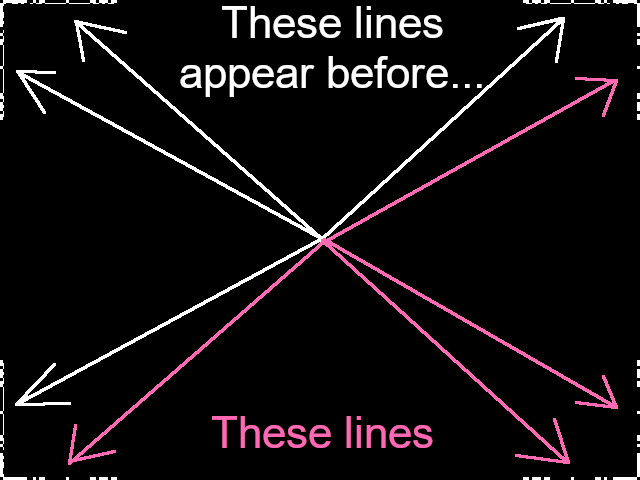
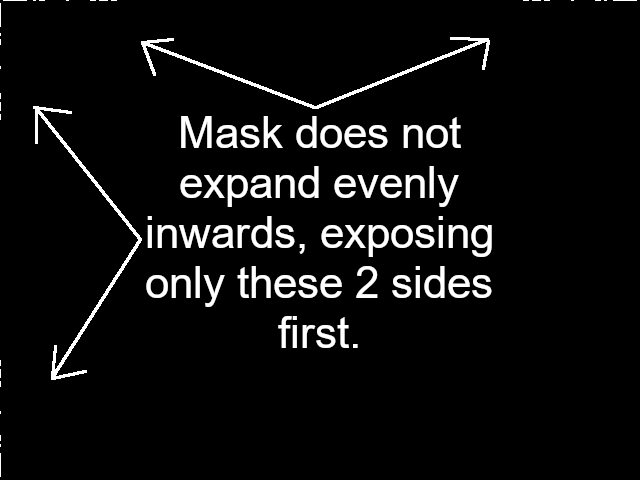
However, I’m trying to achieve this same uniformity from the outside moving inwards, and the only way I can figure out how to achieve this is by using the Mask: Simple Shape filter as described above, and the only keyframes available are percentage based and they do not open the image evenly on all sides.

Here are a few picture examples:
Example5
Example1

Any input is appreciated on this. I feel like I have OCD and this is not very important and these imperfections would not be visible to almost anybody’s eyes as the video rolls out the Mask over a ~ 10 second timeline, but for some reason it has me yearning for perfection and wondering if it’s achievable.

I am more than happy to clarify my question or clear up anything, please don’t hesitate to ask!

I think there is indeed a problem with the Mask:Simple Shape filter since I see the same thing happening.

I can sort of make a correction for it by setting the Horizontal and Vertical values to 49.92, rather than 50.0. Does this work for you?

1 Like

That actually helped a bit, it brought in 3 sides simultaneously, though the bottom vertical is still late, and the horizontal/ vertical is continuously off set by single frames on all side until the end.
example6

Btw, thank you for attempting this. Here is the border that I’m using for anyone interested in attempting to solve this:
CORNERS-2hbx8emBLACK

Just attempting to get each pixel to appear evenly on all sides, every frame starting from the outside and moving inwards towards the center.

I don’t get this problem.

Just make sure you leave all parameters to there default values, except for Width, Height and Softness

I turned Softness to zero and used keyframes on Width and Height.

First keyframe: Width and Height are set at 50%. It is a bit confusing, but 50% means the mask will occupy 100% of the screen…
Second keyframe: I set both values at 40%

As you can see, the border appears evenly on each side.

1 Like

Thank you for taking the time to make this!

I think the problem arising with the ‘even’ mask keyframes is that the project is not a perfect square, and is a 4:3 ratio. The percentage based keyframes make it more difficult because 54 pixels horizontal is a different percentage of 640 than 54 pixels vertical is a percentage of 480.

Looking at your example, you understand perfectly what I’m attempting to do and are coming into the same problem I’m having. Here is an example:

I tried figuring out the percentages for 640 vs 480 to evenly roll out but it’s way past my brain power. That is why the Crop keyframes being position, size based was successful in rolling it in evenly.

Here is an example of how I was able to accomplish a perfect even roll in using Crop:Rectangle: Exampleclip The crop visibility starts at position 45 both vertically and horizontally, so 45 multiplied every 4 frames equals 180 frames. 180 frames divided by 25 fps equals a 7:05 clip length. I was able to crop “outwards” achieving a perfect pixel ratio on all sides.

I was hoping to achieve this same thing but from outside to inside. If this is literally not possible, I’ll scrap the idea.

To do that, you could use the Mask: Draw (Glaxnimate) filter instead of Mask: Simple Shape.

I made a quick tutorial.
Note that I also used the Aspect Ratio Calculator website to help with the keyframe values.
Also note that I used the image you provided above, which is different from the one you used in your Exampleclip

I know you will say that it doesn’t grow evenly on every sides. But that is what I got while preserving the 4:3 ratio throughout the animation. Maybe you used different values to achieve your perfect even roll in.
These values might work also with Glaxnimate. But I believe that you’ll probably also need to use keyframes on “Position” to keep the rectangle centered.

But in my opinion, as long as all sides start to appear at the same time, no-one will notice that there is a slight difference between the thickness of the horizontal and vertical growth

2 Likes

Wow, that was a million times smoother. What a great tutorial, too. I just subscribed to your channel.

The Mask: Simple Shape filter moves at a much shakier consistency. This looks like it will definitely work. I am going to try this tomorrow morning. I’ve also been wanting to familiarize myself with the Mask: Draw (Glaxnimate) filter so I’m stoked that you were able to incorporate this filter into this project idea.

So, I think the only reason to deal with the 4:3 ratio is when dealing with percentages, like mask simple shape forces you to. When dealing with size, and positions – the rectangle borders only need to travel 45 pixels horizontally, and 45 pixels vertically to make the image appear completely. So, it is much easier to get the ends of the rectangle to start/end at the spot that you want, at the specific time you want it there. Like you did in this video.

Immense appreciation for making this video. I know this is going to work and I’m excited to finally learn Draw Glaxnimate. And you are absolutely correct when you say that no one will notice the inconsistencies in the size of the edges. This was more for myself and to force myself to learn how to have total control over this idea, especially when dealing with pixels. I’ll post tomorrow the results!

2 Likes

I’m looking forward to see your results.
Don’t hesitate if you have more questions.

Worked like a charm: Exampleclip It appears to be perfectly fixed on all sides. I also figured out the exact visible crop borders to be at 72 width, height - which made the collapsed rectangle size to be 496x336
CORNERS-2hbx8emBORDERexample

I chose to have this image ‘appear’ at a rate of 5 frames per expansion (72 x 5 = 360 frames = 14:10 clip), as you can see in the example.

Though, I went back to edit the duration to 6 frames per expansion (72 x 6 = 432 frames), and I now can’t move the keyframe past 360. I am currently stumped on how to change the duration to 432 frames? I went into properties and couldn’t find any option related to this. I even changed the clip to 17:07 to support the 432 frames. Any recommendations?

If you extend the length of the clip in Shotcut, make sure it is selected and click on Edit.

SLFjqBoFJT

When you switch back to the Glaxnimate window, the length should be updated.
You might need to zoom-out the Timeline. Use Ctrl + Mouse wheel for that.

Note: Take the habit of ALWAYS clicking on Edit before switching to the Glaxnimate window. Also, always Save in Glaxnimate before switching to Shotcut. And when you go back to Shotcut, you might need to click on Reload to update the changes. So make an habit of that also :wink:


In Glaxnimate, you can also:

  • Select the item on top of the Layers panel.
    iresk0fnUq
  • Go to the Properties panel. If you don’t see it, go to View > Views and enable Properties.
  • Edit the Last frame line.

Note: Even if you save save the Glaxnimate file after editing Last frame, the lenght of the clip in Shotcut will not be updated. You’ll have to do it manually.

2 Likes

This works. It didn’t automatically update, however I was able to extend the frames via the item on top of layers panel → properties.

Mask: Draw (Glaxnimate) is exactly the filter I needed to achieve the even fixed ratio. It allows you much more control than Simple Shape, and Crop. I’ve been playing with it for last hour and re-doing the other images that I key-framed their visibility using Crop:Rectangle. Glaxnimate looks a bit smoother as it ‘rolls in’ than even the Crop that I thought was perfected already.

MusicalBox, you have a made a best friend for life. This will keep me busy and will allow me to finish my current project. Also, I am going to check out Glaxnimate further and see what other creative ideas I can come up with it. I already subbed to your Youtube channel and will check out your other videos to see what else I can learn.

Sincerely appreciate you. Thank you for your time and consideration with this.

2 Likes

You’re welcome @Joel, and thanks for the sub :+1:

1 Like

This topic was automatically closed after 90 days. New replies are no longer allowed.