Stabilization reduces or eliminates unwanted camera shake, creating a smoother and more professional-looking video. This is particularly important for footage shot handheld, in motion, or in windy conditions. Without stabilization, shaky videos can be distracting, disorienting, and even cause dizziness for viewers.
The Shotcut filter uses the open source library GitHub - georgmartius/vid.stab: Video stabilization library
Here is how its UI looks initially
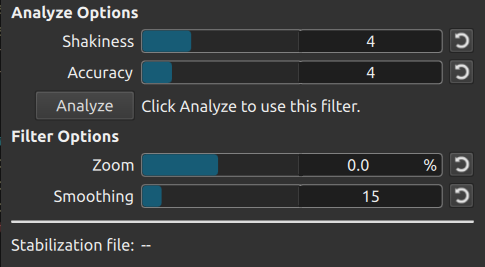
You must first analyze before the filter affects the video. Clicking Analyze creates an analysis job in Jobs. You will be prompted to save a .stab file, which stores the analysis data. You are not prompted to save a file when you have made a project folder because it automatically generates the file in the project folder. When the job completes successfully it looks something like this:
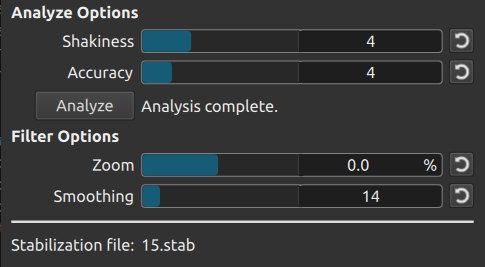
Notice it says “Analysis complete” next to the button and reports the file name.
Shotcut version 25.05 added a menu item File > Rerun Filter Analysis that creates a new analysis job for every Stabilize filter in the current project. This is useful if you did a lot of trimming or splitting clips after having done stabilization or if you change the Video Mode resolution or aspect ratio. Note that this also redoes analysis for Normalize: Two Pass audio filters.
Parameters
@jupiter wrote in Stabilization Settings, Descriptions, and Tendencies
After rendering a video project countless times with low & high settings of each scale, then closely studying the results, this is what I believe each setting does. The higher the setting, the more it does what is described.
- Shakiness seems to average out the frame movements instead of each frame migrating too much compared to the previous/next frame. Max recommended.
- Accuracy seems to prefer keeping the main point-of-reference figure stabilized instead of the moving background (this was for my case of a moving selfie camera; not sure what happens with a stationary camera and moving objects; in a video of walking around filming a city, this setting didn’t make any difference). I found Accuracy to be more effective at stabilizing the video than Shakiness, tho there seemed no downside to maximizing both.
- Zoom is the relative size of the output frame compared to the input frame. If the whole input frame matters, I wouldn’t set it above 0%. And if you do want to zoom in, I’d rather do it with Smoothing.
- Smoothing is how much the frames are allowed to move around from center to stabilize the image (this can be seen when Zoom is negative). It also zooms in, which I guess is to hide the shifting frame borders. Without allowing some Smoothing, Stabilize isn’t able to do its job. I suggest between 10 to 30, depending how tolerant you are if the moving original border becomes visible in your output. If you prefer to not see any corrections along the edge and want to keep almost the entire outer frame, then set Zoom=0 and Smoothing to less than 5, but don’t expect much stabilization.
By setting the Zoom out the maximum of -50% and the smoothness around 30, I was able to get a good perspective of how hard its working and what it’s doing. I suggest max shakiness, max accuracy, zoom around 0%, and adjust your smoothness for how much you want the video to be stabilized.
To compare the scale of Shakiness vs Accuracy, I rendered the same video 4 times with low and high settings for each (low-low, high-low, low-high, high-high) then made a single video with each version in its own video track and displaying them in the 4 corners using the Size and Position filter (like 4 Picture-in-Pictures). Then Render/Export the whole project to have them play smoothly side-by-side and analyze the movements frame-by-frame. I also took the same approach with Zoom and Smoothing to determine their effects and preferred settings.
In my very dynamic sports video with a GoPro on a selfie stick, the Stabilize feature helped tremendously, tho the algorithm still needs improvement. Big stabilization movements seem to correct in sets of 2 frames instead of every frame (or the average of many frames) across the sample, resulting in jitteriness. Lossy vs Lossless didn’t seem to correct this, nor did any combination of Stabilization settings.
Stabilize/Analyzing filter tendencies:
- When exporting the video, the stabilization filter won’t apply to the output if the frame rate or video size is changed.
- When Stabilizing (or any other filter) make sure you’ve properly selected what you want it applied to. Videos in the Player, Playlist, and Timeline are 3 different instances, and are not connected. To apply to the other instances, you must update or add the video to them. When Exporting, you also select From which source at the top of the tile.
- Player and Playlist videos only analyze the portion selected. If its in-point/out-points are ever expanded (in the Player or Timeline), the new sections won’d be stabilized.
- Timeline clips analyze the entire source video, not just the portion that’s selected. If you only need a small clip of a long source video, it’s much quicker to analyze a portion in the Player/Playlist, then add it and further trim it down in the Timeline.
- The Stabilization filter can only be applied to individual clips, not the entire track or project. To affect more than just a single clip, either apply stabilization before you chop a source video into many pieces, or render your tracks or final project into an output file with minimum compression, then start a new project with that output file as your source and apply your stabilization and other global processing as needed.
- If after stabilizing, you see little artifacts along the edges, this is a byproduct of it being stabilized. If you set your Zoom to a negative value with a little bit of Smoothing, you can see what’s happening. Read about Zooming and Smoothing above for a solution.