I’m new to shotcut and just downloaded version 22.04.25.
I’ve been having a lot of problems trying to export files. If I put 16 fps then it saves it as a random fps. Frame rates over 100 are frequently exported. I tried using different codecs like MPEG, but it just does the same thing.
Long story, I’m using a wolverine film scanner to scan old 8mm movie film into mp4s. The wolverine has an ongoing firmware bug that allows it to only save at 20 frames per second, even though the original 8 mm was 16 frames per second.
I can set the play rate to 0.8 and save it as 16 FPS and it will work maybe one out of 10 times doing the exact same steps. Other times generate random frame rates.
Obviously, this is a bug, but I was wondering if there was an earlier version that works properly when it comes to saving the video at the correct frame rate?
Is there a way to trick this version into saving at 16 fps? I tried lowering the frame rate setting to 8fps, but it ignored it and just saved it at a random fps anyway.
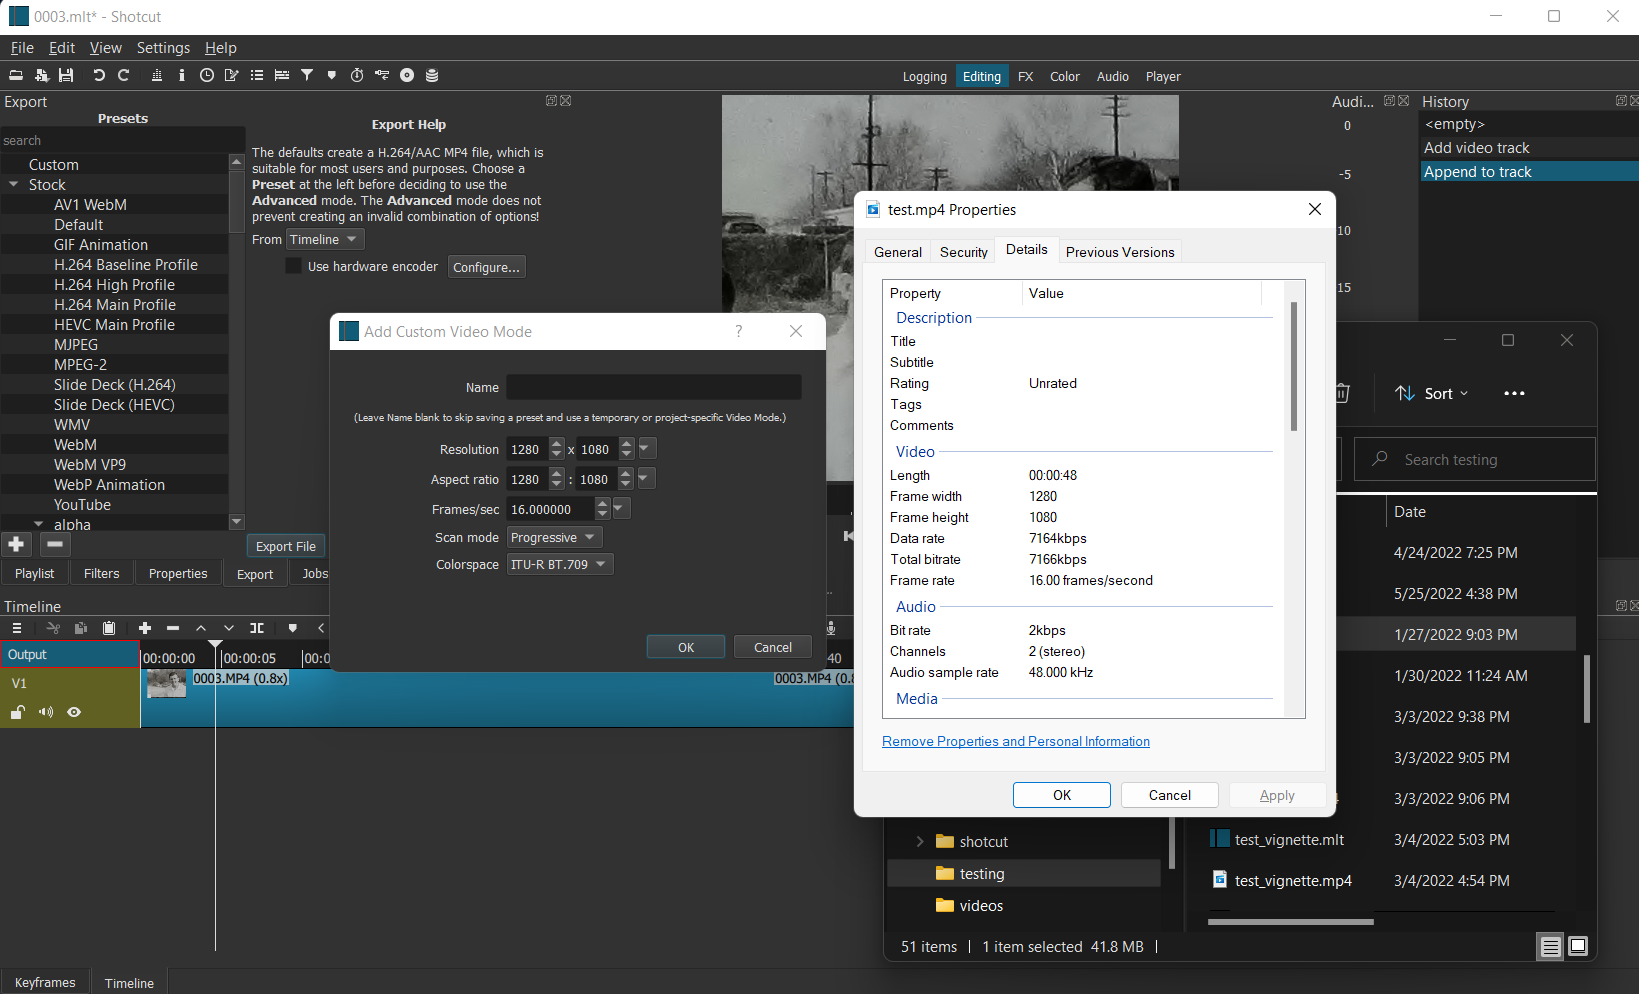
You need to use Settings > Video Mode > Custom > Add… instead of changing Export > Advanced > Video (frequently mentioned here).
You did not say what version of “MPEG” because they do not all support arbitrary frame rates. Just use the export defaults for now (H.264 MPEG-4).
How do you know the resulting frame rate? Open the result in Shotcut; what does it say in its Properties?
I tried the settings custom thing and it makes no difference. I selected a previously generated custom setting which is at 16fps did another export and this time it was 57fps.
I am primarily exporting mp4, but selecting mpeg-2 got 24fps. I haven’t tried avi or mjpeg yet. I’m thinking if the codec had a problem with the frame rate, it would have said something.
I know the true output frame rate because it shows up in the windows 7 folder where the files are kept.
I tried mJpeg which saves as an avi file and it worked fine if you ignore the huge output file.
I noticed another bug where the files are not being closed. So if you export to tmp. Mp4 and then try to erase it in file manager, it says it’s not closed. Closing the project will not free it. You have to shut the program completely down. That’s probably something unrelated, but it could be some other file not being closed that is causing the random frame rates.
I also tried deleting the old custom 16 fps profile and then creating a new one, but it made no difference.
Here are my exact steps.
Start program.
Settings, video mode, custom, standard8mm (my pre-created custom 16fps profile)
Open file (select mp4 file and press enter)
Drag playing video to time line.
Properties and set speed to 0.8 and then apply.
Export, advanced (to verify the frame speed is 16)
Export file
Type tmp then enter.
This will generate an mp4 file with a frame rate anywhere from 24 to 127 with 57 the most popular.
The codec listed under codec is libx264 and quality based vbr
Check the frame rate in Shotcut and another tool if you wish instead of relying on Windows 7. I seem to recall hearing about a problem where Explorer would try to read a file before Shotcut was done writing it and then cache that info for some time.
I will do that as soon as it gets done with the latest test run. However I can tell you that it’s the real number. I know this because the oddball frame rate causes oddities when it’s played back including jerky panning.
Btw, its Converting the file to the new frame rate by adding extra frames. When it’s played, it appears almost normal in speed.
I did discover that some files are less problematic than the one I’m using right now. I tried a different input file and it worked perfectly. I also know when it’s not working right because it takes about 10 times longer to generate the file with all the extra frames.
There are no errors detected in either input file and both play perfectly.
With the problematic file, I tried exporting at the original 20 FPS and it’s still gave me a 77 FPS file.
I used Mediainfo, shotcut and vlc and they are all reporting 16fps.
This still doesn’t explain why the saved video played back jerky. It’s doing something it shouldn’t. So I would load the input video and run the stabilize filter on it. Then save. The played video would have a jerky pan to it that was not present in the input file.
Note that 16fps does not divide evenly into a computer monitor’s 60 Hz refresh rate. Frames will likely be duplicated by the media player at an uneven cadence to scale up to the 60 Hz refresh rate. The uneven cadence will wreck a camera pan by making it stutter. Since 16fps is well inside human persistence of vision, this is a losing battle where smooth motion is concerned. Out of curiosity, how does the video look at 15fps instead of 16?
I agree with Austin, 16 fps is not a good framerate for a computer monitor - it simply doesn’t fit into its refresh rate of typically 60 Hz. I would go for 15 fps or even 30 fps and see how it looks in playback. Btw: i never heard of a camera capturing with a FR of 16 - thats really odd.
I’m not where I can test 15 FPS right now, but I will do it as soon as I can and let you guys know. The camera is a standard 8 mm movie film camera and they all capture at 16 fps, with the exception of super 8 which captured at 18 fps.
If I do save at 15 FPS, that means that I will be dropping a precious frame. These films were never meant to be shown on anything other than a projector. It might be possible to save at 30 FPS and simply don’t double two frames. But all that really does is double the file size.
To convert the 16 fps to anything standard, like 24 fps, it means that tweening must be used to generate the extra frame rather than doubling or else the jerkiness will be obvious. Most file converters simply double or add extra frames rather than tweening. I think I heard some of the high-end video editors would do this, but I cannot remember any names.
Tweening will generate a new second and third Frame based on the differences between two other frames. So the first original frame gets copied as is and then two generated frames will be output based on the differences between the original second and the first, and the second and the first of the next set. So two original frames get converted into three evenly spaced frames. This would yield 24 fps.
Playing a 16fps video on my monitor isn’t that objectionable as long as the motion is evenly spaced.
I really like shotcut over many of the others. The learning curve was not that steep. There are some things that could be added to make it better, but I imagine that new things are being added all the time.
There is another possibility regarding the jerkiness on panning. Like I said before, the wolverine film scanner incorrectly marks the film as 20 fps while the frames are spaced at 16 FPS from the camera. So if you play a raw MP4 from the scanner, it plays slightly faster than real time.
So using shotcut, I have to mark the playback speed as 0.8. this causes it to play back at the original 16 fps. And then later I save it as 16 FPS which equalizes everything.
However, if I forgot to change the 0.8 playback speed, and then saved it as 16 FPS, shot cut would respond by dropping frames in the final MP4.
I don’t know that this is what actually happened, but I am suspecting as such.
I had a Wolverine scanner for a short while and converted a bunch of my father’s films. I too used the 0.8 speed adjustment to reduce the frame rate as a stabilization to remove the vertical judder that I suppose is a combination of the mechanics of both camera and scanner. I also used the Crop: Source, Levels, Reduce Noise: Wavelet, followed by Sharpen filters to get like below. I stepped through the result frame-by-frame for a while in Shotcut to see if there were any duplicate or dropped frames, but I did not find any. You can compare yours with my results.
Wolverine does a fantastic job capturing, but has several design flaws. The biggest would be that the light source is located under the frame being exposed. So it’s next to impossible to get a good scan without dust accumulating down there during scanning. I’m thinking about using a little mini squirrel cage fan to blow air on it to try to keep it clean.
Then it looks like a bunch of others copied the design, flaws and all, and made their own.
I heard some of the paid editors will get rid of the scratches and other artifacts as well. It would be nice if shotcut would get those eventually. It has a lot of old film filters, but it didn’t take me long to realize that these were designed to make good video look bad, not the other way around.
I’m going to try some of the filters you mentioned to see if it helps mine.
As soon as I’m happy with my 8 mm transfers, I’ll probably sell mine on eBay just like everybody else does.
I couldn’t get the crop filter to work as expected. It just blacks out the outside instead of expanding to fill the frame. I used the resize filter to stretch it over the visible frame excluding the parts I don’t want.
I did find a trick with stabilize that helps when the original is excessively grainy. I put a heavy blur filter just before the stabilize filter so that the stabilize filter isn’t confused by the excessive grain. Then when I go to export, I uncheck the blur filter and the video is exported unblurred but stable.
I may add to the suggestion box special zoom transition filter attached to the stabilize filter. What happens is that the stabilize will nearly always zoom in a little bit. When you are dealing with whole scenes, it’s no problem. But when you just need a small section out of a big scene, you can partition it off into separate scenes and just stabilize the part you want, but the result is that when you play it back the unstabilized video will suddenly zoom in and then play that section, and then suddenly zoom back out. A nice feature would be a AutoZoom that gradually zoomed to the stabilized zoom level, and then unzoomed when it was done.
That and a checkbox to prevent rotation correction. Sometimes it generates a rotation artifact when there is a transition between two scenes that are similar but not identical.
That is because your video mode has incorrect resolution. When you crop the source, you are changing its aspect ratio, and when aspect ratios mismatch Shotcut pads with black. Your custom profile needs to factor in the width of the left edge you are removing. My video mode resolution and aspect ratio are 1280x1080, and I crop 142 from the left edge.