Hi there, I’m Gin.
Please, if possible, could I get some simple, non-jargon help. My mum died in May, she was a singer. We have many cassette tapes of her singing, which many in our local area would love to hear, so I came up with a plan. I would digitize the cassettes using Audacity audio software and then convert the audio file into a video file with an added photo or 2 for a bit of colour using Shotcut, and then finally upload them to a registered channel on Youtube where they would be available for all to access. The trouble is, I can’t seem to get Shotcut to get all the elements to go together. I can either make an audio video or a picture video, but not a video incorporating audio and my pics! Please could someone give me a little help, be it direct info or video tutorials you know of. I thought Shotcut would be easier than this to use 
Audacity: export everything to WAV format.
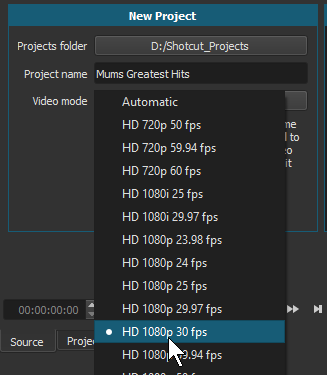
Step 1: Decide your Video Mode. A common one is 1080p 30fps, which works great for YouTube.
When you first open up Shotcut you’re present with this New Project Box.
You want to change your Video Mode from Automatic to a desired Video Mode.
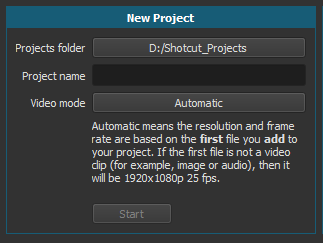
Just click on where it says “Automatic” to change it.
Name your project.
Click Start
Step 2: Open File for a picture. (Shows up in the Source tab)
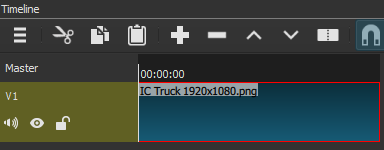
Step 3: Click Timeline icon on the top row.
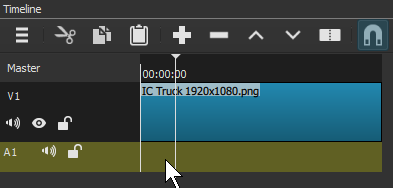
Step 4: Drag picture from Source tab to Timeline and drop it. (Creates V1, which is Video 1)
Step 5: Add Audio Track. Directly under where it says Timeline, you’ll see 3 lines, click there and select Add Audio Track.
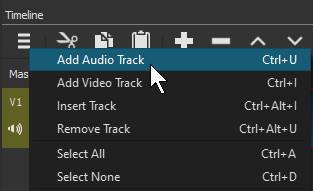
By clicking on the track the selection will show green as active.
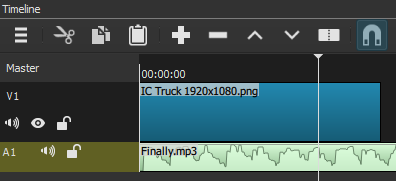
Step 6: Open the WAV file exported from Audacity. It will show up in the Source tab as solid white, and start playing the file. You can just pause it with the space bar.
Step 7: Insert the WAV file into the timeline. Just drag the file to A1 just under the picture on V1. Or adjust to desired position.
Just add more pictures and audio files from the source to your timeline by dragging & dropping. Watching tutorial videos showing you how to use the various Shotcut features will be in your best interest.
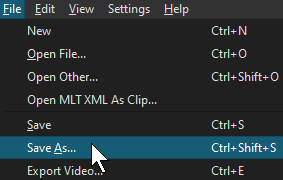
Step 8: Save Project File. This just saves the project MLT file (lines of code for Shotcut).
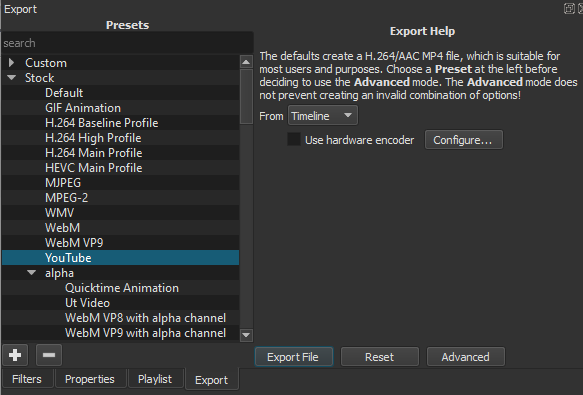
Step 9: Exporting. Click the Export icon on the top row.
Click the YouTube Preset, then Export File. Simply name your desired exported file name.
There is no need to enter Advanced. Changing settings in there may result in a bad or failed export.
Before rendering, restart your computer.
While exporting, just leave the computer to put away laundry and let Shotcut do it’s thing.
Depending on the age of the computer this may take a while.
You can add multiple video layers and audio layers to Shotcut, which you might want to have for various pictures. For video layers the top most layer is what’s visible.
There is a slight learning curve to learning Shotcut. There are numerous tutorial videos on Shotcut on YouTube.
I didn’t explain anything beyond the very basic adding pictures to audio, and you may want something more than what I explained.
And because all of your time is precious do a Save As, and give the project MLT file a different name possible on a different storage device for a safe back up of your work. You can also use Save As to save various stages of your project as well.
This topic was automatically closed after 90 days. New replies are no longer allowed.