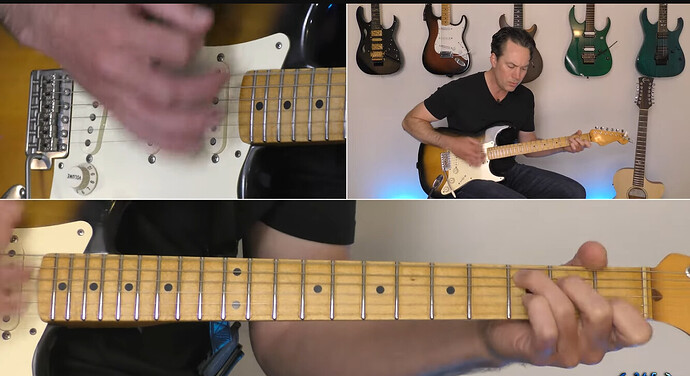
I need to do this, can any body give me step by step tutorial? thanks in advance
There is a video about this on the Tutorials page that is in a link at the top of this page as well as in the Help menu in the app.
Hi @iharpyou , I also made you a tutorial video. I just ran a screen capture program and made it from start to finish.
I used sample photos but you can use videos instead.
Took 6 minutes. Half of that time was making a black and white border mask. This ensures that the border between each of the photos is a constant 10 pixels wide. To save you time, here’s the border mask I created. Feel free to download it:
I went quite fast (I’m an advanced user) so I hope you can get an idea of what I did. Best to view the YouTube tutorial in full-screen mode and pause if necessary.
Here’s the tutorial:
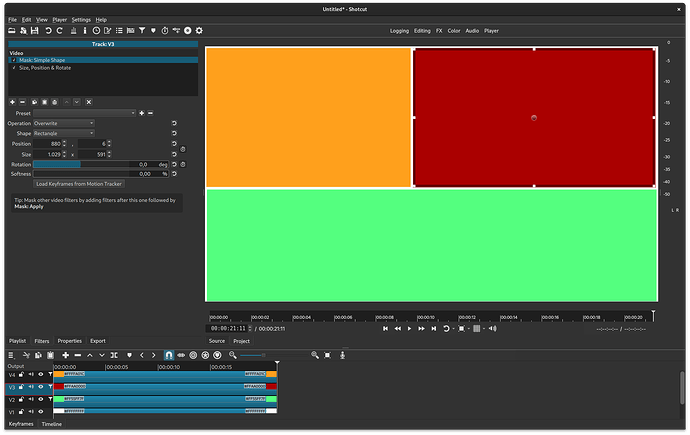
Just add the 3 video on separate track bellow each other.
Add a color clip on a track bellow the 3. (for the frames)
apply a “Mask: Simple shape” and “Size, position & Rotate” to each of the video tracks.
Adjust “Mask: Simple shape” on each track to make the windows shown for each track.
Adjust the SPR filter position & zoom to adjust what part of the original video to show
in each cutout.
Here’s a 2-minute method ![]()
Clever! I didn’t think of using the grid…D’oh!! Thanks @musicalbox, you saved me 4 minutes of my life next time I do something like this… ![]()
@MusicalBox
Yes👍 I’ve used this method before, with 2x2 grid… 10 seconds faster
Track V2: Size, Position & Rotate: Preset-> Top Right
Track V3: Size, Position & Rotate: Preset-> Top Left.
Result: 1minute 50 ![]()
![]()
@SergeC We only have your word ![]()
Where’s the proof? ![]()
With that said… Now that you mention it, it is true that I didn’t need to use a 4x4 grid.
@MusicalBox I swear, Your Honor

A quoi sert le “Crop Rectangle” sur l’image du bas, puisque les 2 autres sont au-dessus ?
Il vous a fait perdre au moins 15 secondes ![]()
What is the purpose of the “Crop Rectangle” in the bottom image, since the other 2 are above?
He lost you at least 15 seconds ![]()
@TimLau
C’est aussi la solution que j’utilise, elle est plus polyvalente car elle permet d’ajuster le cadrage de l’image avec le SPR dans la découpe
This is also the solution that I use, it is more versatile because it allows you to adjust the framing of the image with the SPR in the cutout
En effet, une autre étape inutile pour ce cas particulier. Si on continue à creuser, on arrivera peut-être à réaliser cet effet en un seul clic ![]()
Indeed, another unnecessary step in this particular case. If we keep on digging, we might be able to achieve this effect with a single click. ![]()
Unfortunately, @musicalbox, I notice that you omitted the 10 pixel border:
… so therefore I have to break it to you gently that you failed. ![]()
![]()
No matter, I have a present for you. A 10 pixel border mask image:
Feel free to use it, but adding it to your demo and applying a blend mode filter (or chromakey) will add another 9.745 seconds to your completion time… ![]()
hmmm I’m a bit confused @jonray … even with my glasses on, I don’t see any white border around the screen (edges) on the original poster’s example ![]()
But maybe he cropped this hypothetical border when capturing his screen…
(as improbable as it may sound…)
That sounds like a challenge ![]()
Sur ce coup, je suis d’accord avec @MusicalBox, il n’y a pas de bordures autour de l’écran dans le premier message.
Maintenant si vous voulez cette bordure, c’est possible, mais cela prend un peu plus de temps, environ 10 à 15 minutes.
On this one, I agree with @MusicalBox, there are no borders around the screen in the first post.
Now if you want this border, it is possible, but it takes a little longer, about 10 to 15 minutes. ![]()
Rectification… I did need the 4x4 grid to align the vertical middle line easier
@jonray I’m down to about 37 seconds ![]()
(I made 20 pixels thick lines… to make sure they are seen by everyone ![]() )
)
No - it just means you can divide it into 3 or 4 even boxes.
I do a “random size” with Church Services - have the Congregation or Organ as the main area, with a small rectangle (rounded corners?) with the Preacher in the top corner, during hymn singing.
Hi @musicalbox and @namna - Dammit, no, you are right… no border. My bad! Apologies. I must have dreamt it. Actually I think I glanced at @TimLau’s image up in post no.4 and assumed there was a border.
Anyway, a perimeter border is a nice touch, right?
Nice animated borders! Like it!
You didn’t use my border mask! (actually the 20-pixel border is great)… ![]() But I see you made a useful filter-set using Text:Rich filters for the white lines. What a cool idea.
But I see you made a useful filter-set using Text:Rich filters for the white lines. What a cool idea.
That filter-set would be very useful to have if you feel like sharing it… (hint, hint) ![]()
![]()
Will do… This evening or tomorrow morning.


