Message bubble effect

Can someone please tell me how to create the message/text bubble effect in shotcut? I’ve looked for it everywhere but can’t seem to find it.

By text bubble I mean like the ones in this video

Hi.
You need to create a transparent image from an image editor. Put it on top of your clip and apply the Mask: Simple Shape and play around with the height, position etc. Use the keyframe from the Mask filter to reveal the bubble chat.

There is no specific filter in Shotcut for this. It possible to create something in Shotcut, but Shotcut is not a graphic editor. It would require the use of many different filters, and more time than you may wish to dedicate for a single project.

The best way to achieve this is as @Sheep points out is to make a transparent PNG image in a graphic editor and use that in Shotcut. This gives you full control over what you want, and the creation is yours.

I would go a few steps further. Use Shotcut to your advantage in creating your text bubbles.

Prepare Shotcut

  1. Place your image/video on V1

  2. Create 2 more Video layers
    a. Leave V2 blank
    b. Create a transparent color clip (Open Other, Color) and place on V3

  3. Use Text: Simple to place text exactly how you want it to look on this layer.
    a. For multiple text bubbles, use another Text: Simple filter.

  4. Export frame (File - Export Frame)
    shotcut_2021-10-17_00-59-22

Graphic Editor

Use any graphic editor where you can use layers, and that supports exporting transparent images. Create your own text bubbles to the exact size of your text on the exported frame.

Click here for my mini tutorial using GIMP

In my example I’m using GIMP.

  1. Open up the exported frame from Shotcut. Leave this image as your base layer (bottom most).
  2. Create a new layer, and create your bubble around your text using.
    a. In this example I used the Rectangle Select Tool to create an image around the red text. This tool allows for rounded corners.
    b. Select color with color picker.
    c. For easier viewing, I reduced the Opacity of the layer to 50% (Just temporary).

  1. Select the Text tool and use the same exact color, and use a capital Q, and place/align somewhere along the bottom edge. We are just wanting the tail of the Q to show.
  2. Select the 2nd layer (color layer) and put Opacity back to 100%
  3. For the white text bubble, I used the paint brush tool. Left click once to set paint point, then hold down Shift+CTRL move to the right, left click once again.
    2021-10-17_01-23-31
  4. Hide bottom layer.
  5. Export As. Export settings used in GIMP.
    file-png_2021-10-17_01-36-26

Back to Shotcut

  1. Place exported transparent text bubble image on V2.

Final product.

Source image used: https://pixabay.com/photos/meeting-team-workplace-group-1245776/

2 Likes

Thanks a lot!!

thanks a lot!!!

1 Like

Like @Hudson555x said, there is no specific way.

As a third way,
I would have already made those bubbles (with text in Photoshop (or the photo editor you use in your case) and then just use the Size, Position and Rotate filter to move and resize, and the same filter can also make a pop out effect.
And for making it look good in video, I will just use a single frame of video (as the video originally is) and use it as canvas.

(This is something that matches to Hudson’s solution, but you just already fit and write the text in photo editor)

(Sorry for replying you @Sheep , it was just a miss click, which I didn’t notice till me third edit)

1 Like

Here’s another method that can be used in some situations to create Speech bubbles.

If you go on a site like Dafont, and search in the Shapes category, you can find a few speech bubble fonts like these 3:

https://www.dafont.com/fr/carr-balloons.font
https://www.dafont.com/fr/talkies.font
https://www.dafont.com/fr/alin-speech-bubbles-2.font

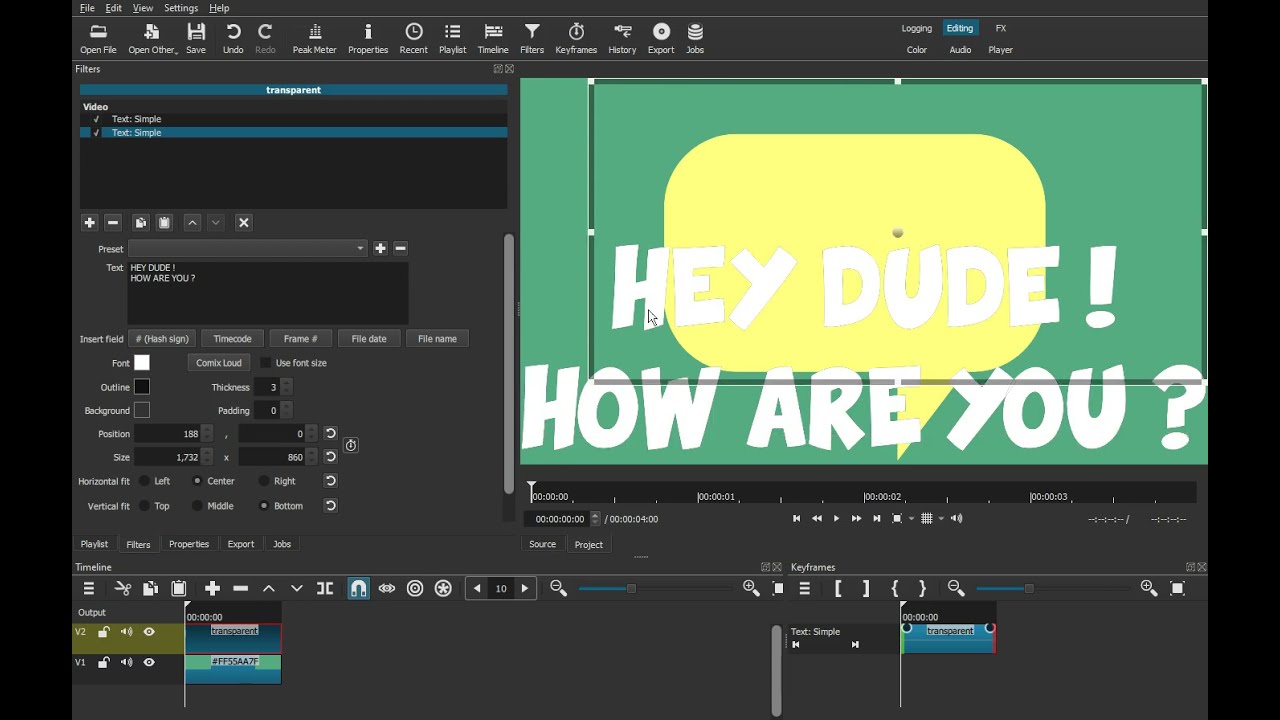
I installed the Carr Balloons font and I’ll show you how to use it in Shotcut.

  1. On a transparent clip, add a Text: Simple filter. Uncheck Use font size

  2. Select the Carr Balloon font and choose one of the bubbles.
    Use the chart on the Dafont site to help you. The one I’ll use is created by typing a left parenthesis on the keyboard.
    oM0mDSFqJr

  3. You can change the color and add an outline if you want

  4. Add another Text: Simple filter and write the text that will go inside the bubble. Resize it to fit.

  5. If you need to modify the shape of the bubble, add a Size, Position & Rotate filter, move it between the two Text filter and set the size mode to Distort.

  6. Adjust the shape of the bubble.

  7. Add another Size, Position & Rotate filter to the bottom of the list of filters

  8. Use it to resize and position the bubble.
3 Likes

As always, a great creative solution, MB!

One thought - it would be easy to manipulate the size and position of the speech bubble directly using the Text:Simple filter settings, rather than adding an SPR filter to do it. The problem, of course, would be if you need the speech bubble to be a different aspect ratio than the font natively provides!

1 Like

Thank you!

Yes, that’s the main reason why I add the extra SPR filter.
This tutorial is incomplete… I did it in 15 minutes to propose this alternate method of creating dialog bubbles.
I started a more elaborate one that will explain all the steps in details.

1 Like

… and I just noticed that I missed the first part of Step 5 in your post - “if you need to modify the shape of the bubble …” Sorry for pointing out what you had already pointed out!!

You are forgiven :slight_smile:

Whew! I was worried … :slight_smile:

1 Like

This topic was automatically closed after 90 days. New replies are no longer allowed.