The video filters beginning with “Mask:” let you select a portion of the image or video in which to apply other video filters. There are a few different ones, and this one goes after a sequence of other filters.
There are no parameters or UI for this filter. Also, it can only be used once per clip or track.
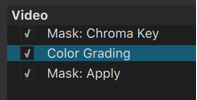
To really make this work you first add a Mask: Simple Shape, Mask: From File, or Mask: Chroma Key video filter to select the portion of the image you want to affect. Then, add one or more filters that apply some effect to that area. Finally, add Mask: Apply, which combines every thing in between. So, the order of the filters is very important. For example, for secondary color correction, you might put a Color Grading, Levels, or Hue/Lightness/Saturation video filter in between them:
You can also add video filters that further affect the alpha channel created by the initial mask creation filter. These go between the mask creation filter and Mask: Apply. For example:
- Add Alpha: Adjust to invert the mask and affect everything except the chosen color range or outside of the mask.
- Add Mask: Simple Shape along with Operation: Minimum to further limit the mask created by chroma key to a geometric-shaped (e.g. rectangle or circle) area of the video. Or use Operation: Subtract to exclude a certain area.
- Add the Alpha Channel: View video filter before Mask: Apply (or disable it) to better visualize what is going to be affected. Just do not forget to remove or disable Alpha Channel: View in order to see the final combined result.
You can include video filters before a mask creation filter to affect the entire image before the mask filters. And you can add other video filters after Mask: Apply that also applies to the entire image.
See also: