LCD Clock

Having followed this thread recently:

It reminded me of an HTML/CSS/Javascript project I did a while back - an LCD clock. Unfortunately it is a bit laggy, so not useful for creating videos where you need frame-accurate timing. Recording it as a browser source in OBS Studio on my (empty) PC it lags about 66 seconds over a 60-minute period. I compensate for this when using it in Shotcut by adding a Time-Remap filter to it and this works quite well.

Each of the digits of the clock are made of 7 line segments, top, bottom, middle and 2 on each side. Each line is animated separately which means you get a realistic animation, rather than using single characters and animating those which gives a false-looking animation for a digital clock. See the short video below.

The HTML file is below, just remove the ‘.txt’ suffix and run it in a browser and use screen-recording software, like Sharex, to record it.

Or, run it as a “Browser Source” in OBS Studio, recording the animation and then open this clip in Shotcut.

LCD_clock.html.txt (22.2 KB)

It is available as a public pen on codepen here:

2 Likes

Wow, that is great @elusien. I clocked it and downloaded it. :wink:
Works beautifully. I took a look at the HTML /CSS/JS code- amazing! Some advanced coding there…602 lines…

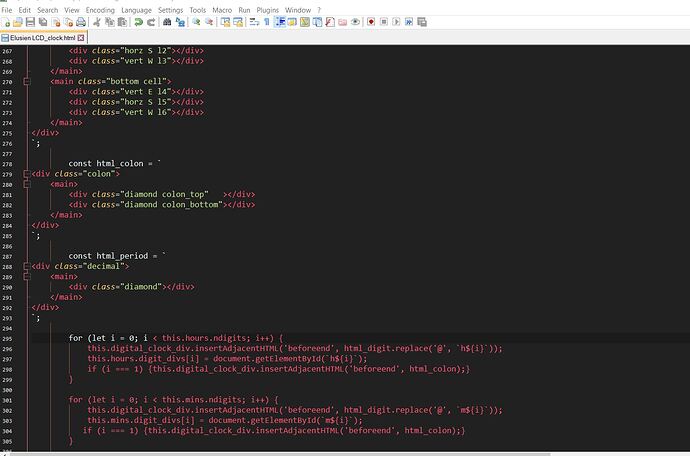
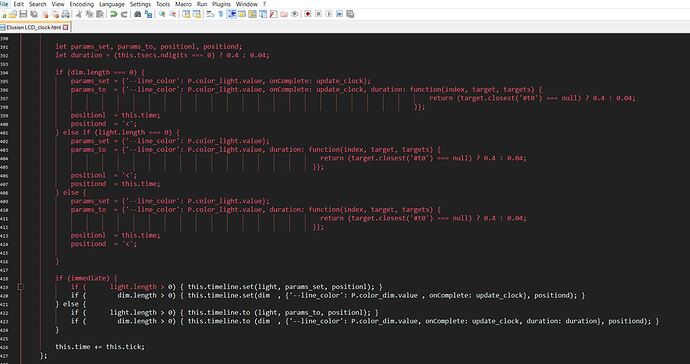
One thing I noticed … a large chunk of the JS script is RED on my Notepad++ screen. is that normal? I’ve never seen that before. See attached screenshots. Also I notice you have incorporated some HTML into the JS. (line 263 onwards for example). Interesting…


You will notice that the red section starts when I have a less-than symbol (<) in the javascript. Notepad++ is a bit simple in its analysis and thinks this is the start of an HTML element (like <div>) so highlights it in red until it reaches a greater-than symbol (>). If you open the file in Visual Studio Code it can recognise this and highlights it correctly.

Yes I set up the clock HTML in the Javascript using the “insertAdjacentHTML” method as it would be impossible otherwise to know how many digits to create e.g. HH:MM:SS.T, MM:SS, SS.T etc, also it enables me to add classes/IDs easily.

1 Like

@elusien - thanks for your answers. Ah, OK. Makes perfect sense!

BTW I was wondering how the code gets each digit to appear and saw this snippet in the JS code which I presume relates to the sequence of lines which should light up for each digit. Ingenious!

 const lines = [
 [true , true , false, true , true , true , true ],  // 0
[false, true , false, false, true , false, false],  // 1
[true , true , true , false, false, true , true ],  // 2
[true , true , true , false, true , true , false],  // 3
[false, true , true , true , true , false, false],  // 4
[true , false, true , true , true , true , false],  // 5
[true , false, true , true , true , true , true ],  // 6
[true , true , false, false, true , false, false],  // 7
[true , true , true , true , true , true , true ],  // 8
[true , true , true , true , true , true , false]   // 9

];

Clever stuff…

Well spotted. Yes you are right, for example the number 1 has only two “true” values corresponding to the top right-hand side and the bottom right-hand side lines, while the number 9 has only one “false” value, the borrom left-hand side.

By comparing the line values (true/false) between two digits I can dim the ones that are true (on) for the first and false (off) for the second and highlight the ones that are false for the first and true for the second in the loop at line 352

            for (let j = 0; j < 7; j++) {
                if (lines[val][j] && !lines[prev][j]) {
                    light.push(line_divs[j]);
                } else if (!lines[val][j] && lines[prev][j]) {
                      dim.push(line_divs[j]);
                }
            }
1 Like

Amazing! So very logical… (I can just about understand the first code, but the one in your last post just completely baffles me) … Bravo. PS I now follow you on Codepen… love your fancy buttons:

I’ve been coding for over 50 years but I still get a kick when it all comes together.

The variable “val” is the number of the current digit, say 4, while “prev” is the number of the previous digit. i.e. 3. (when the current digit is 0 the previous will be 9)

The “for” loop repeats 7 times, the first time round “j” is 0 and it increments each time round the loop, so the 7th time round it is 6.

These denote the 7 lines making up the digital number and the values are either true or false.

Then according to the comparison of the true and false values I add the line <div>s to a “light” array or a “dim” array, or if both are true (lit) or both are false (dim) I do nothing.

The light and dim arrays are then fed into GSAP to animate the relevant line <div>s.

Simples!