What is your Shotcut version (see Help > About Shotcut)? Is it 32-bit?
22.06.23
Can you repeat the problem? If so, what are the steps?
I noticed again the problem about keyframe that was resolved some time ago.
If I set keyframes to “Size, position, rotate”, and the clip started zoomed and repositioned, when I cut in the middle of clip A, I obtain that the new clip B that starts “zoomed and repositioned” as the start of the original clip A.
In my opinion instead, this is wrong - the clip B must start with a calculated “zoom and position” near the cut position, in order to have clips A and B still in continuity during playback.
I am not 100% sure but i think if you cut a keyframed clip somewhere inbetween you have to reposition the keyframes again to you liking - SC isn’t doing the calculation an math included in cutting a keyframed clip afaik. If you do several cuts and use multiple keyframed filters on a clip that would be quite a complicated procedure to rearrange and calculate all keyframes involved. You should do the keyframing after all nessecary cutting procedure as one of your last steps. Also the application of filters and their order in arrangement have an effect to the outcome. filters like graduation and sharpening should be the latest in the procedure e.g.
Error
1 - the cut in the middle of the keyframes interrupts the continuity of the video
2 - new clip have wrong initial keyframe
3 - original clip doesn’t have an interpolated end keyframe
4 - final result is not as expected…
Truly, I have discussed this topic 5/6 months ago but something went to version regression about keyframes
Able to duplicate what you posted in #4.
Seems to originate from the first keyframes being set in what would be clip B after splitting.
2nd keyframe set at 00:00 on the timeline, I get the same exact result in your video (1:34).
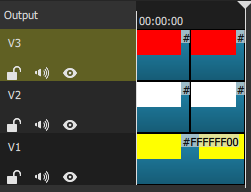
Step 1: Size, Position, Rotate filter with a clip (used a color clip)
Step 2: Activate keyframes, set both positions
File saved: keyframe 7a.mlt (3.5 KB)
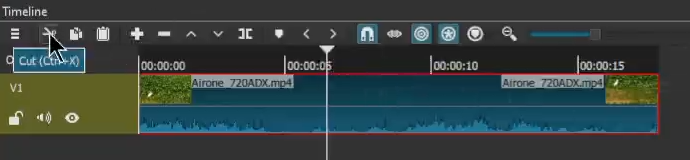
Step 3: Split between both keyframes.
File saved as: keyframe 7b.mlt (4.9 KB)
7a video
7b video
Edit: No preview scaling or Proxies used.
Edit: Found out the true cause.
Load up keyframe7a.mlt
Split somewhere in the middle
Select the first clip. This is where the keyframes get messed up.
maybe the visual defect is related to 720p/540p video resampling (I often use F7, F8 and F9 for performances), because “original” is different during a preview. F6 set the original sample and plays differently.
I usually don’t use preview scaling, and in my example above, preview scaling is not used. Preview scaling can change the appearance of some filters in the preview itself, but does not change the output. To test, export a small part of the video or export a frame.
Excellent video showing what was going on. Helped me to find the same issue better. At first, I thought it was the order the keyframes were set.
i’ve learned that if i have a clip with keyframes A and B and i need to split the clip somewhere between A and B, i need to insert a keyframe C between A and B and split the clip at keyframe C. this retains all the keyframes on the side to the left of C, and usually the side to the right of C is pretty good, too, except maybe a few keyframes getting shifted by +/-1 frame occasionally.
but sometimes i have a clip that has keyframes, and I want to extend it. for example, suppose i start with a 5 second video, and i trim the beginning 1 second and ending 1 second, ending up with a 3 second clip. afterward, i put in my keyframes, and if i realize at that point that i need to restore the ending 1 second by extending the clip to the right, this is usually fine. but if i need to restore the beginning 1 second by extending the clip to the left, then my keyframes get all messed up, and i don’t know of a good way to work around the issue except to shift / redo all the keyframes. (if anyone knows of a good workaround, please describe it.)
Insérez le clip original de 5 secondes devant votre clip coupé de 3 secondes. Divisez ce clip de 5 secondes en 2 parties (1 seconde au début et 4 secondes à la fin) Supprimez la partie de 4 secondes. Votre clip de 3 secondes conserve toutes ses images clés.
Insert the original 5-second clip in front of your cut 3-second clip.
Divide this 5-second clip into 2 parts (1 second at the beginning and 4 seconds at the end).
Delete the 4 second part. Your 3 second clip retains all its keyframes.
i guess this would work in some cases, but is there a way to merge the 1 second clip and the 3 second clip into a single 4 second clip? if, for example, i want to put some sort of linear keyframes effect from 0:00 to 0:02, then i’d prefer to do it in one clip than try to do that across 2 clips.