It’s now clear to me that this step here is very important to the use of Time Remap yet it’s never going to be something anyone that hasn’t read this thread will do. It’s a shame that a similar function couldn’t be added inside the Time Remap filter so that it would’ve been clear to anyone who uses the filter. The next best thing is to put this note in the documentation for Time Remap.
Even if most of the clip is 1x that’s still going to add time to the export because of the application of the filter and the sampling rate converter you mentioned, right?
And to ask again: My idea is to program it so that when a keyframe is moved and it gets very close to 1x it will settle to 1x and not at a speed that is close to 1x. Is that possible?
Perhaps. But I doubt that it would be a perceivable difference.
That suggestion might defeat legitimate use cases where someone wants to stretch the time by a very small amount.
I still prefer the suggestion to extend the existing buttons for setting an exact speed by also modifying the horizontal (x) position of the keyframe. Do you still think that would work?
Going back to this, it needs to be pointed out that this issue is not just with the workflow that I suggested. It is literally a problem with any clip that will follow a clip that has Time Remap. That means it seems that there is no way around it. If you use Time Remap and there is a clip that follows it as is expected with editing, you just have to deal with the audio pop. Not good. The best that can be done is to do some audio fade outs but the pops will still be heard in some capacity and no one wants that in their finished project. Other than not using audio from the clip with Time Remap, from what I can see this problem has no workaround as fade outs can only reduce the volume of the pops from Time Remap but not eliminate it. Is there a workaround or is this just unavoidable? Can this issue have a fix in the future so that when passing through a clip with Time Remap no pop will be heard?
Absolutely. My suggestion for it being able to go back to 1x by just dragging is so the user can set it to 1x speed faster without having to click so much because that will be a very common workflow. But we’ll see how it works out after adding the x position option to the setting speed buttons.
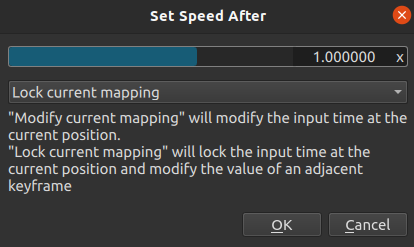
I have added an option to the dialog to lock the current value
I am open to suggestions on the wording.
Also, I am considering adding another option for direction and then combining the left/right arrow buttons in the filter panel. I have not decided if I will do that yet.
I assume that the Modify Current Mapping option is the exact same behavior as before.
The option to set the speed by moving the keyframe at its x-axis in order to keep the input time is badly needed. Is that what Lock Current Mapping is supposed to be? I assume that the “adjacent” keyframe (left or right side) will be according to the direction that the user picks but what value will it move it by (x or y)?
This time remap filter is very cool, but sadly it has to be one of the least intuitive features in shotcut
the time remap filter section doesn’t appear in the UI unless one has almost everything right. I started with an “imported MLF as clip” and it’s not there. Then I generated an mp4 from that manually which had B frames (I made a mistake). At that point I got the “do you want me to convert the clip” option. Why didn’t I get that same option on the imported mlf-as-clip?
figuring out how to extend the clip is super unintuitive, you really have to see a video of someone doing it, otherwise if you’re as dumb as I am you won’t figure it out . What do you think of having a button in the time remap filter UI to lengthen the clip (e.g 1.5x or 2x)?
trimming the clip at the end is also painful, is it possible to add another button to trim the end of the clip, i.e. remove all frozen frames at the end?
I think these additions could prompt the user to follow the right workflow without having to resort to finding & watching videos. On the plus side, the “modify current mapping” / “lock current mapping” choice actually worked for me. The “modify”/“locked” words don’t mean anything to me, but the explanatory text told me which I wanted.
I will not add the ability for a filter to change the length of a clip. There are too many possible unexpected side effects. What if it runs into something on the timeline? What should the keyframes on all the other filters do? Changing the clip length needs to done in the proper context of the UI. Maybe there are some hints we could add in the filter UI to give the user hints about where to change the clip length?
Trimming a clip is a pretty standard operation and is commonly done on clips without the time remap filter. Maybe you are not familiar with the Keyboard Shortcuts?
You should be able to use the keyframe seek arrows to seek the cursor to the last keyframe. Then hit “o” on your keyboard to trim off the end of the clip.
I would call it the most advanced and complex feature for a lot of people. So I think it is acceptable that people need to take more time to learn how to use it. There are a couple of video tutorials out there. But we could use even more tutorials.
But this is something proprietary video editors do which is why it’s expected. It keeps everything in place such as the first frame that starts the clip and last frame that ends the clip. The clip length being changed when the speed of the clip is changed is paramount for editing purposes. So for example, the last frame of the clip will be the same and that will allow very easily to be edited to the clip that follows. The inherent design of the Time Remap filter does not take that into account which takes away a lot of its appeal because it makes something that should be very easy very frustrating instead.
Ripple the clips down the timeline so that it doesn’t.
Move accordingly. If there is a keyframe set at 5 seconds into the clip to do something and the clip is slowed 2x then it happens at 10 seconds into the clip.
If this is your workflow, you are working against the tool. There is no need to split the clip and align the two splits. Apply the time remap filter to the entire clip. Do not split the clip at the end of the speed change. Just return the speed to 1.0 for the remaining duration of the clip.
I know. You’ve said this before but the way it works is not practical and will continue to frustrate editors. Your instruction to apply it to the whole clip doesn’t work when the clip that follows is a totally separate clip that didn’t have Time Remap applied to it.
You have to see it from an editor’s perspective. Every cut is on purpose and editors want to end a shot on a specific frame before it goes to the next clip. Having the length of the clip’s length change automatically is beneficial to the editor since it will keep the first and last frames intact because that is what the editor wants. The way Time Remap works is that if you want to change the speed of a clip with slow downs and speed ups you have to manually change the length yourself. But after you do that you then have to find the very frame the clip originally ended on so that it can connect to the next section you want. That’s a lot of steps and will frustrate most.
Also, the fact that Time Remap has the keyframes take the entire clip into account and not limit themselves to the length of the split section of the clip makes the tool not intuitive. It would be much more intuitive if the first and last default keyframes are locked to the first and last frames of the split section and they cannot be moved. The frames of the clip that the first and last default keyframes represent would only change if the user manually changes the length of the clip. Otherwise, any speed changes made in between would alter the length of the clip to accommodate the speed changes.
One problem I just encountered is that splitting a time-remapped clip results in garbage. Specifically, I took a 20 second clip, time-remapped it so it plays backwards at 1/2 speed (thus it became 40s long), then set the playhead somewhere in the middle and hit the “split at playhead” button. I then played the whole sequence, which I expected to look identical to before, but what happens is that there is a significant jump at the split. Is this expected or a bug?
@brian, thinking about this again, there could be something else that can be done to remedy the issue I brought up just now. But it wouldn’t be limited to the Time Remap filter.
Keyframes right now don’t respect snapping. Can this be updated so that keyframes snap to the playhead when they are dragged to it? This would be a very welcomed huge improvement for use in keyframes in general and in regards to this it would make it much easier when using Time Remap to get the clip to end or even start on the exact frame you want after extending or shortening a clip.
I made a change for the next release so the keyframe will snap to the cursor. I did not make this an option because there is nothing else for the keyframe to snap to besides the cursor. Do you think a setting would be needed?
Right, the playhead is what a keyframe would snap to.
I would say that snapping keyframes on and off could just be based on whether or not snapping in the main timeline toolbar is on or off. I think it could work that way.
There is no “Main” toolbar. I assume you are talking about the timeline toolbar. Maybe you always have the timeline open when you are using the keyframes toolbar. But that is not required. In fact, a user can have a project that does not use the timeline and only uses clips and the playlist.
I prefer to have no setting tied to the keyframe cursor snap. But if a setting is required, I think it needs to be a new setting specific to the keyframe panel.
Good point. I forgot about that. You can add a button there in the keyframe panel to cover those instance that would also control the snapping for the timeline.
It’s standard to be able to turn snapping on and off including for keyframes. There are times when editors want to move keyframes to a very specific point and other times when they want to move them freely around just like clips in the timeline.
It’s too confusing to do that (i.e. have snapping in the keyframes on but off in the timeline?) and it would waste a shortcut key. It’s better to add a snapping icon to the keyframe panel that would cover Clip Only and Playlist layouts but still cover the same as the snapping icon in the timeline toolbar.
Here is a demo. After I create the second keyframe and I try to bring it to the last frame of the clip by snapping it to the playhead. But when you zoom in, the keyframes look like they are still in the spot where they were originally.
Also seen in the demo is that while testing this I noticed another bug where after I deleted the second keyframe, the first keyframe cannot be deleted.
Both of these are happening with keyframe with curves too.
I am actually in the middle of a large audit of all the settings and actions in Shotcut. All of the settings in the “Options” section for the keyframes panel are shared/duplicated settings with the timeline options:
Rather than duplicating these settings, I am thinking about moving them up to the main application header menu. I could do the same for snapping if they are shared. The only question left will be what to do with the timeline toolbar button for snapping. Maybe that should be duplicated on both timeline and keyframes toolbars.
Thank you for reporting this. I have duplicated the problem and I see what is wrong. When I have a fix, I will report back for you to test again.
This is by design. We do not allow the user to delete the last keyframe. The filter would not have any values to work from. If you don’t want any keyframes, you can switch off keyframes for the parameter by clicking the clock icon.

 . What do you think of having a button in the time remap filter UI to lengthen the clip (e.g 1.5x or 2x)?
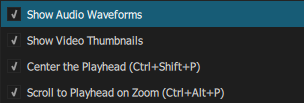