I believe that when going through the following scenario, the rendering is not correct:
Create two adjacent pictures with length 10s each on the timeline
Move the second picture across the first one so that a transition between them is created
=> then, the transition is rendered properly
Add a “Rotate & scale” filter on the second picture and add keyframes to it (e.g. a scale to 200% after 7 seconds, plus a +10° rotation at the same time)
=> After that, the rendered transition is still showing the transition without the filter and and as soon as the transition is over, there is a discrete “jump” to the new parameters (having a rotated & scaled image).
If I understand you correctly, you want to scale and rotate during the transition, right?
If you add the filter to the second picture it will only affect it and not the transition. You can achieve a zoom effect afterwards, just with the second picture, like this: https://streamable.com/sg89x
In your mlt file you start with a 190.8 % scale factor for the second picture so it is not surprising that there is a jump after the transition. I am honestly not sure what you try to achieve. Could you explain that in more detail? (I think you speak German so you could explain it in German if you want to. )
I tried adding the filter to the transition but that distorts the picture without even changing any values. Perhaps someone with more experience knows an easy way to enable the filter during the transition.
The only other way I can think of would be to try a transition with an HTML overlay and the desired effect which would be a bit more advanced. There are some around who probably are able to achieve that. I could try as well.
By the way, the mlt file on its own is somewhat useful but the pictures are not embedded. I just replaced them with different jpegs but it would be ideal to get the pictures which you used. If you are not allowed to upload it, you can just recreate your procedure with public domain pictures. A tip for the next time .
It’s best to apply the effect before overlapping the clips to create the transition.
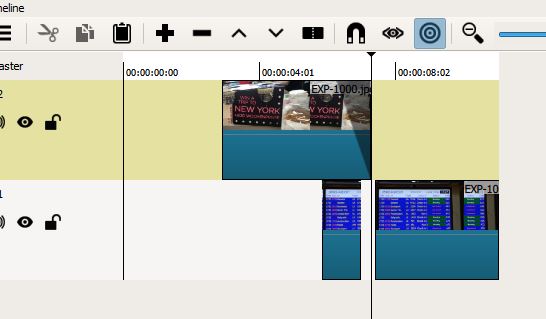
Using 2 tracks for transitions with effects works better than the overlap method. You can add and modify the effects easier.
Project demonstrating the two methods for transitions.
And I wanted to use a HTML overlay .
This a straightforward approach and less obstructive in a workflow compared to a HTML overlay.
And I agree that using two tracks is better because the keyframes panel does not show the keyframes during the transition after overlapping the tracks, so editing signifies recreating every keyframe.
Hi - here are the pictures; no worries - I shot them :-)…
On your questions:
yes; I would like to rotate & scale during the transition
the MLT file shows the result of creating a transition as a first step and THEN applying the filter on the 2nd picture. I’d then expect that the transition takes the filter into account too (which it doesn’t)
if you exchange steps 2. and 3. in my description, you get the result I would like to have.
(as in this case, the transition then picks up the filter and blends correctly into the 2nd clip)
=> so: the result you get depends on the sequence in which you execute 2 and 3
(from my point of view, that’s a bit inconsistent)
My general understanding is that filters are applied to clips on the timeline.
Transitions are then created by moving clips on top of others (on the borders).
On sauron’s proposal to just perform step 3 before 2: well - that works for this initial scenario. But once you add a step 4 and adjust the parameters of the filter on the second picture, then the same problem occurs (then, the transition blends as specified by the set of filter parameters given when the transition was created and NOT with the updated parameters => so then there’s a nasty “jump” then too)
I wanted to upload a rendered clip, but the forum rules do not let me to.
Well - applying step 3 before 2 actually solves the problem at first glance. BUT: once you add a step 4 and adjust the parameters of the filter on the second picture, then the same problem occurs (then, the transition blends as specified by the set of filter parameters given when the transition was created and NOT with the updated parameters => so then there’s a nasty “jump” then too).
Your proposal works if only if filter parameters are not adjusted after a transition was created.
It’s best not to adjust parameters after the overlap transition is created. The overlap transitions work well for simple dissolves and wipes. And for html based GL transitions.
If you want to create complex transitions with key frames the 2 track method will work better.
I get why you find this behaviour inconsistent. I never used another video editor so I view it sometimes rather naïve which means that the three sections after creating a transition are independent from each other. In this case the behaviour of Shotcut makes sense.
And what do you think about sauron’s second proposal? A step four is possible if using two tracks.
You can use streamable.com which does not require an account and is easy to use. There is just a limit on file size and duration.
Html works but it makes things complicated. I like using GL transition html overlays with the overlap method. It’s easy and clean. Although the GL transitions work a bit better with 2 tracks.
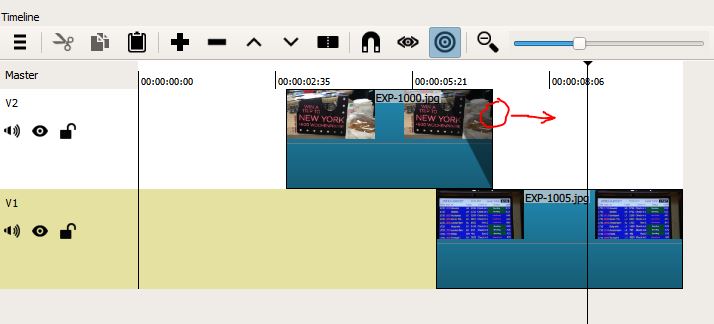
So now when I want to make the clip on V2 longer (red arrow), the start of the clip V1 is not automatically moved; so I would have to move that manually too. The reason for that is that clips on tracks are not related in anyway (as far as I know).
Using “ripple all tracks” (which is the only way I know how tracks can be related) does not help either as it destroys the 2nd track:
(2) It doesn’t scale up. I have tracks with hundreds of scenes/pictures with transitions. If I were to use 2 tracks, I would have to switch track when adding a new scene/picture after each and every scene. That’s too much manual work.
Well - maybe I am just not experienced enough with shotcut.
This is something I plan to try to fix in the next version.
once you add a step 4 and adjust the parameters of the filter on the second picture, then the same problem occurs
This surprises me because…
not entirely. If you look at the XML for the <tractor> elements that represent transitions on the same track you will see that it references the existing clips (<producer>s) and the filters are attached to the clips used in the transition and not the transition itself. Yes, it is possible to select a transition and attach unique filters to it, but that is separate.
If your filter parameter adjustments involve keyframes then it may cause this problem because keyframes needs some additional work to be aware of the portion of the filter that extends into the transition. That I will also try to address in the next version. Since your step 3 includes “add keyframes to it” that is probably the case here.
Yes, correct, the issue is with the part of the filter that goes into the transition: if the filter is completely defined before creating the transition, everything is good (and that’s how I workaround), but as soon as the filter parameters are adjusted, the part of the filter applying to the transition stays with the old values.
Very happy to hear that you plan to adjust this for the next release.
The rendering sequence for transitions should probably be:
(1) Render the two involved clips (for the part where they overlap in the transition), incl. all filters
(2) Then blend first clip into the second (for the part of the transition)
By the way - you guys do an awesome job; keep going… Shotcut allowed me to turn some of my greatest emories into movies! Sent a small donation.
 .
. .
. .
.
 .
.