Been messing around with trying to get my Voiceover set just right and consistent. I have these filters here and I wasn’t sure of the order. This seems to work but I wanted to make sure:
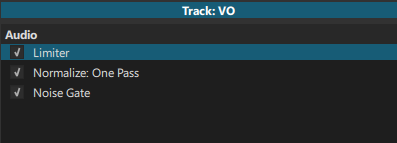
In the screenshot I have
1: Limiter
2: Normalize: OP
3: Noise Gate
My intention is to first remove the noise (3), then normalize the audio so I can try and keep my voice semi consistent (2), then use the Limiter to make sure I don’t go above a certain threshold so I don’t blow out peoples headphones (1).
Am I correct in the way that the audio filters would be applied or is it actually the opposite?
Filters are applied from top to bottom. So, the screenshot is doing the opposite of what you want.
On a side note, if there are other tracks with audio, it might be good to put a second limiter on the Output track to protect the final mix from clipping (all tracks summed). A limiter at -1.5 dB is usually good, and provides a little headroom for lossy audio codecs to breathe during encoding, too.
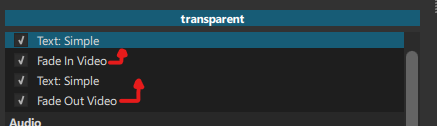
Hmm well okay then. I’ve seen different results with video filters. Like applying a video fade right below something applies to it instead of the one below. Then again maybe I can read it like the one below, applies directly to the one above it like this:
0: (the text on the third line is visible since there is no direct filter modifying it)
1->2.The top text is faded in
3. while the upper text fades in the lower text was already visible
4. then all are applied the fade out at the end as fade out applies to all above it
Maybe not 1:1 but I guess that’s the best way I could understand it. (Wrong?)
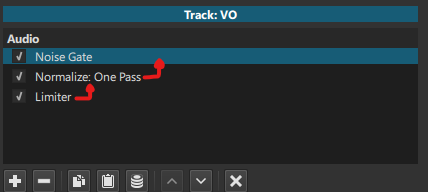
1: Apply Noise Gate to raw audio
2: Apply Normalize from the “noise gated” audio
3: Apply Limiter from the normalized audio
I do have limiter on the other tracks so I can balance out gameplay audio and then background music too to make sure the VO isn’t washed out, which is why I want to make sure to normalize it and keep it at least above those levels. I didn’t think to put an overall output track limiter though since I assumed the loudest limiter would have been the loudest anyway.
The video filters are actually applying in top-down order as well. Filters do not apply to other filters except for the special masking filters. Filters rather apply to the overall frame.
In the screenshot provided, the first Text: Simple filter would normally be immediately visible, as it is the first filter to be processed. But then Fade In comes along and hides it. But the fade is not fading the previous filter, it is fading the entire frame, and the frame just happened to be created by the first text filter. That’s the key difference. This is why the second Text: Simple filter is always visible until the end. There is no later (lower) filter to modify it. If each filter is like a layer of paint on a canvas, then the second text filter is the last layer of paint to go on the canvas (until the fade out), therefore we always see it.
A quick example is to move both text filters before the fade in filter. The fade now affects both text filters, not just the text filter above it. That’s because the fade filter affects the entire frame, not just the filter above.
True. But what happens when two limited tracks are added together for the final mix? The sum of them could clip, hence the benefit of a limiter on the Output track as a safety.