About the loudness meter

I used in several projects, the normalization filter in two passes.
The result was the expected one so I’m happy.:grinning:
While watching the loudness meter I thought it would be a good idea to include some option to activate the maximum reading of some parameters (Momentary, Short and True Peak).
Through the individual activation of the maximum register,
would convert the readings to Momentary Max, Short Max, and True Peak Max.
It is especially interesting in the True Peak value because the maximum value of the project playback is not currently recorded because it is currently an instantaneous or real-time reading.
Currently, I can check the instantaneous value using the right arrow to advance frame by frame, but this is not practical.


Meanwhile, I compared the result obtained by the SC loudness meter with external loudness meters (VST) and found that I did not exceed the dBTP value I needed and that the integrated loudness measurement (I) is accurate in SC with respect to my external meters.
If SC incorporates this, I don’t need to test the loudness externally to SC.
I would like to take this opportunity to thank everyone involved again for the work and effort used in this Shotcut software. :+1:

Maybe a new Job could be added to allow the user to run a loudness analysis on a project. After the job completes, the user could click in the jobs panel to see the results. I think the results would show:

  • Program Loudness
  • Loudness Range
  • True Peak

I’m not sure what the purpose would be for maximum momentary and short term values. Those aren’t really mentioned in any standards.

2 Likes

It was just an idea that I matured when I compared Shotcut’s loudness meter results with VST meters like Youlean Loudness Meter 2 or TBProAudio dpMeter IV (both free).
In those meters appear these values and I assumed (apparently wrongly) that these values were important for something.
My reasoning (surely wrong) is that since the monitoring of these values already exists, perhaps it was easy to establish a record of the maximum value they reach.
Maybe a checkbox (activation of maximum register) in the true peak value would be enough (I write from my ignorance of what involves the code so it is an absurd idea or very difficult implementation)
I’m still getting errors in dBTP. I managed to reproduce this in a project and upload it to the corresponding thread.
Thank you for answering.

A loudness analysis job would be AMAZING and could turn Shotcut into a turnkey product for simple interview, documentary, or vlogging-style videos. By simple, I mean a dialog track with background music.

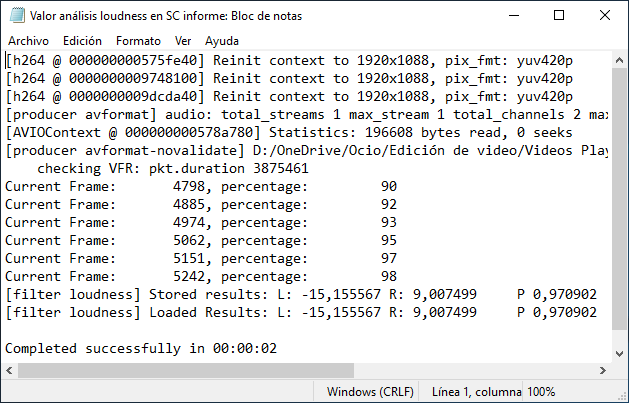
Using YouTube as an example, I’ve settled on dialog at -21 LUFS and background music at -25 LUFS (both integrated using BS1770-4 and with LRAs less than 6) in order to be equally loud as everyone else yet not get gained down by YouTube for being too loud. [EDIT: I was trying to find a halfway point between YouTube and broadcast standards so I could tweak the gain of one mix rather than make two specialized mixes, but I’ve about abandoned that idea now. These LUFS targets are now out of date.] I can use Orban Loudness Meter to do offline analysis of stock music files (which are mastered very loud), then Gain the music down in Shotcut to the -25 LUFS level I need. If Shotcut could do loudness analysis on its own, Orban would no longer be needed. Likewise, I analyze dialog separate from music, and that’s where the silence gate in 1770-4 is handy. That, or 1770-1 using the Dolby Dialog Intelligence algorithm for gating as per the new Netflix submission standard. (Side note: Dolby has released the Dialog Intelligence code for free!)

Speaking of Netflix, this article is an amazing read on the state of broadcast loudness these days:

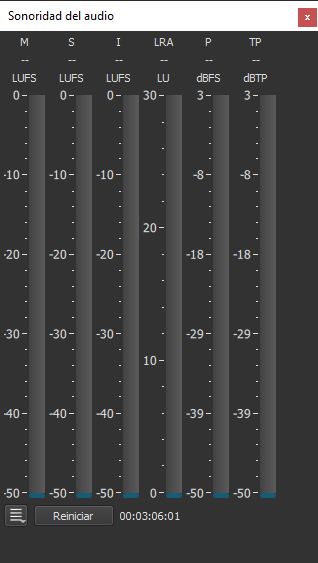
As for maximum momentary values, these are occasionally cited in broadcast standards. Quoting the article above for a quick example:

In Canada, the CBC and Radio Canada both now require that the LRA be less than 10 and some request 8. Also, the Integrated loudness for the complete program AND the integrated loudness of the dialogue stem must BOTH be -24 LUFS. Lastly, the momentary loudness must not exceed +10LU above the target loudness. So with a -24 LUFS target there, your momentary must always remain below -14 LUFS.

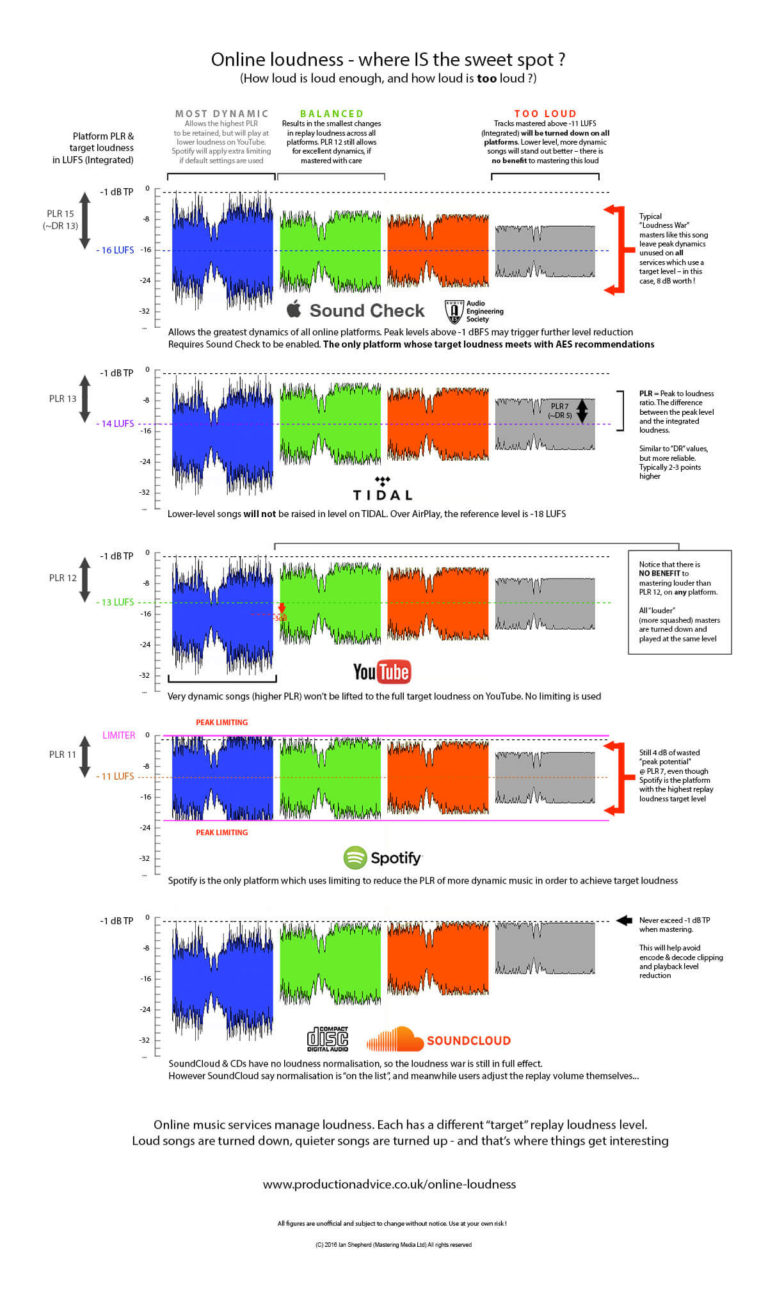
When it comes to music loudness, Ian Shepherd has a fondness for tracking the short-term loudness maximum.

Quoting from How loud ? The simple solution to optimizing playback volume online - and everywhere else - Production Advice

Instead, my recommendation uses short-term loudness values, and it’s this: Master no louder than -9 LUFS short-term at the loudest moments (with True Peaks no higher than -1)

With so many submission standards and mixing targets floating around out there, the idea of an analysis job in Shotcut is very exciting. No pressure, just providing feedback. :slight_smile:

Have you tried the “Normalize: 2 Pass” filter? It does exactly what you describe. The first pass analyzes the clip and the second pass applies a fixed gain to achieve the target loudness. The filter can be applied to a single clip, a track, or the entire project.

You may also be interested in the “Normalize: 1 Pass” filter. It uses a sliding window loudness average to feed an automatic gain control to try to achieve a target loudness. It is useful for clips that have inconsistent audio levels.

You might find the 2 pass filter good for stock audio clips and the 1 pass filter good for voice recordings.

My videos are basically songs that I play with my bass on Rocksmith 2014, and that I share on a channel on YouTube.
The main problem I have is that there are big differences in the volume of the songs and also in tone (effects) applied to the bass. Each charter (including the notes to play the songs) uses different audio settings for the songs and although Rocksmith 2014 has a mixer to compensate for this, there is no way to know (directly) during the mixer setting, the output signal. Rocksmith uses ASIO exclusively, and although I can turn it off and open an external meter, it’s a bit cumbersome.
So I record my performance on video and then make loudness analysis.
My first task was to determine a loudness target that met the specifications of the platform (in this case YouTube), but at the same time, served for other platforms in case of need.
In my last three projects, I found that for my projects I can set a loudness target of -16 LUFS with the 2-step normalization filter in SC.
Then I check the register of the maximum true peak dBTP with an external plugin, so that it is less than -1 dBTP and YouTube does not cut it.
In videos with several audio tracks (background music, dialogues, effects, opening music, etc) the loudness analysis is very useful.

About the behavior of different streaming platforms regarding our audio-video source, here I found an online tool that I use to know if the audio of my video is compensated for most platforms.

The behavior of each platform with respect to the audio parameters sometimes changes.
As an example, this image shows the variety of criteria that each platform uses (or used).

Just to say, that all the information I read was in English and that in addition to the errors or different interpretations of the translator, many technical terms escape my understanding.:sweat:

I confess that I never looked at the normalize filters because I assumed they were traditional peak normalizers. That’s what I get for assuming!

You are right, the 2-pass filter would work perfect on stock music. It appears I can also view the log of the analysis job and see L=loudness, R=range, and I assume P=true peak? Does that mean the analysis feature described in your first reply already exists?

For sake of completeness, which measurement is used for the analysis? I’m mostly interested in whether it uses a gate. As in, if the dialog has significant gaps in it, or if the background music is cut out for a moment, will the silence bring down the average loudness of the analysis?

This is cool stuff. I love this program.

The loudness analysis button is associated with the normalize filter: two passes.
Then, by pressing the analysis button, a report with the loudness data is generated.
To avoid modifications in loudness target, we must deactivate the box of the normalization filter or simply remove it.
This would be the process as it is currently linked the analysis process with the normalization filter.

The values that appear in the loudness L and R analysis log file are consistent with the external measurements that I made with test audio and two loudness VST meters (Youlean Loudness Meter 2 / dp Meter IV).

notepad_E3A1QwoNZP

L:-15,15567 is consistent with the Integrated Loudness value (measured value VST= -15.2/-15.2 LUFS).
R: 9.007499 is consistent with Loudness Range value (measured value VST= 9.0/9.0 LU)

MusicStudio_x64_GoVDwKx6mF

However, I don’t know what P means: 0.970902 as the maximum true peak value is -0.2 / -0.1 dBTP.

The measurement conforms to EBU R128. It has a gate.

This is the library we use:

This is a clever “work-around” way for an advanced user to analyze a clip. But I do not recommend it as a general solution for all users.

“P” indicates Peak, not True Peak. While the filter analyzes and prints debug messages for Loudness, Range and Peak, it only uses Loudness for the normalization.

The Peak debug message is absolute peak level (between 0.0 and 1.0). Not dB.

You are indeed right.
It was just an alternative way of being able to work with the software as it works today.

In the loudness analysis log, the maximum true peak value is not, so I still need an external meter to check this value.
Anyway, there’s no problem with this.
Perhaps in the analysis log, the dBTP value could appear instead of the P value (or both).
In the loudness meters (in the screenshots in the previous post), I did not find the value P (0-1) in specification mode EBU R128 (LUFS) That’s why I was so confused.

Although I don’t understand most of this, I saw a link to Loudness Scanner Tool.

In the scanning options I read this that might work:

Use the option “-p” to print information about peak values. Use “-p sample” for sample peaks, “-p true” for true peaks, “-p dbtp” for true peaks in dBTP and “-p all” to print all values.